
I still remember the summer my front yard completely gave up on me. Every morning, I’d step outside hoping to see green—but instead, it was dry soil, wilted plants, and a rising water bill that made no sense. I watered more, spent more, and yet… everything kept dying.
That’s when I stumbled into xeriscaping—not as a trend, but out of frustration.
At first, I thought it meant a lifeless yard full of rocks. But what I discovered changed everything. Xeriscaping isn’t about removing beauty—it’s about working with nature instead of fighting it.
The secret? Choosing the right elements that thrive on neglect, not constant care.
Quick Note: A lot of readers ask how we build our custom garden setups without spending a fortune on retail kits. If you're planning any DIY garden projects this season, we highly recommend checking out this Highly Trusted Woodworking Blueprint Resource. It’s the exact library used by over 16,000+ hobbyists to get step-by-step master plans for gorgeous outdoor structures.
And in this guide, I’m sharing the exact ideas that turned my struggling yard into something neighbors now stop and stare at.
Quick Selection Table
| Idea | Best For | Maintenance Level | Budget Tip |
|---|---|---|---|
| Gravel + Succulent Beds | Modern look | Very Low | Buy gravel in bulk locally |
| Native Plant Borders | Natural landscaping | Low | Use local nurseries |
| Decorative Stone Pathways | Visual structure | Very Low | Use reclaimed stones |
| Mulch-Based Garden Beds | Moisture retention | Low | Use organic mulch |
| Raised Dry Garden Beds | Small spaces | Medium | DIY with bricks |
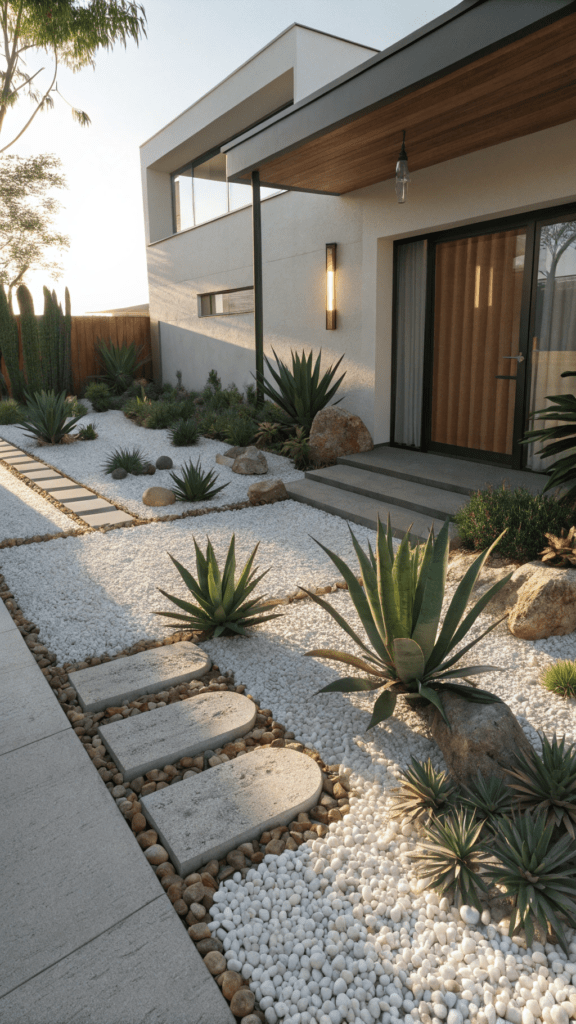
1. 🌵 Gravel + Succulent Garden Beds (Modern Minimalist Magic)
There’s something incredibly satisfying about a front yard that looks expensive but costs very little to maintain. That’s exactly what gravel and succulent beds do. I started small—just one corner—and quickly realized how forgiving this setup is. Even when I forgot to water for days, everything still looked alive and vibrant.
Start by clearing a section of your yard and laying down weed barrier fabric. This is one step people skip—and regret later. Trust me, pulling weeds out of gravel is not fun. Then layer decorative gravel. Local suppliers often sell it much cheaper than garden centers, so always compare prices.
For plants, go with hardy succulents like agave, aloe, or echeveria. These are widely available and often cheaper at roadside nurseries than branded stores.
One mistake I made early? Overcrowding. Succulents need breathing space to really stand out. Less is more here.
Also, think about contrast. Pair light gravel with darker plants or vice versa—it creates a designer look without designer prices.
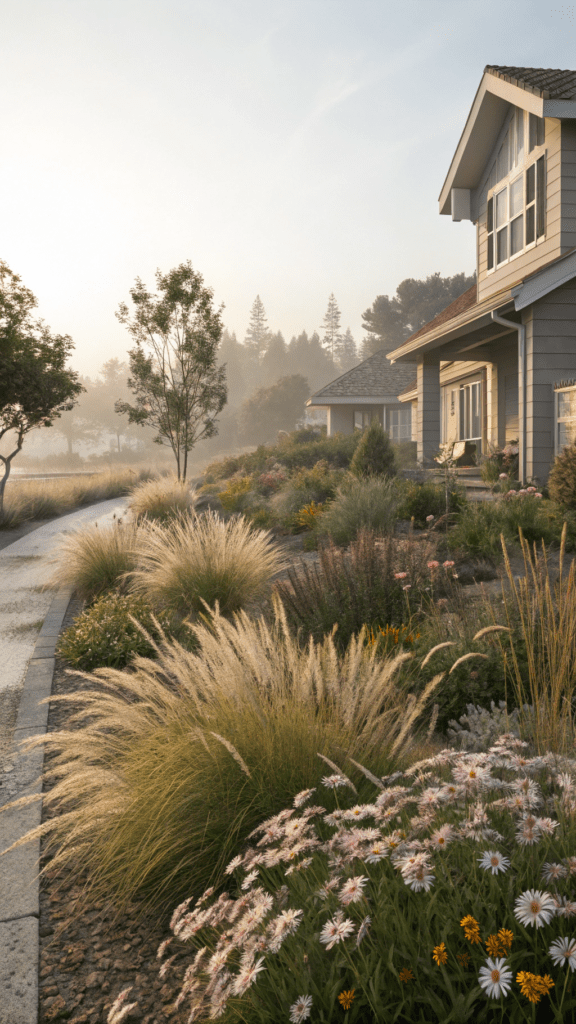
2. 🌾 Native Plant Borders That Practically Care for Themselves
If there’s one thing I wish I had done earlier, it’s switching to native plants. These plants are already adapted to your local climate, which means less watering, fewer pests, and almost no babysitting.
Walk into a local nursery and ask specifically for “native drought-tolerant plants.” You’ll often find them cheaper because they’re easier to grow locally. I found some incredible grasses and flowering shrubs that now bloom even during dry spells.
Plant them along your front boundary to create a natural border. It instantly frames your home and adds structure without feeling rigid.
A common mistake? Treating native plants like exotic ones—overwatering them. These plants actually perform better with less attention.
Layering is key here. Use taller grasses at the back and shorter flowering plants in front to create depth.
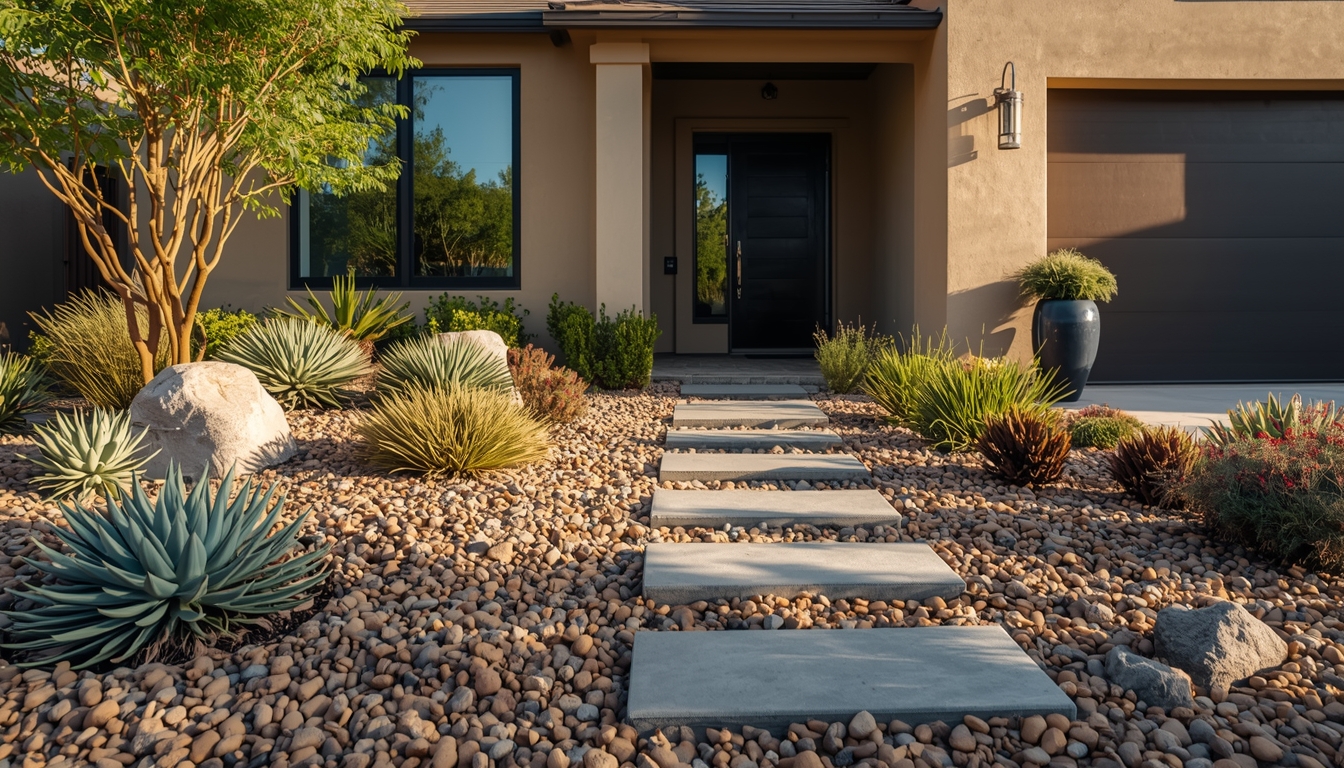
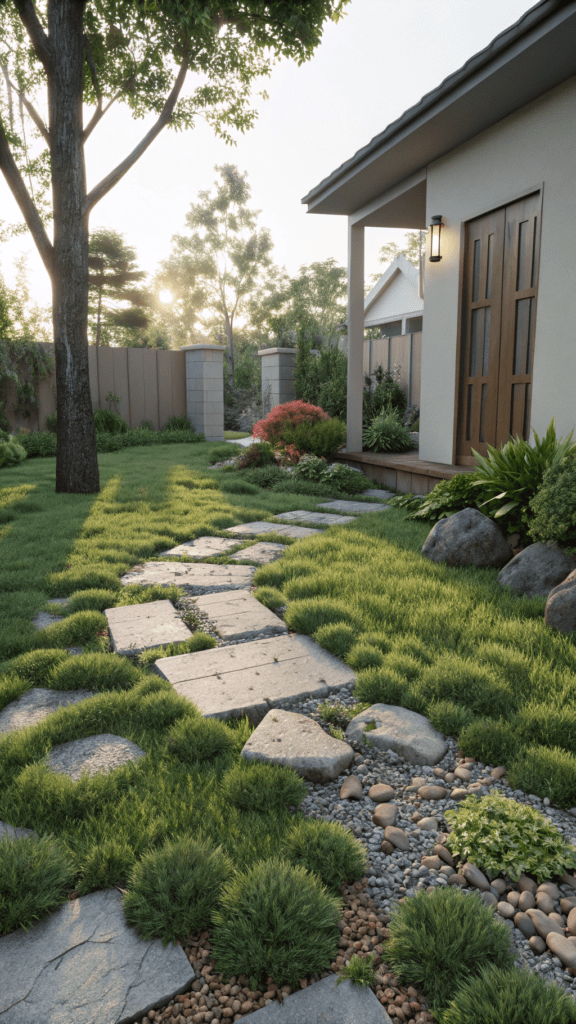
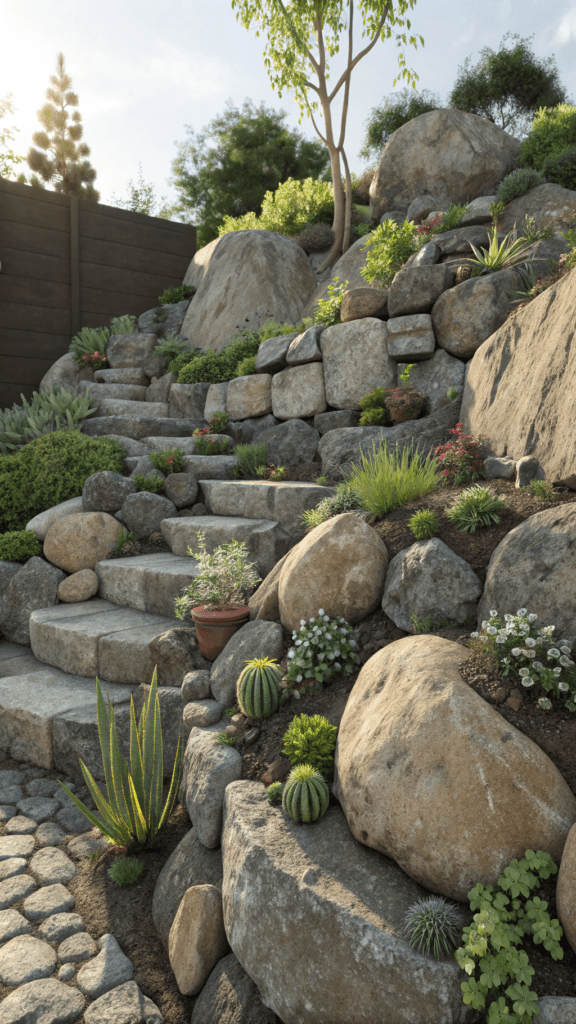
3. 🪨 Stone Pathways That Add Instant Structure
Adding a stone pathway was one of the easiest upgrades I made—and it changed everything. Suddenly, my yard felt intentional instead of random.
You don’t need expensive materials. I sourced uneven stones from a local supplier at a fraction of the cost of polished ones. The slightly imperfect look actually feels more natural.
Lay them over compacted soil or sand, leaving small gaps in between. You can fill these gaps with gravel or even creeping plants.
Here’s a mistake to avoid: don’t space stones too far apart. It might look good in pictures, but in real life, it’s awkward to walk on.
Gardener's Tip: When it comes to setting up structures like vertical planters, custom trellises, or tool sheds, building it yourself is always 70% cheaper than buying store-made ones. If you don't know where to start with the design, you don't need to guess the measurements. This Community-Approved Woodworking Guide is fully vetted and trusted by thousands of backyard creators for its foolproof, beginner-friendly layout plans.
Use pathways to guide visitors from the gate to your door—it subtly improves the entire layout of your yard.
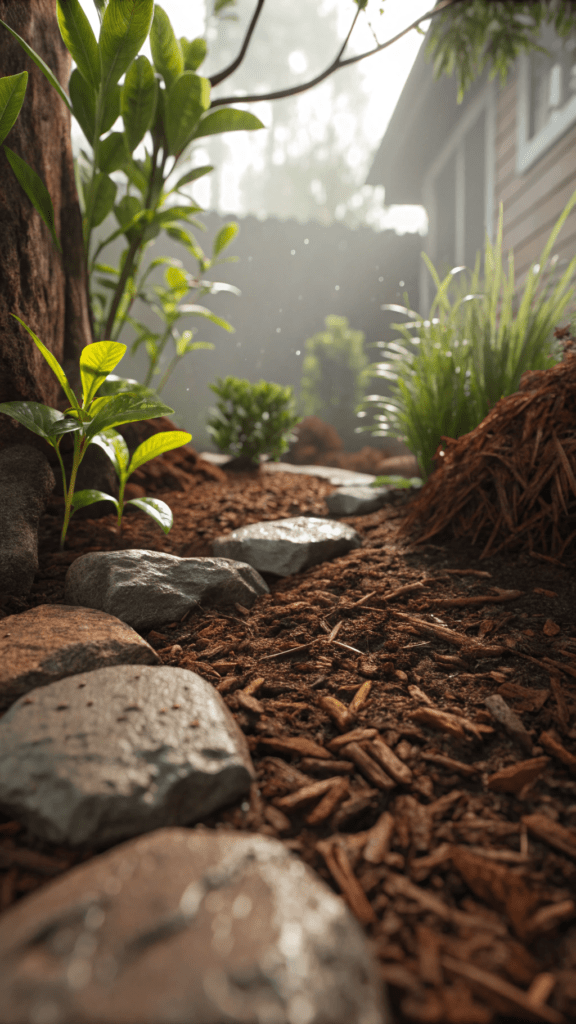
4. 🌿 Mulch-Based Garden Beds (The Moisture Keeper)
Mulch doesn’t look exciting—but it’s one of the smartest things you can add. When I first used it, I noticed a difference within days. The soil stayed cooler, and I watered less frequently.
Use bark chips, dried leaves, or coconut husk—especially affordable in India. Spread a thick layer (at least 2–3 inches) around plants.
The biggest mistake? Using too little mulch. A thin layer dries out quickly and defeats the purpose.
Mulch also suppresses weeds naturally, which saves hours of maintenance over time.
This pairs perfectly with ideas from vertical gardening setups, especially if you’re working with limited space.
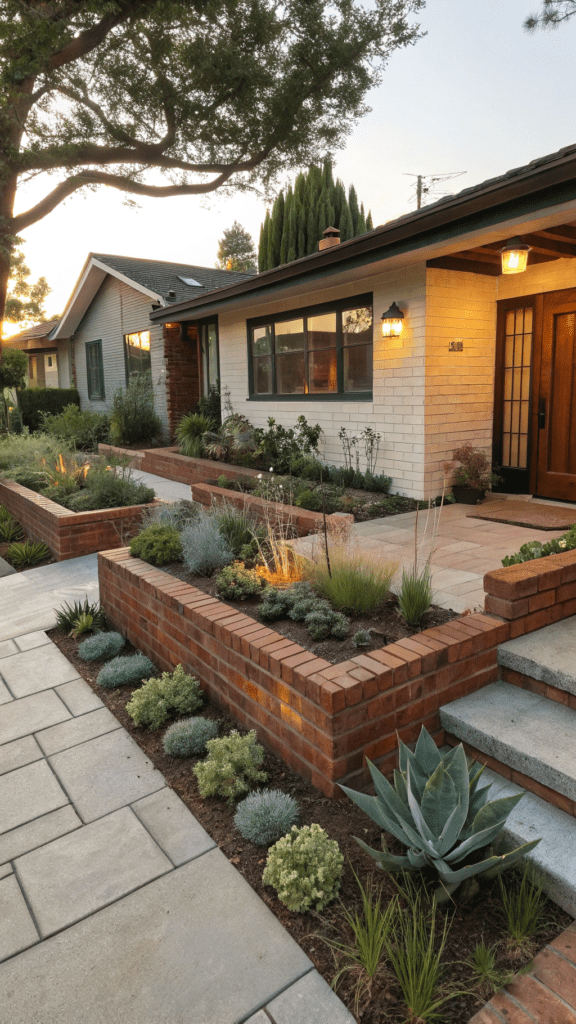
5. 🧱 Raised Dry Garden Beds for Small Front Yards
Raised beds helped me control my soil better—especially in areas where drainage was poor. And visually, they add layers, making even a small front yard look dynamic.
You don’t need expensive kits. I built mine using leftover bricks and stones. Even broken materials work if arranged creatively.
Fill the beds with sandy, well-draining soil and plant drought-resistant species. This setup prevents root rot and keeps plants healthier.
One mistake? Making beds too tall. It increases cost and doesn’t add much benefit.
PRO TIP
Most people think xeriscaping means “no watering.” That’s not true.
The real secret is deep but infrequent watering. Water thoroughly once, then let the soil dry out. This trains roots to grow deeper, making plants more resilient over time.
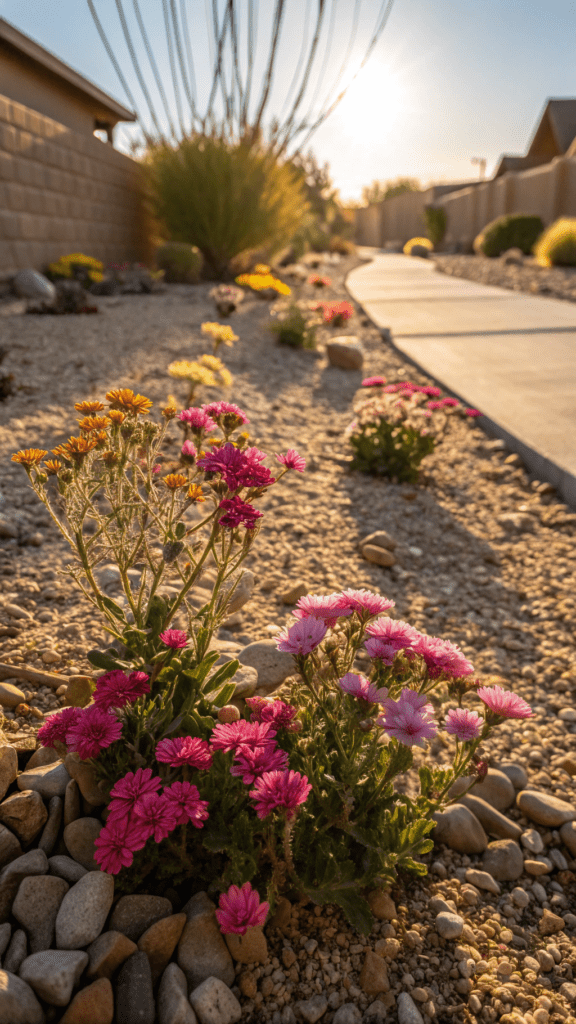
6. 🌸 Drought-Tolerant Flower Pockets for Color Without the Hassle
One thing people assume about xeriscaping is that it lacks color. I believed that too—until I started experimenting with drought-tolerant flowering plants. The trick isn’t to plant them everywhere, but to create intentional pockets of color.
Start by choosing 2–3 varieties like portulaca, gazania, or coreopsis. These plants thrive in heat and actually bloom better when conditions are a little tough. I like grouping them in small clusters near pathways or entrances, where the eye naturally lands.
Buy them in small nursery trays instead of individual pots—it’s far cheaper and allows you to fill space quickly. Local plant markets often sell these in bulk at a fraction of the cost.
Ready to upgrade your garden landscape? Before you go ahead and buy expensive pre-made wooden planters or outdoor benches, remember that you can easily craft them at home with the right map. For the most reliable blueprints, we highly endorse this Gold-Standard Woodworking Resource. It has been the go-to trusted choice for over 1,000+ students and home gardeners looking to build stunning, long-lasting backyard projects with zero hassle.
A mistake I made early? Mixing too many colors. It made the yard feel chaotic. Stick to a simple palette—like yellows and oranges, or pinks and purples—for a more curated look.
Water deeply but infrequently, and avoid overhead watering to keep blooms healthy.
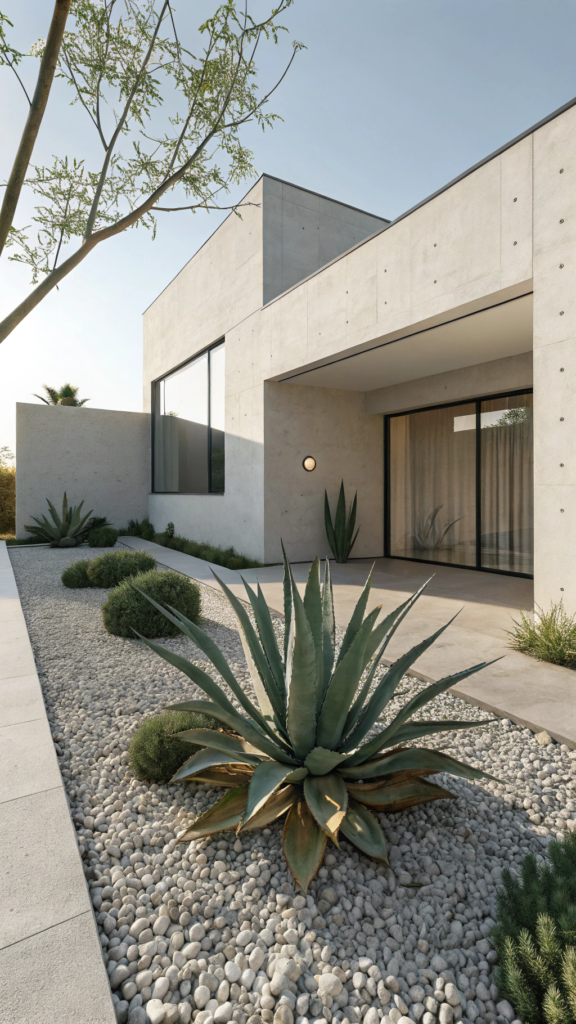
7. 🌴 Statement Desert Plants That Anchor Your Design
Every great front yard needs a focal point—and in xeriscaping, statement plants do all the heavy lifting. I added a single agave plant in the center of my yard, and suddenly everything felt intentional.
Look for plants with strong shapes—yucca, agave, or even large aloes. These are usually available at roadside nurseries for reasonable prices, especially if you’re not picky about size.
Place them where they can stand alone and shine. Avoid crowding them with smaller plants. These are your “centerpiece items,” not background fillers.
Here’s the mistake I see often: planting them too close to walkways. Some of these plants have sharp edges, and trust me—you’ll regret brushing against them.
Give them space, and let gravel or mulch surround them for contrast.
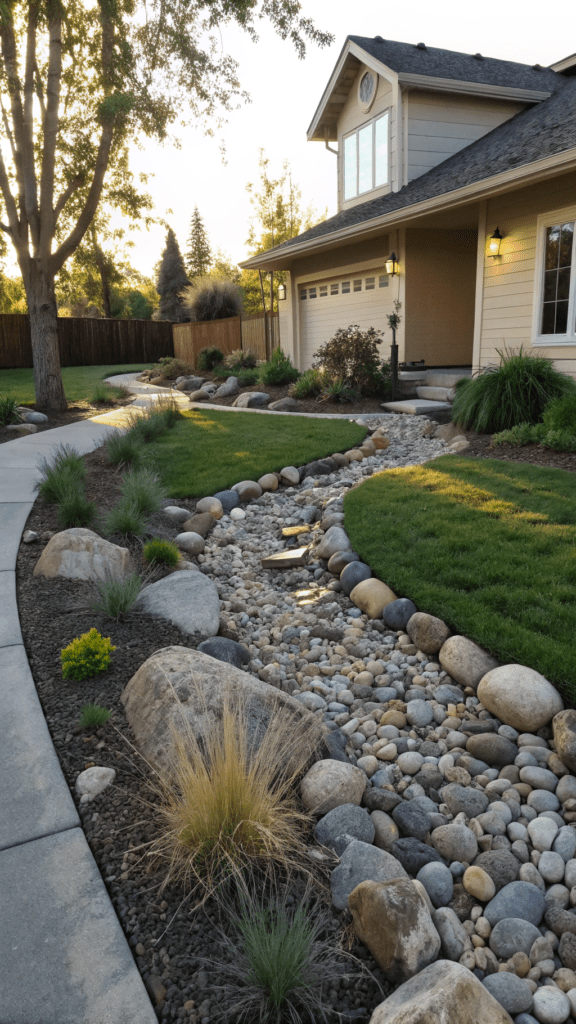
8. 🏜️ Dry River Bed Landscaping (The Illusion of Flow)
This is one of those ideas that looks complicated—but is surprisingly easy to DIY. A dry river bed adds movement to your yard without using a single drop of water.
Start by mapping out a gentle curve across your yard. It shouldn’t be straight—natural rivers rarely are. Dig a shallow trench and line it with landscape fabric.
Fill it with a mix of stones—larger ones on the edges, smaller pebbles in the center. I sourced mine from a construction supplier, which was significantly cheaper than garden stores.
You can even add a few drought-tolerant plants along the edges to soften the look.
Biggest mistake? Making it too symmetrical. It should feel organic, not engineered.
This idea pairs beautifully with creative garden pathways, especially if you want a cohesive layout.
9. 🌿 Groundcovers That Replace Thirsty Lawns
Lawns are the biggest water guzzlers—and honestly, the biggest headache. Replacing mine with groundcovers was one of the smartest decisions I made.
Look for options like creeping thyme, sedum, or dwarf mondo grass. These spread naturally and create a soft carpet effect without needing constant care.
Plant them in patches, leaving space for them to grow over time. It’s tempting to fill everything instantly, but patience saves money.
One mistake I made? Walking on them too soon. Give them time to establish before treating them like a lawn.
If you’re exploring more options, you might find inspiration in groundcovers that naturally suppress weeds, especially for low-maintenance setups.
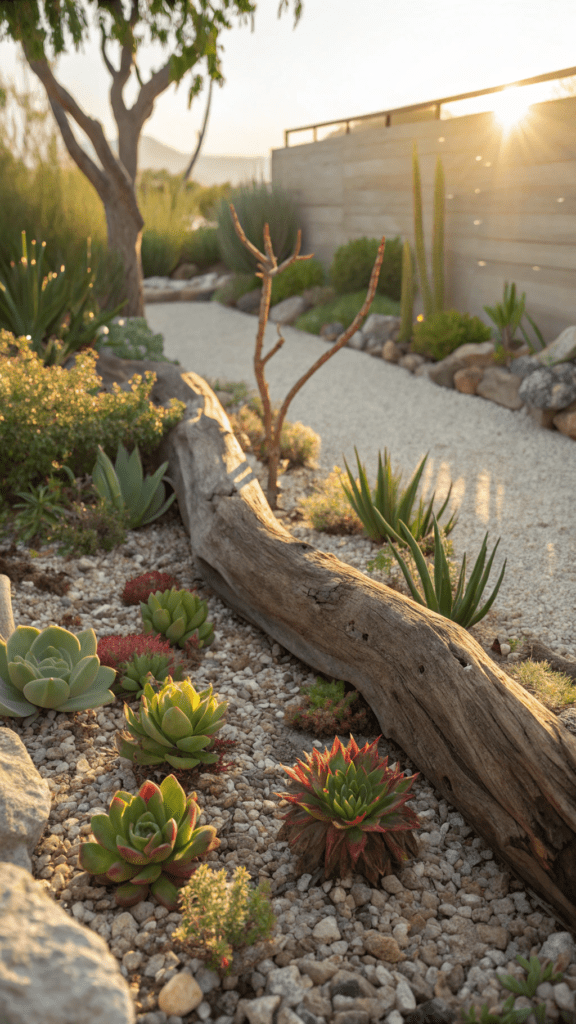
10. 🪵 Driftwood & Natural Decor Accents
Sometimes, what your yard needs isn’t more plants—it’s more personality. Adding driftwood and natural elements brought a warmth to my xeriscape that plants alone couldn’t achieve.
Look for fallen branches, reclaimed wood, or even old logs. These are often free if you know where to look—construction sites, tree trimming areas, or local marketplaces.
Place them strategically—near plant beds, along pathways, or as standalone features.
Avoid overdecorating. One or two pieces are enough to create interest.
A mistake I made? Using polished or artificial-looking wood. It breaks the natural aesthetic. Stick to raw, weathered textures.
GROWING SECRET
Layering isn’t just for plants—it’s for materials too.
Combine gravel, mulch, stone, and wood in different zones to create depth. This makes even a simple xeriscape look professionally designed without increasing cost./h
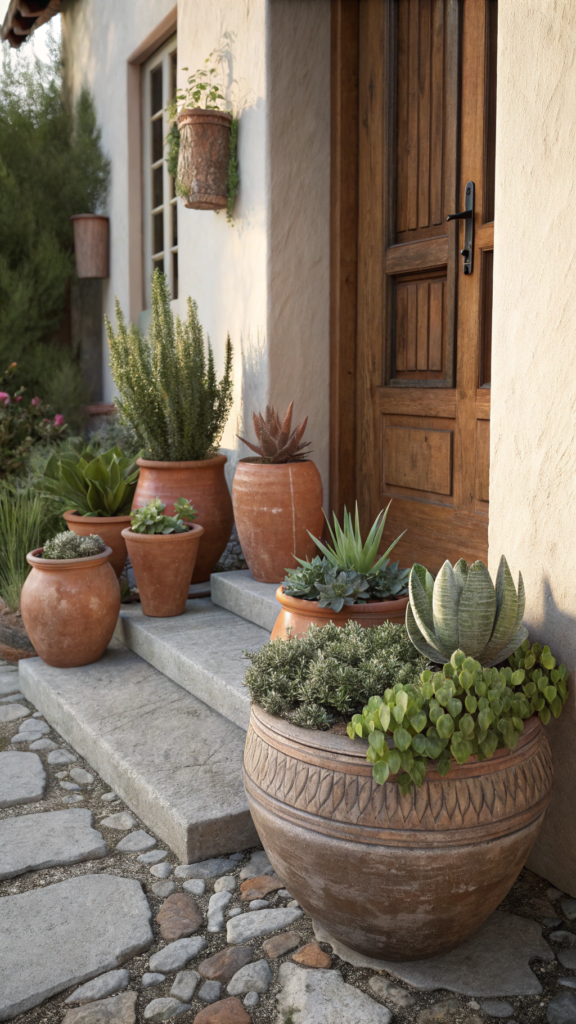
11. 🪴 Container Xeriscaping for Flexible Design
Containers gave me flexibility I didn’t know I needed. When something didn’t look right, I could just move it—no digging required.
Choose terracotta or ceramic pots—they breathe better and keep roots healthy. Fill them with well-draining soil and plant succulents or hardy perennials.
You can often find affordable pots at local markets or reuse old containers creatively.
Mistake to avoid? Using pots without drainage holes. That’s a fast track to root rot.
Cluster pots in odd numbers (3 or 5) for a more natural look.\
12. 🌱 Permeable Gravel Driveway (Functional + Stylish)
Switching part of my driveway to gravel wasn’t just aesthetic—it solved drainage issues too.
Gravel allows water to seep into the ground instead of running off. It also stays cooler than concrete, which benefits nearby plants.
Use a solid base layer and compact it well—this prevents sinking and uneven surfaces.
Mistake? Skipping edging. Without borders, gravel spreads everywhere.
This works beautifully if you want a cohesive look between your driveway and garden.

13. 🌿 Layered Rock Gardens for Depth and Texture
Flat yards can feel boring. Adding layers with rocks changed the entire visual dynamic of my space.
Use larger rocks as anchors and smaller ones to fill gaps. Arrange them in tiers to mimic natural landscapes.
Don’t aim for perfection—natural randomness looks better.
Mistake? Using identical stones. Variety creates interest.
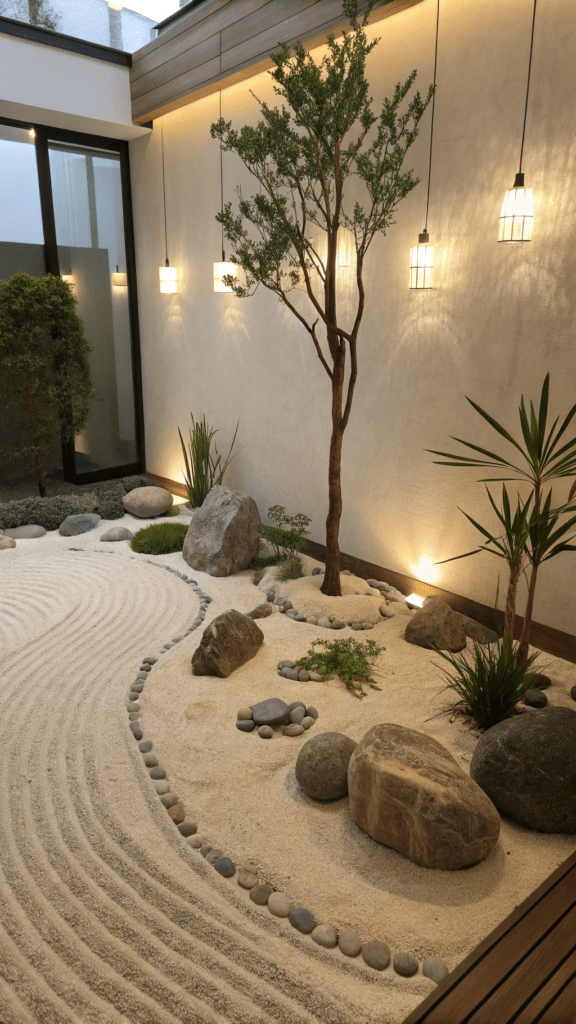
14. 🌼 Minimalist Zen Xeriscape Corner
I created a small zen corner just to experiment—and it became my favorite spot.
Use sand or fine gravel, a few stones, and minimal plants. Keep it simple.
Rake patterns occasionally to maintain the look.
Mistake? Adding too many elements. Zen is about restraint.
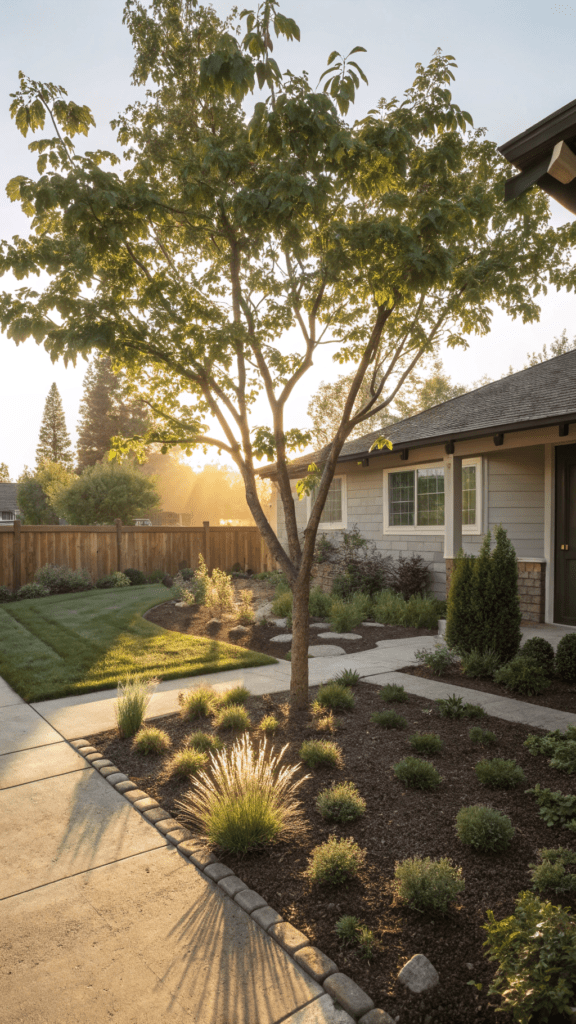
15. 🌳 Strategic Shade Trees for Microclimate Cooling
Adding a tree was a long-term investment—but one that paid off beautifully.
Choose drought-tolerant species suited to your region. They reduce heat and help surrounding plants thrive.
Plant it where it can cast shade during the hottest part of the day.
Mistake? Planting too close to the house—roots and shade can become an issue later.
FAQ
Q1: Is xeriscaping expensive to start?
Not really. It can actually be cheaper long-term since you reduce water bills and maintenance costs.
Q2: Can xeriscaping look lush and colorful?
Absolutely. With the right plant choices, you can have blooms, textures, and seasonal interest.
Q3: Do I need to remove my entire lawn?
No. You can start small by converting sections gradually.
Q4: Is it suitable for small front yards?
Yes—xeriscaping works especially well in compact spaces.
Q5: What’s the biggest beginner mistake?
Overwatering drought-tolerant plants.
Seasonal Maintenance Calendar
Spring:
- Add mulch
- Plant new drought-resistant species
Summer:
- Deep watering once or twice a week
- Remove weeds early
Autumn:
- Prune dead growth
- Add compost lightly
Winter:
- Minimal care
- Plan new layout changes
Common Mistakes to Avoid
- Overwatering drought-tolerant plants
- Skipping soil preparation
- Using too many plant varieties
- Ignoring spacing between plants
- Choosing aesthetics over climate suitability
Final Thoughts
If there’s one thing xeriscaping taught me, it’s this—gardening doesn’t have to be a constant struggle. Once you align your choices with your environment, everything becomes easier.
Your front yard stops being a chore… and starts becoming something you actually enjoy looking at every day.
And honestly? That feeling is worth more than any lush lawn.
Aagam – Founder of SpruceTouch
Hi, I’m the creator behind SpruceTouch. i am a home and garden enthusiast who shares practical ideas for backyard design, garden projects, patio decor, and small outdoor spaces. Through SpruceTouch, he focuses on simple and budget-friendly ways to improve outdoor living spaces.