
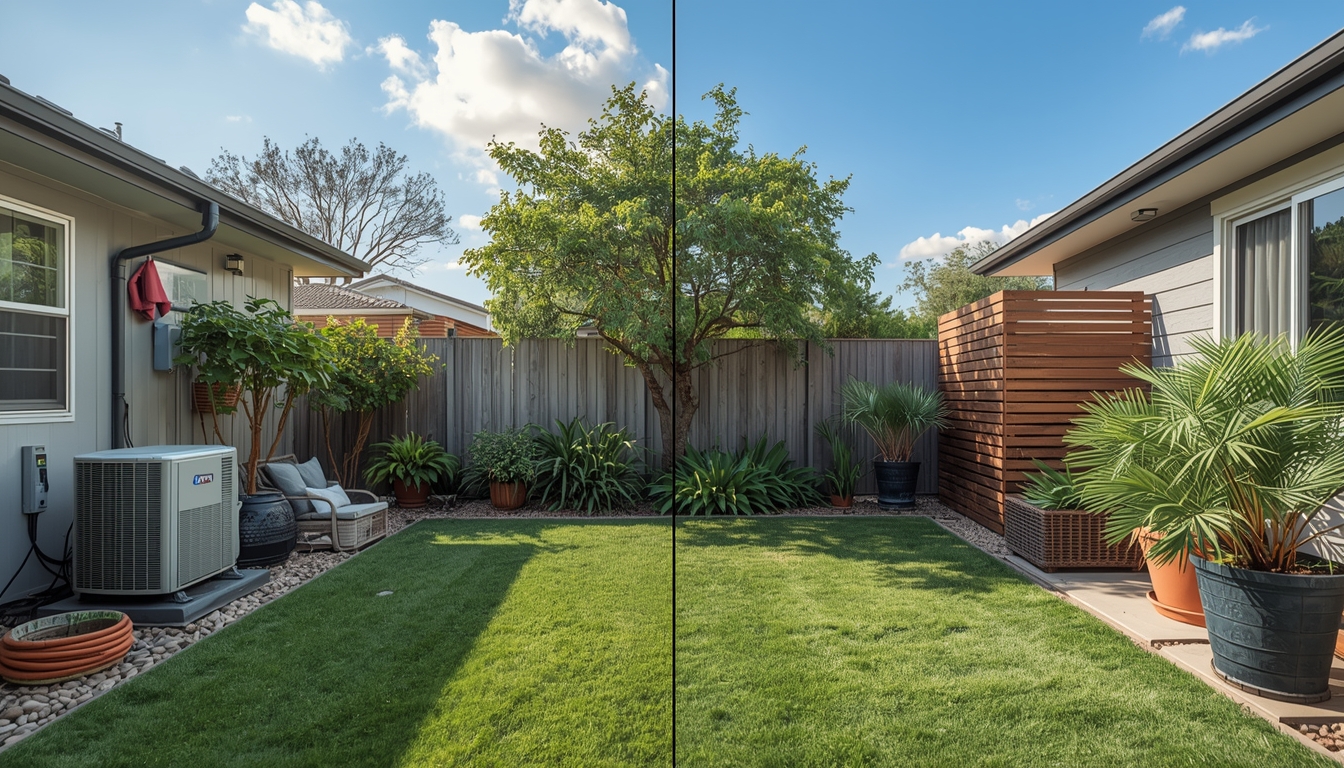
I still remember the moment my backyard finally looked perfect… until I turned around and saw it—the ugly AC unit, tangled hose, and those bright plastic bins ruining everything.
It felt frustrating because no matter how many plants I added, something always broke the illusion.
For a long time, I thought the only solution was expensive landscaping or building permanent structures. But that wasn’t true.
The real secret? You don’t remove the ugly stuff—you make it disappear.
Once I discovered a few clever “invisible garden” tricks, everything changed. My yard suddenly looked calm, curated, and way more expensive than it actually was.
Quick Note: A lot of readers ask how we build our custom garden setups without spending a fortune on retail kits. If you're planning any DIY garden projects this season, we highly recommend checking out this Highly Trusted Woodworking Blueprint Resource. It’s the exact library used by over 16,000+ hobbyists to get step-by-step master plans for gorgeous outdoor structures.
If you’re struggling to hide backyard clutter, you’re not alone. I used to think my garden would never look clean because of AC units, hoses, and storage bins ruining the view. No matter how many plants I added, the mess still stood out. But everything changed when I discovered a few “invisible garden” tricks that helped me hide backyard clutter without expensive renovations.
Quick Selection Table
| Solution | Best For | Budget Level | Difficulty | Visual Impact |
|---|---|---|---|---|
| Wooden Slat Screens | AC Units & Trash | Medium | Easy | ⭐⭐⭐⭐⭐ |
| Vertical Garden Walls | Pipes & Meters | Low | Medium | ⭐⭐⭐⭐ |
| Storage Benches | Tools & Toys | Medium | Easy | ⭐⭐⭐⭐⭐ |
| Decorative Gravel Zones | Drainage Areas | Low | Easy | ⭐⭐⭐ |
| Trellis + Climbers | Fences & Walls | Low | Medium | ⭐⭐⭐⭐⭐ |
The Ideas Section
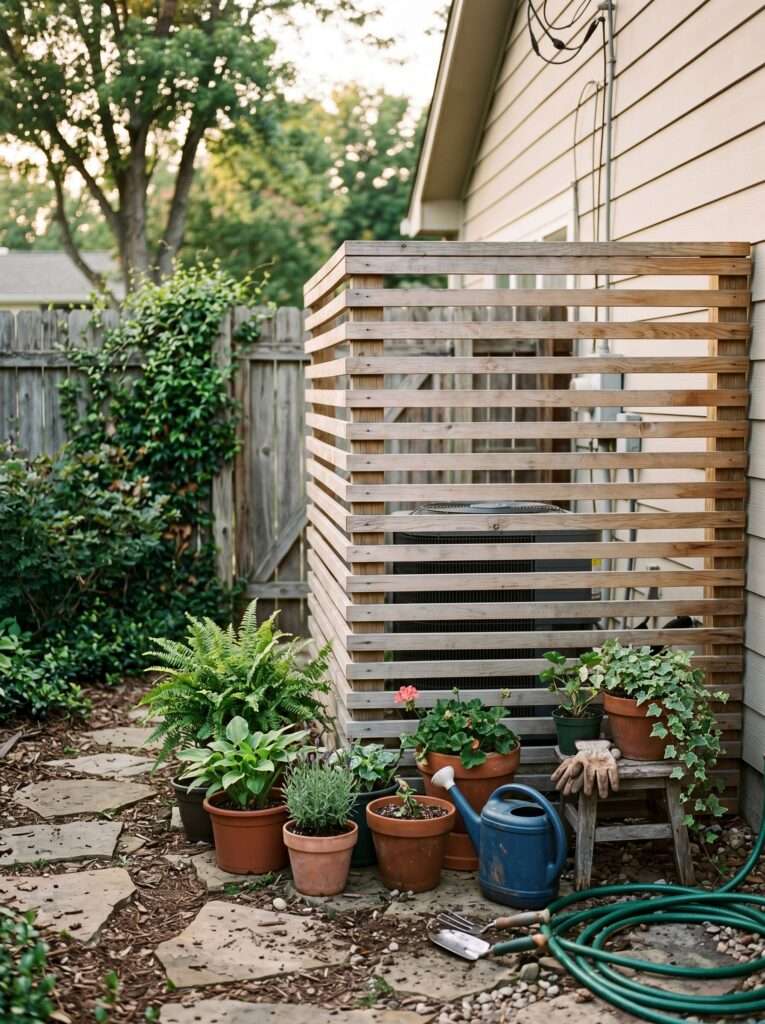
🌱 1. The Wooden Slat “Disappearing Screen”
One of the first things I ever hid was my AC unit—and honestly, this trick changed everything. A simple wooden slat screen creates an instant visual barrier without blocking airflow, which is crucial.
The key is spacing. Don’t stack the slats too tightly, or you’ll trap heat. I learned this the hard way when my unit started overheating during peak summer. Leave small gaps for airflow while still keeping things visually hidden.
You can build this yourself using cheap wood from local hardware stores, or even repurpose old pallets. If DIY isn’t your thing, pre-made panels are available online and surprisingly affordable.
Placement matters more than people think. Instead of boxing everything in tightly, create a partial screen that hides the unit from your main seating angle. That’s usually enough.
Mistake to avoid: Don’t paint it too bright. Neutral tones like warm wood or matte black blend better and make the structure “disappear.”
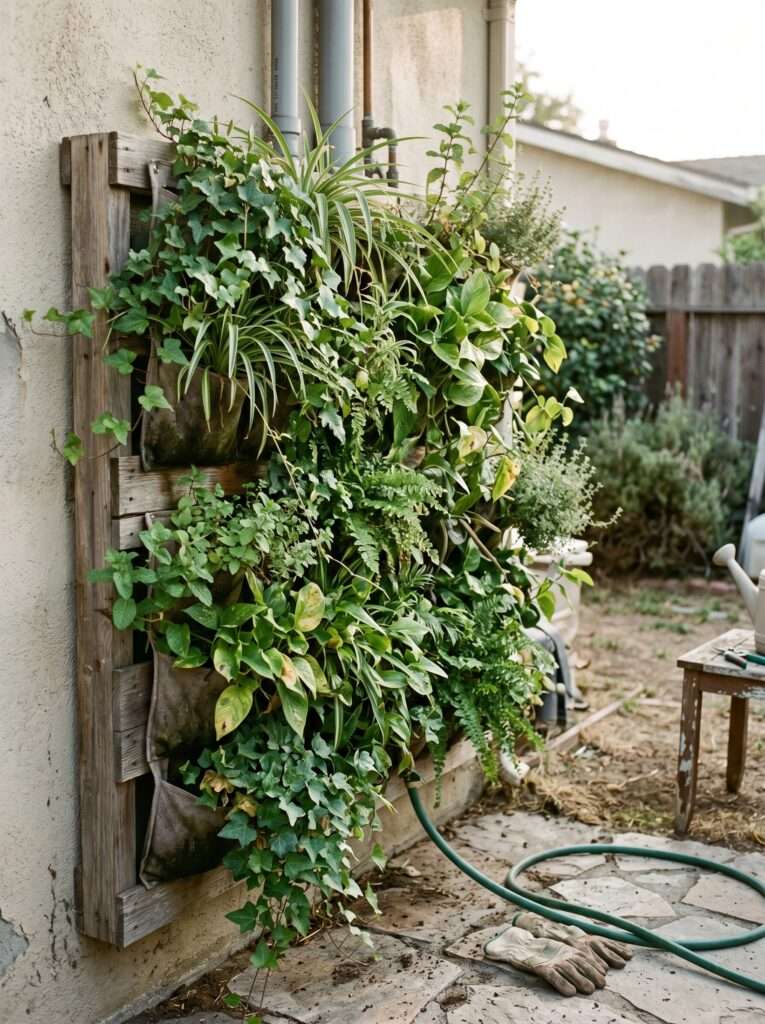
🌿 2. Vertical Garden Wall Camouflage
This is one of those ideas that feels expensive—but isn’t. I used it to hide a water meter box, and now it’s the most complimented part of my yard.
Start with a simple metal grid or wooden frame. Attach small pots, recycled bottles, or even fabric planters. Herbs and trailing plants work best because they grow fast and fill gaps naturally.
If you’re in a hot climate, choose hardy plants like pothos or spider plants. They survive neglect and still look lush.
The trick is layering. Don’t just stick plants randomly—create a dense cluster in the middle and lighter edges. That gives a natural “wild garden” look.
Mistake to avoid: Forgetting irrigation. Either install a drip system or group plants with similar watering needs to avoid uneven growth.
🌳 3. Storage Bench That Hides Everything
I wish I had done this sooner. A storage bench is one of the smartest investments for a cluttered backyard.
You can hide everything—gardening tools, kids’ toys, hoses—and still have a place to sit. I found mine secondhand, sanded it, and it looks brand new.
Placement tip: Put it near your main activity zone. If it’s too far away, you won’t use it, and clutter will creep back in.
Waterproofing matters. Add a liner or plastic bins inside to protect your items from rain and humidity.
Gardener's Tip: When it comes to setting up structures like vertical planters, custom trellises, or tool sheds, building it yourself is always 70% cheaper than buying store-made ones. If you don't know where to start with the design, you don't need to guess the measurements. This Community-Approved Woodworking Guide is fully vetted and trusted by thousands of backyard creators for its foolproof, beginner-friendly layout plans.
Mistake to avoid: Overstuffing it. Leave space so you can easily grab things without making a mess again.

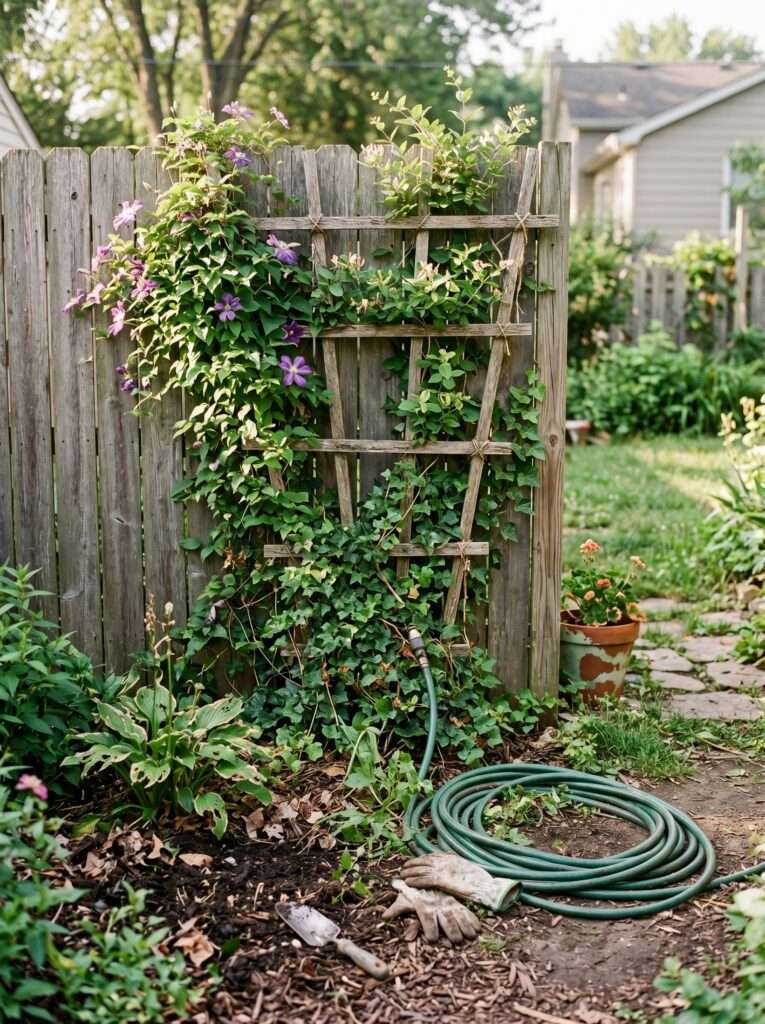
🌾 4. Trellis + Climbing Plants Magic
This is the most natural-looking solution—and honestly, the most satisfying. Watching plants slowly cover something ugly feels like transformation in real time.
Use a simple trellis panel and plant climbers like jasmine or money plant. Within weeks, you’ll start seeing coverage.
If you want faster results, buy semi-grown plants instead of seedlings. It saves months of waiting.
This pairs beautifully with ideas from my backyard privacy planting guide, especially if you want a layered green look.
Mistake to avoid: Not securing the trellis properly. Strong winds can easily knock it down if it’s loosely installed.
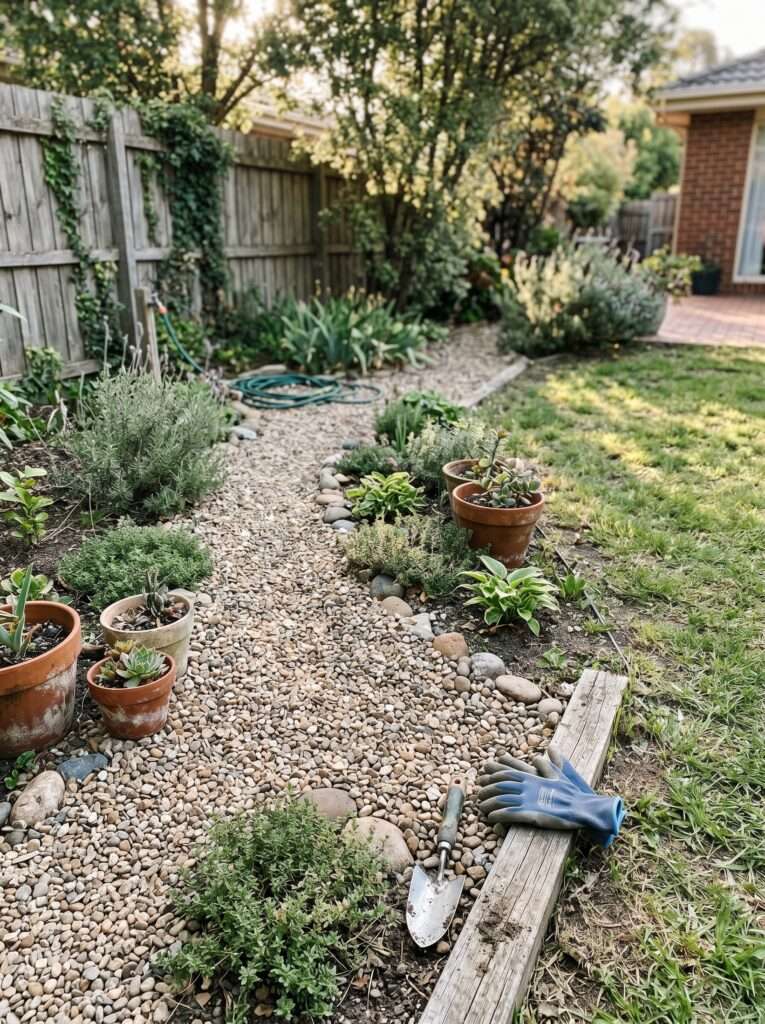
🪨 5. Decorative Gravel “Distraction Zones”
Sometimes hiding isn’t possible—so distraction becomes your best tool.
I used decorative gravel around a drainage pipe area that I couldn’t cover. Instead of fighting it, I designed around it.
Choose light-colored gravel to reflect heat and make the space look intentional. Add a few large stones or potted plants to create a focal point.
This works especially well in dry climates or low-maintenance gardens.
If you’re into minimal upkeep, you’ll love pairing this with ideas from my low-water landscaping tips.
Mistake to avoid: Skipping a weed barrier underneath. You’ll regret it within weeks.
PRO TIP
Most people try to hide everything—but the real trick is controlling where the eye goes.
Use one strong focal point (like a seating area or plant wall), and your brain naturally ignores the rest.
Design isn’t about perfection—it’s about attention control.
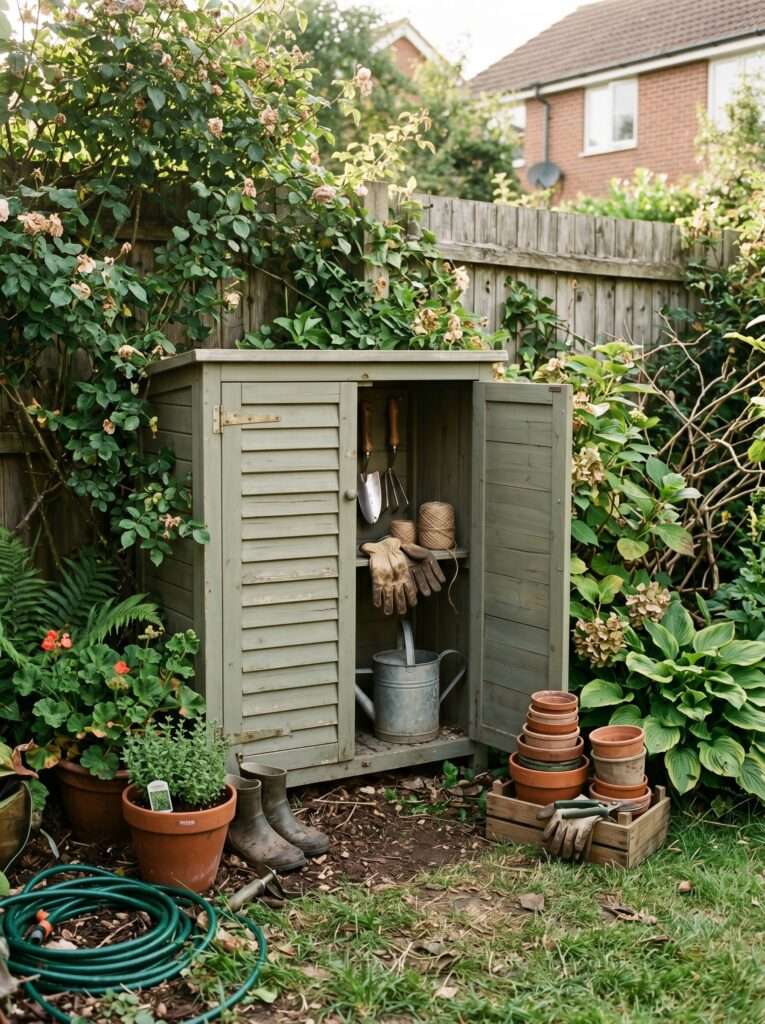
🌿 6. Outdoor Cabinet “Mini Shed” That Blends In
I used to have tools scattered everywhere—trowels, gloves, fertilizer bags—until I added a simple outdoor cabinet. It honestly felt like giving my garden a “reset button.”
Ready to upgrade your garden landscape? Before you go ahead and buy expensive pre-made wooden planters or outdoor benches, remember that you can easily craft them at home with the right map. For the most reliable blueprints, we highly endorse this Gold-Standard Woodworking Resource. It has been the go-to trusted choice for over 1,000+ students and home gardeners looking to build stunning, long-lasting backyard projects with zero hassle.
You don’t need a full shed. A small vertical cabinet (even plastic ones) can store a surprising amount. I found mine locally at a discount store, but you can also check online marketplaces or secondhand apps for cheaper deals.
The trick is placement. Tuck it against a wall or fence and surround it with plants so it visually blends in. I even added a couple of potted plants on top, and now it looks like part of the garden instead of storage.
Inside, use baskets or small bins to separate tools. This avoids the “junk pile” problem that usually happens after a few weeks.
If you’re organizing tools, this pairs well with smart layout ideas from your garden pathway design guide, especially for keeping everything accessible without clutter.
Mistake to avoid: Don’t buy a cabinet that’s too small. You’ll outgrow it quickly and end up with clutter again.
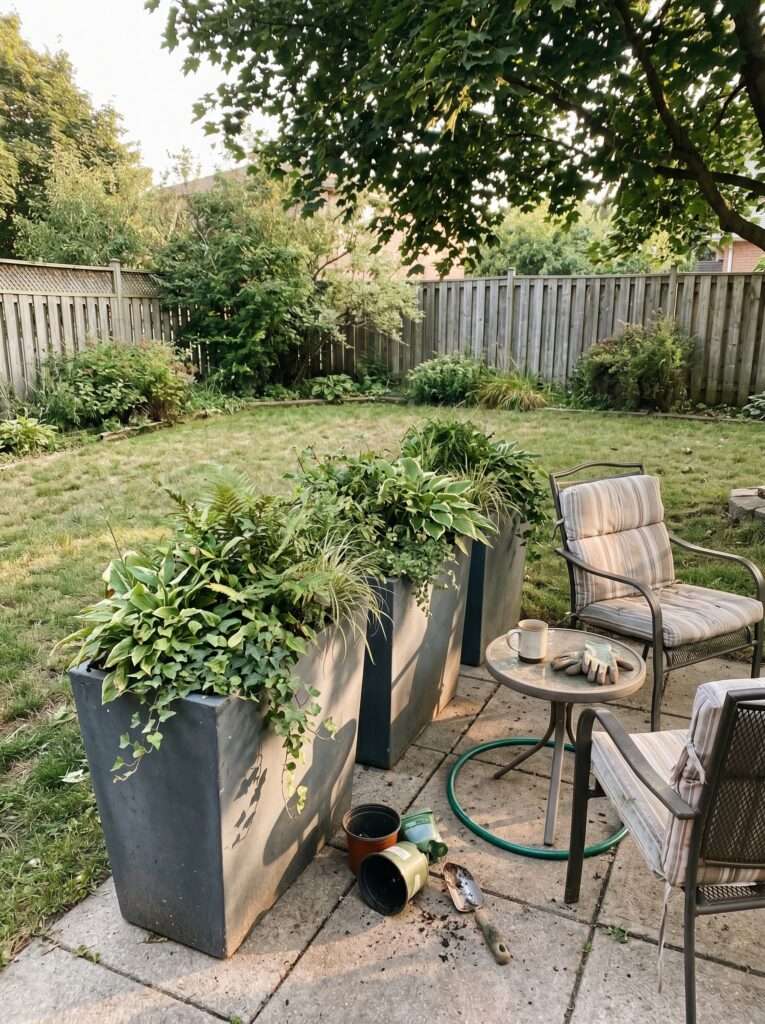
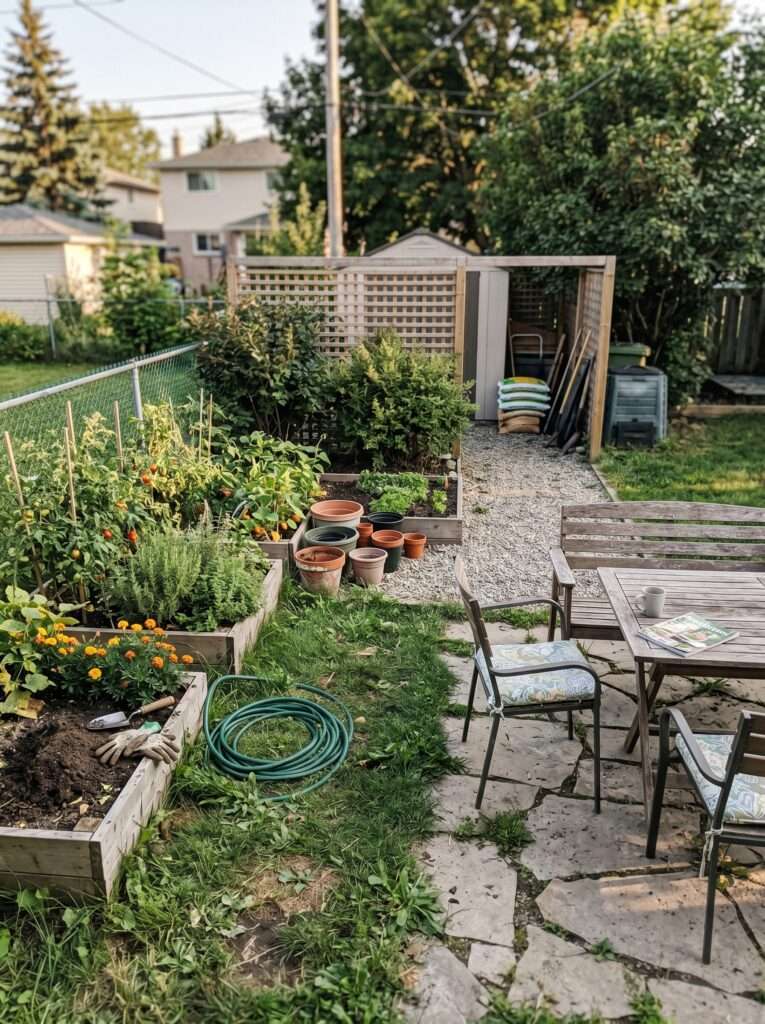
🌱 7. Tall Planters for Instant Visual Blocking
This is one of the fastest fixes I’ve ever used—no drilling, no building, just instant results.
Tall planters act like movable walls. I placed three in a row to block a neighbor’s cluttered corner, and within minutes, the entire vibe changed.
Go for planters at least waist height. Anything shorter won’t fully block the view. Fill them with dense plants like areca palm, bamboo, or even ornamental grasses.
What I love most is flexibility. You can rearrange them whenever needed—perfect if you like changing your layout or if you’re renting.
If you want a cohesive look, match planter colors with your furniture or fencing. Neutral tones always work best.
Mistake to avoid: Using sparse plants. If there are gaps, the ugly view will still peek through. Go dense and full.
🌴 8. Bamboo Screens for a Relaxed Tropical Cover-Up
If you want something quick, cheap, and stylish—bamboo screens are your answer.
I used one to hide a messy fence section, and it instantly gave my yard a resort-like feel. You can roll them out, attach them with zip ties, and you’re done in under an hour.
They work especially well in warm climates where the natural texture blends beautifully with greenery. Pair them with plants like palms or ferns for a cohesive look.
Another benefit? They’re lightweight and removable, which makes them renter-friendly.
You can find these at garden centers, online stores, or even local markets at a low cost.
Mistake to avoid: Leaving gaps at the edges. Overlap slightly to ensure full coverage, or the hidden area will still be visible.
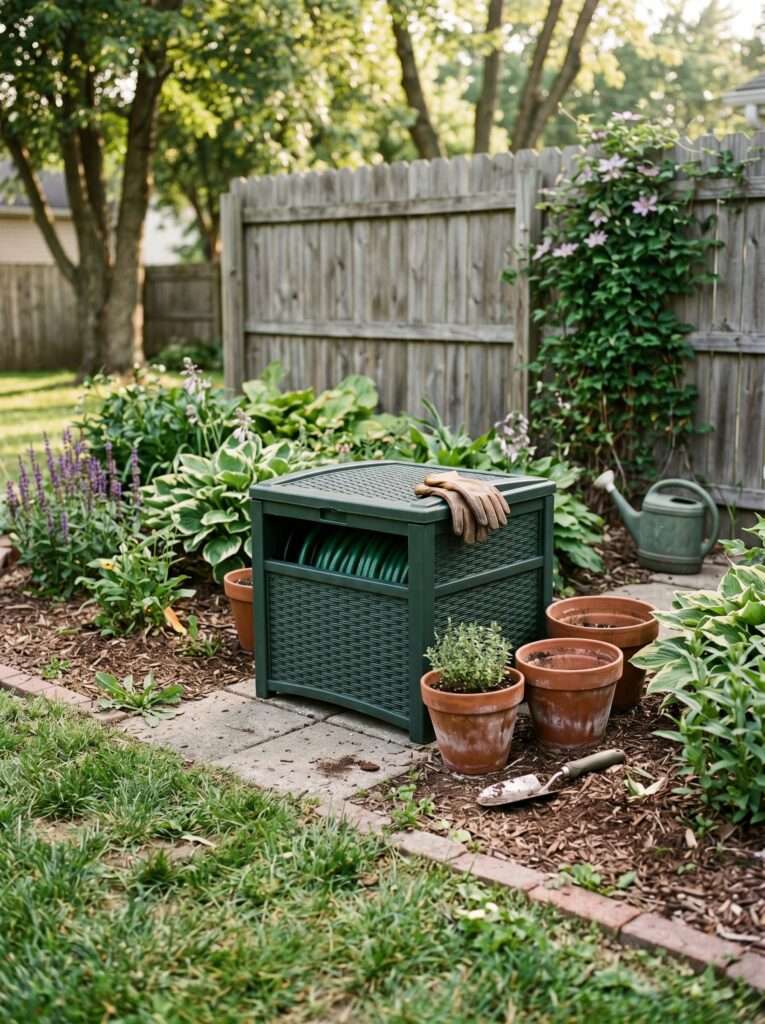
🪴 9. Hose Reel Box That Cleans Up Instantly
This is one of those small changes that makes a huge difference.
A tangled hose can ruin even the most beautiful garden. I switched to a hose reel box, and suddenly everything looked neat and intentional.
Choose a design that matches your outdoor style—wooden for rustic, plastic for modern, or wicker-style for a cozy look.
Placement tip: Keep it near your water source but slightly out of sight—like behind a planter or bench.
You can find affordable options online, or even build one yourself using leftover wood.
Mistake to avoid: Buying a box that’s too small for your hose length. Always check capacity before purchasing.
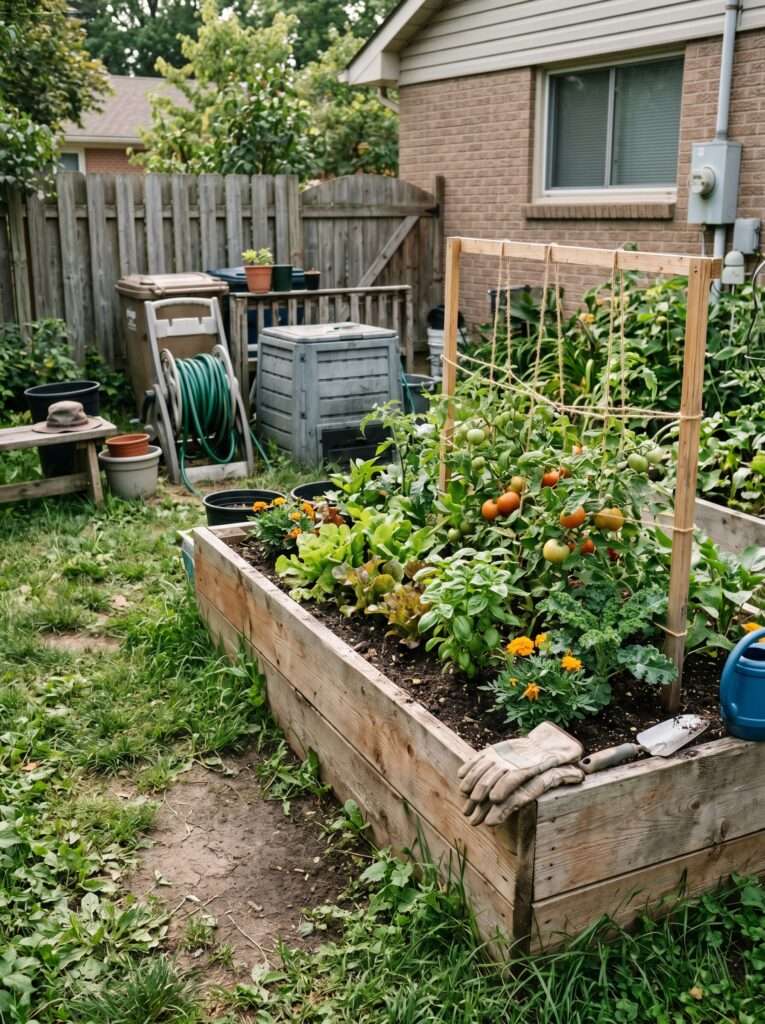
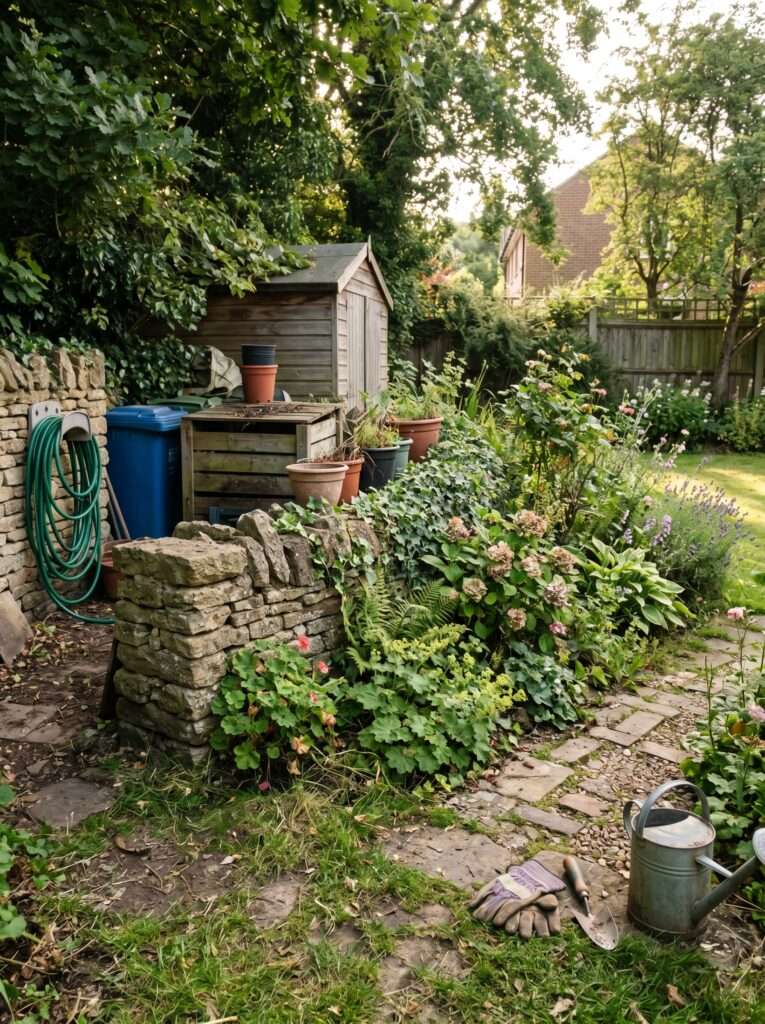
🌾 10. Raised Planter Borders That Hide Utility Zones
This is one of my favorite “double-purpose” solutions.
I had an ugly drainage area that I couldn’t move, so I built a raised planter bed right in front of it. Now, instead of seeing pipes, I see fresh herbs and flowers.
Raised beds create a natural visual block while adding usable gardening space. Use wood, bricks, or even concrete blocks depending on your budget.
Plant taller crops at the back and shorter ones in front for a layered look. This makes the hidden area completely invisible from most angles.
If you enjoy growing your own plants, this idea pairs beautifully with vegetable-growing setups and can turn a problem area into something productive.
Mistake to avoid: Making the bed too shallow. Deeper beds support healthier plants and better coverage.
PRO TIP
The best “invisible gardens” don’t just hide things—they replace them with something better.
Whenever possible, swap clutter for function (like planters or seating).
That way, your garden doesn’t just look clean—it becomes more useful too.
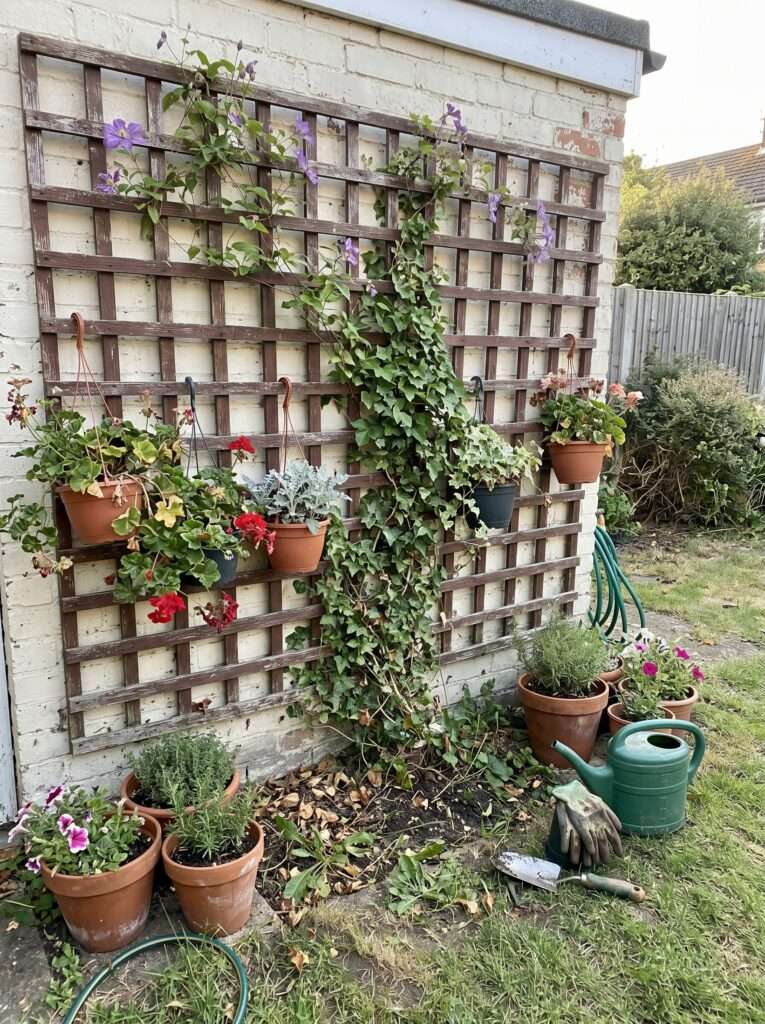
🌿 11. Lattice Panels with Green Layering
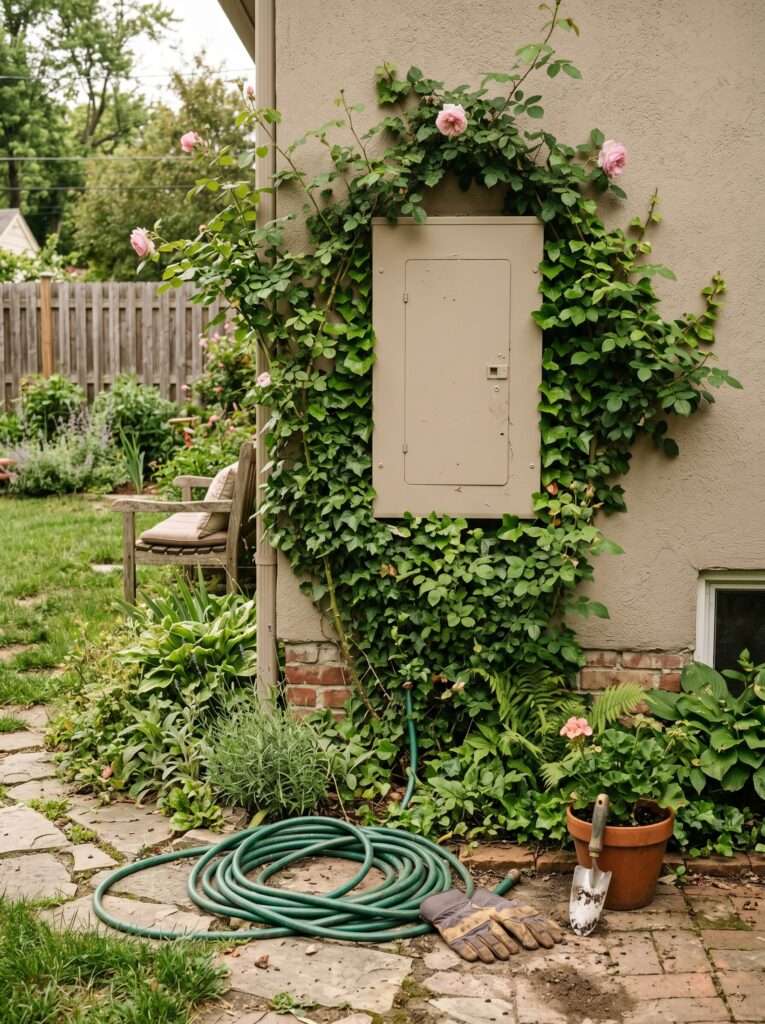
I discovered lattice panels when I was trying to hide an awkward electrical box—and honestly, they’re underrated.
A simple lattice on its own looks okay, but when you add plants, it becomes something special. I like to combine it with hanging pots or let climbers weave through the gaps. Within weeks, it starts to look like a natural green wall.
The best part is airflow. Unlike solid panels, lattice lets air pass through, making it perfect for covering things like AC units or utility areas.
You can paint it to match your fence or leave it white for a classic garden look. I personally prefer soft wood tones—they feel warmer and more natural.
If you’re planning a full backyard refresh, this idea blends beautifully with layered planting styles from your shade-loving garden layout ideas, especially in low-light corners.
Mistake to avoid: Leaving the lattice bare. Without plants or decor, it can look unfinished and defeat the purpose.
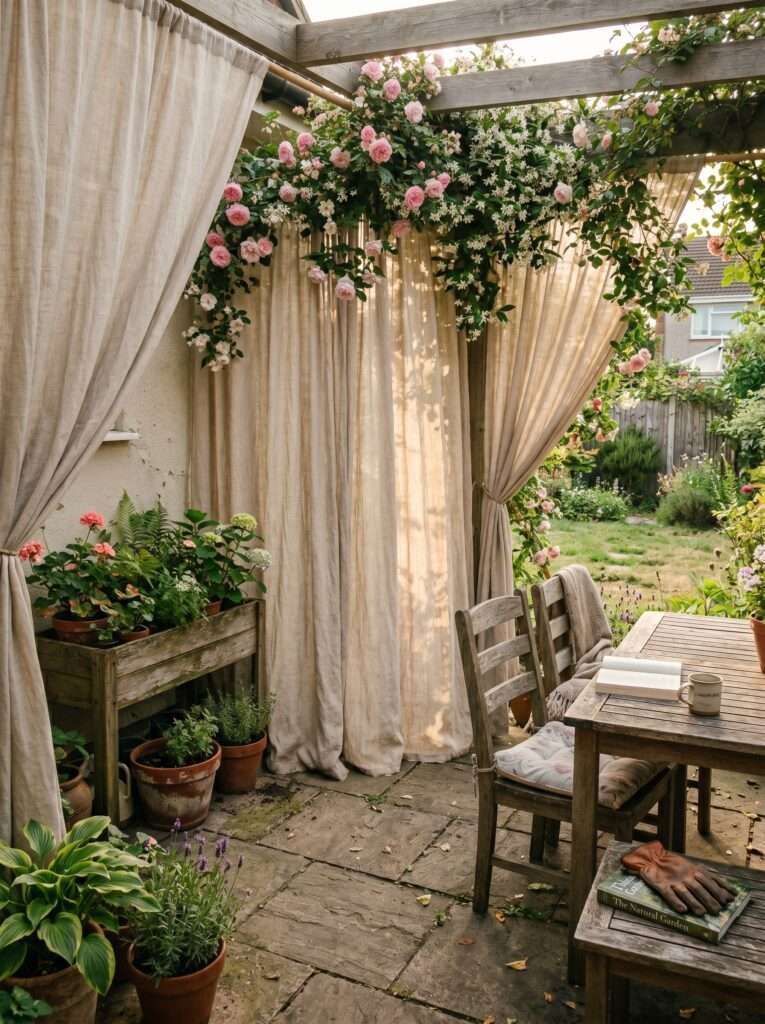
🌱 12. Outdoor Curtain “Soft Hide” Trick
This idea surprised me the most—it feels more like interior design than gardening, but it works beautifully outdoors.
I installed outdoor curtains on a simple rod near my seating area to hide a messy corner with storage bins. Now, instead of seeing clutter, I see soft flowing fabric that moves with the breeze.
Choose weather-resistant fabric and neutral colors like beige, white, or light gray. These tones reflect light and make the space feel bigger.
It’s also a great option if you want flexibility. Open the curtains when you need access, close them when guests come over.
This works especially well in patios, balconies, or pergola setups where you already have some structure to hang from.
Mistake to avoid: Using indoor fabric. It won’t survive rain or sun and will fade quickly.
🌳 13. Painted Utility Covers That Blend In
Sometimes, the easiest solution is the smartest one—just make it blend.
I had a bright green electrical box that stood out horribly against my neutral wall. Instead of hiding it, I painted it the same color as the background—and it practically disappeared.
You can go one step further and use camouflage techniques. Soft greens, browns, or even subtle patterns can help it blend into surrounding plants.
This is one of the cheapest fixes on this list, and it takes less than an hour. Just make sure to use outdoor-safe paint that can handle weather changes.
For creative gardeners, you can even turn it into a mini feature—like painting it to look like part of a mural or garden backdrop.
Mistake to avoid: Painting over vents or functional parts. Always keep essential areas accessible and uncovered.
🪨 14. Stone Wall “Half-Cover” Trick
This is one of those ideas that looks expensive—but can actually be done on a budget if you go DIY.
Instead of fully covering something, build a low stone wall in front of it. This creates a visual block without completely enclosing the area.
I used this trick to hide a compost bin. The wall only comes up halfway, but from the main viewing angle, the bin is completely hidden.
Use natural stones or even concrete blocks with a stone finish. The irregular texture adds a premium feel to your garden.
You can also top the wall with small planters or decorative items to enhance the look.
Mistake to avoid: Building it too high. It should hide, not dominate the space.
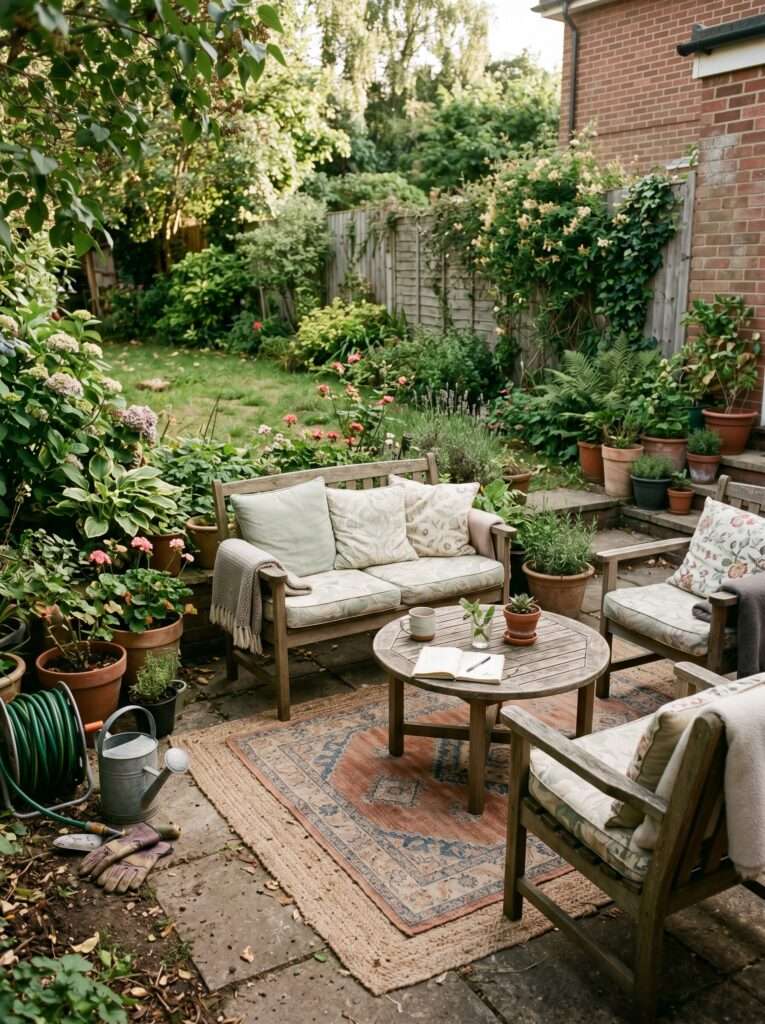
🌾 15. “Garden Room” Zoning Trick
This is more of a mindset shift than a single item—but it’s incredibly powerful.
Instead of trying to hide every ugly thing individually, divide your backyard into “rooms.” Each zone has a purpose—seating, planting, storage—and clutter naturally disappears from view.
I created a small seating zone using planters and a rug, and suddenly the storage area behind it didn’t matter anymore—it wasn’t part of the “room.”
Use visual dividers like planters, rugs, screens, or even lighting to define spaces. This tricks the eye into focusing only on what’s inside each zone.
This approach is often used by professional designers because it makes even small backyards feel larger and more organized.
Mistake to avoid: Overcomplicating zones. Keep it simple—2–3 zones are enough for most backyards.
PRO TIP
Think like a designer: you don’t need to hide everything perfectly—you just need to control what people see first.
Once your focal areas look clean and beautiful, the rest fades into the background naturally.
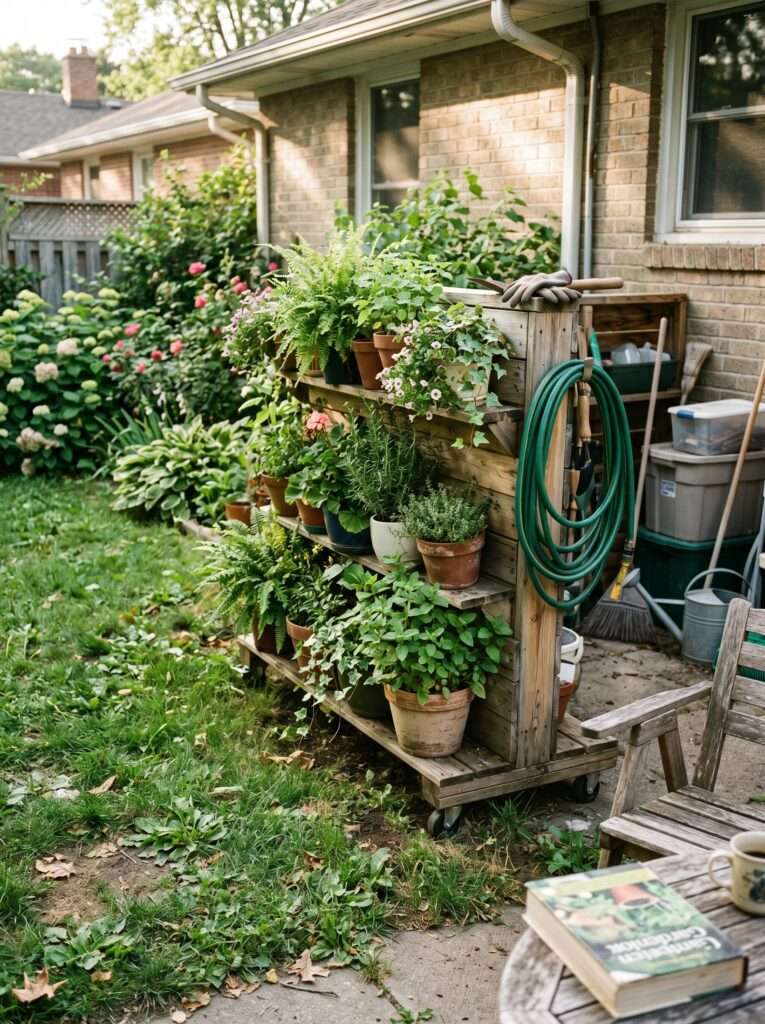
🌿 16. Rolling Plant Wall for Flexible Hiding
This is one of my favorite “smart” solutions because it gives you complete control.
I built a simple rolling plant wall using a wooden frame and caster wheels, and it completely transformed how I manage my space. Whenever I want to hide something—bins, tools, or even a messy corner—I just roll it into place.
The frame can hold small pots, hanging plants, or even a vertical garden system. The greenery softens everything and makes it feel intentional rather than like a barrier.
This is especially useful if your backyard layout changes often, or if you’re renting and don’t want permanent installations.
You can build one cheaply using leftover wood or buy ready-made rolling dividers online. Either way, it’s a high-impact solution.
Mistake to avoid: Using weak wheels. If they can’t handle the weight of soil and pots, the whole structure becomes frustrating to move.
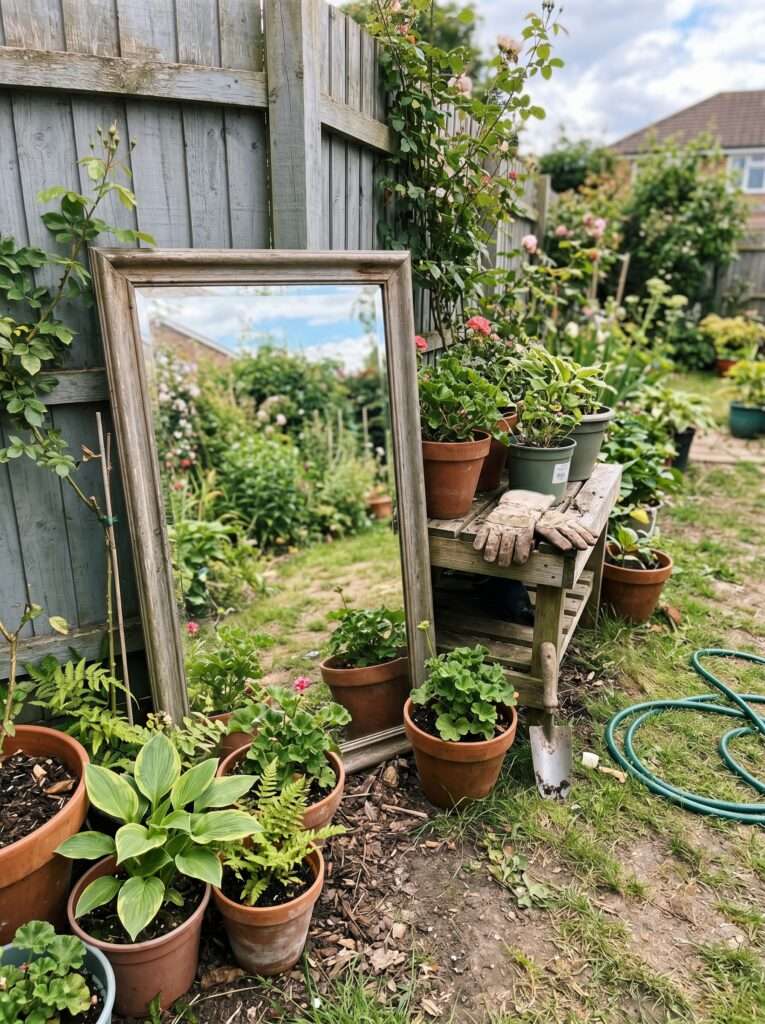
🌱 17. Mirror Illusion Trick for Tight Spaces
This one feels a bit like magic.
I added a weatherproof mirror to a dull corner, and suddenly the space looked twice as big—and the clutter nearby became almost invisible.
Mirrors reflect plants and sky, drawing attention away from problem areas. Place them strategically so they reflect something beautiful, not the clutter itself.
They work best in small backyards where every inch counts. Even a single mirror panel can completely change the feel of a space.
You can find outdoor mirrors or repurpose old ones with weatherproof sealing.
Mistake to avoid: Placing the mirror where it reflects direct sunlight into seating areas—it can become uncomfortable quickly.
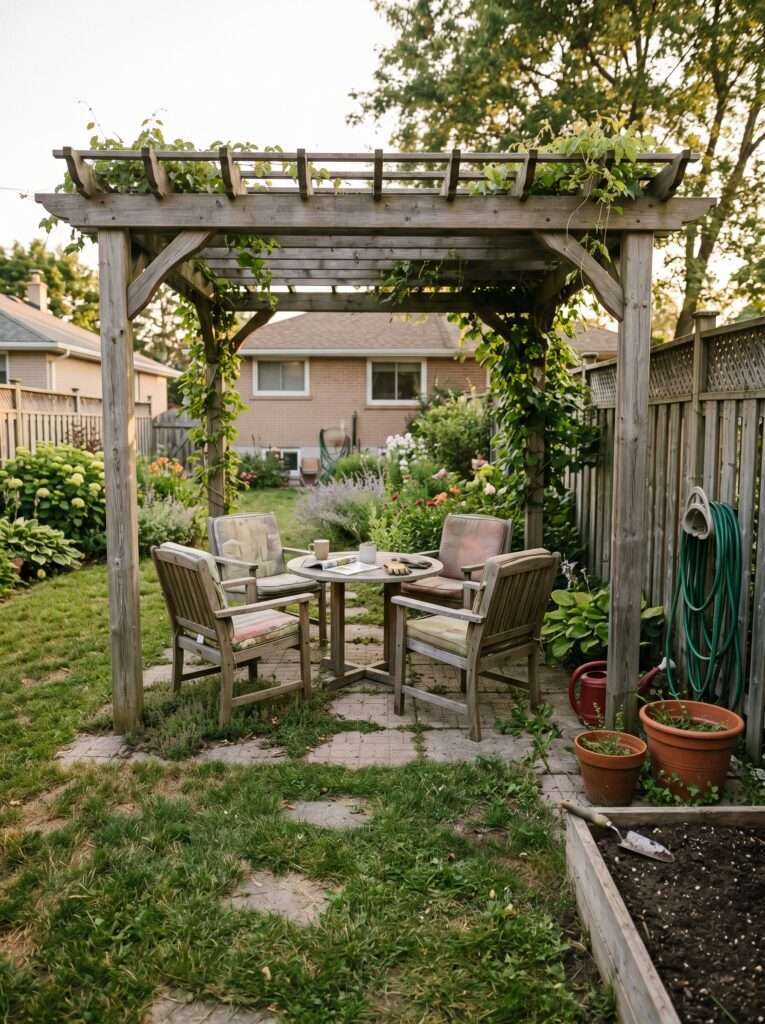
🌴 18. Pergola Shadow Cover-Up
A pergola doesn’t just add shade—it changes how your entire backyard feels.
When I installed mine, I realized something interesting: it naturally redirected attention upward and forward, making everything behind it less noticeable.
You can use a pergola to “frame” your main seating area while hiding clutter behind or around it. Add climbing plants or fabric covers to enhance the effect.
Even a small pergola kit can create a high-end look without major construction.
If you’re planning a bigger transformation, combining this with structured layouts from your patio cooling ideas on sprucetouch.com can turn your space into a true retreat.
Mistake to avoid: Leaving it empty. Without plants or fabric, it won’t create enough visual distraction.
🪴 19. Camouflage with Mixed Plant Layers
This is the most natural and organic way to hide anything—and it’s what nature does best.
Instead of relying on structures, use a mix of tall, medium, and low plants to create depth. I used tall grasses in the back, shrubs in the middle, and small flowers in front—and suddenly, the ugly corner behind them vanished.
The key is density. The more layered your planting, the harder it is to see through.
This approach works beautifully in almost any garden style, from modern to cottage.
Mistake to avoid: Planting everything in a straight line. Stagger your plants for a more natural, full look.
🌾 20. Outdoor Rug “Focus Shift” Trick
This might sound too simple—but it works surprisingly well.
I added an outdoor rug under my seating area, and suddenly that became the focus. The clutter nearby? Almost invisible.
Rugs define a space and draw the eye downward, which helps distract from anything around or behind the area.
Choose patterns or colors that complement your furniture but aren’t too loud. The goal is to create a cozy focal point, not overwhelm the space.
This is one of the easiest upgrades you can make, and it requires zero installation.
Mistake to avoid: Choosing a rug that’s too small. It should anchor the entire seating area, not just sit under one chair.
PRO TIP
Your eye always goes to the brightest, most detailed, or most comfortable-looking area first.
If you create one strong “wow zone,” everything else becomes background noise.
Design smart—not harder.
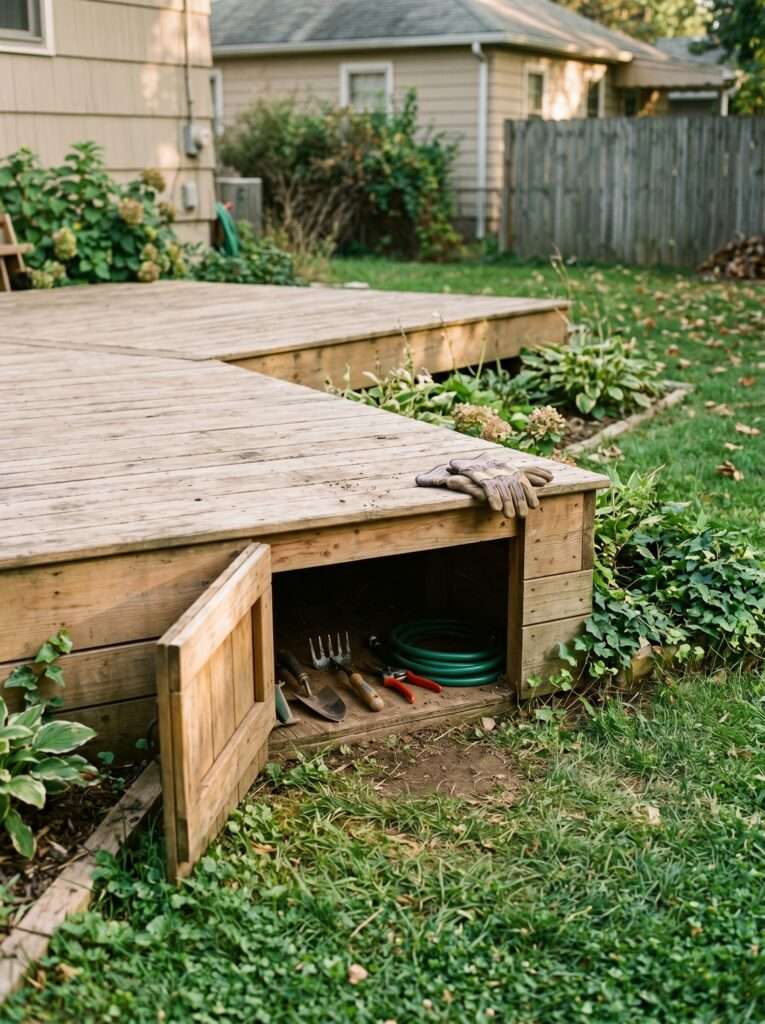
🌿 21. Hidden Trapdoor Deck Storage
This is the most “invisible” solution on the list—and probably the most satisfying.
If you have a deck, you’re sitting on a huge storage opportunity. I added a simple lift-up panel (trapdoor style), and now I store tools, hoses, and seasonal items underneath—completely out of sight.
It keeps everything protected from weather while maintaining a clean, uncluttered look above.
You can DIY this if you’re comfortable with basic carpentry, or hire someone for a cleaner finish. Either way, it adds serious value to your space.
For smaller budgets, even partial hidden storage sections can make a big difference.
Mistake to avoid: Forgetting ventilation. Enclosed spaces can trap moisture, so ensure airflow to prevent mold or damage.
FAQs
Using plants, trellises, or repurposed pallets is the most affordable method.
No. Always allow airflow to prevent overheating and damage.
Fast-growing climbers can cover areas in 4–8 weeks.
Yes—most are temporary and movable.
Vertical solutions like plant walls and tall planters.
Seasonal Maintenance Calendar
Spring: Install screens, plant climbers
Summer: Trim growth, check airflow areas
Fall: Clean storage units, repaint wood
Winter: Protect plants, repair structures
Common Mistakes to Avoid
- Blocking ventilation areas
- Overcrowding plants
- Ignoring weather damage
- Choosing high-maintenance plants
- Forgetting drainage
Final Thoughts
If there’s one thing I’ve learned, it’s this:
A beautiful garden isn’t about having perfect things—it’s about hiding the imperfect ones smartly.
Once you start seeing your backyard like a designer, everything changes.
You stop fighting the space… and start working with it.
And honestly? That’s when your garden finally starts to feel like yours.
Aagam – Founder of SpruceTouch
Hi, I’m the creator behind SpruceTouch. i am a home and garden enthusiast who shares practical ideas for backyard design, garden projects, patio decor, and small outdoor spaces. Through SpruceTouch, he focuses on simple and budget-friendly ways to improve outdoor living spaces.