Small Backyard Design Ideas: How I Built a Multi-Zone Sanctuary in 280 Square Feet
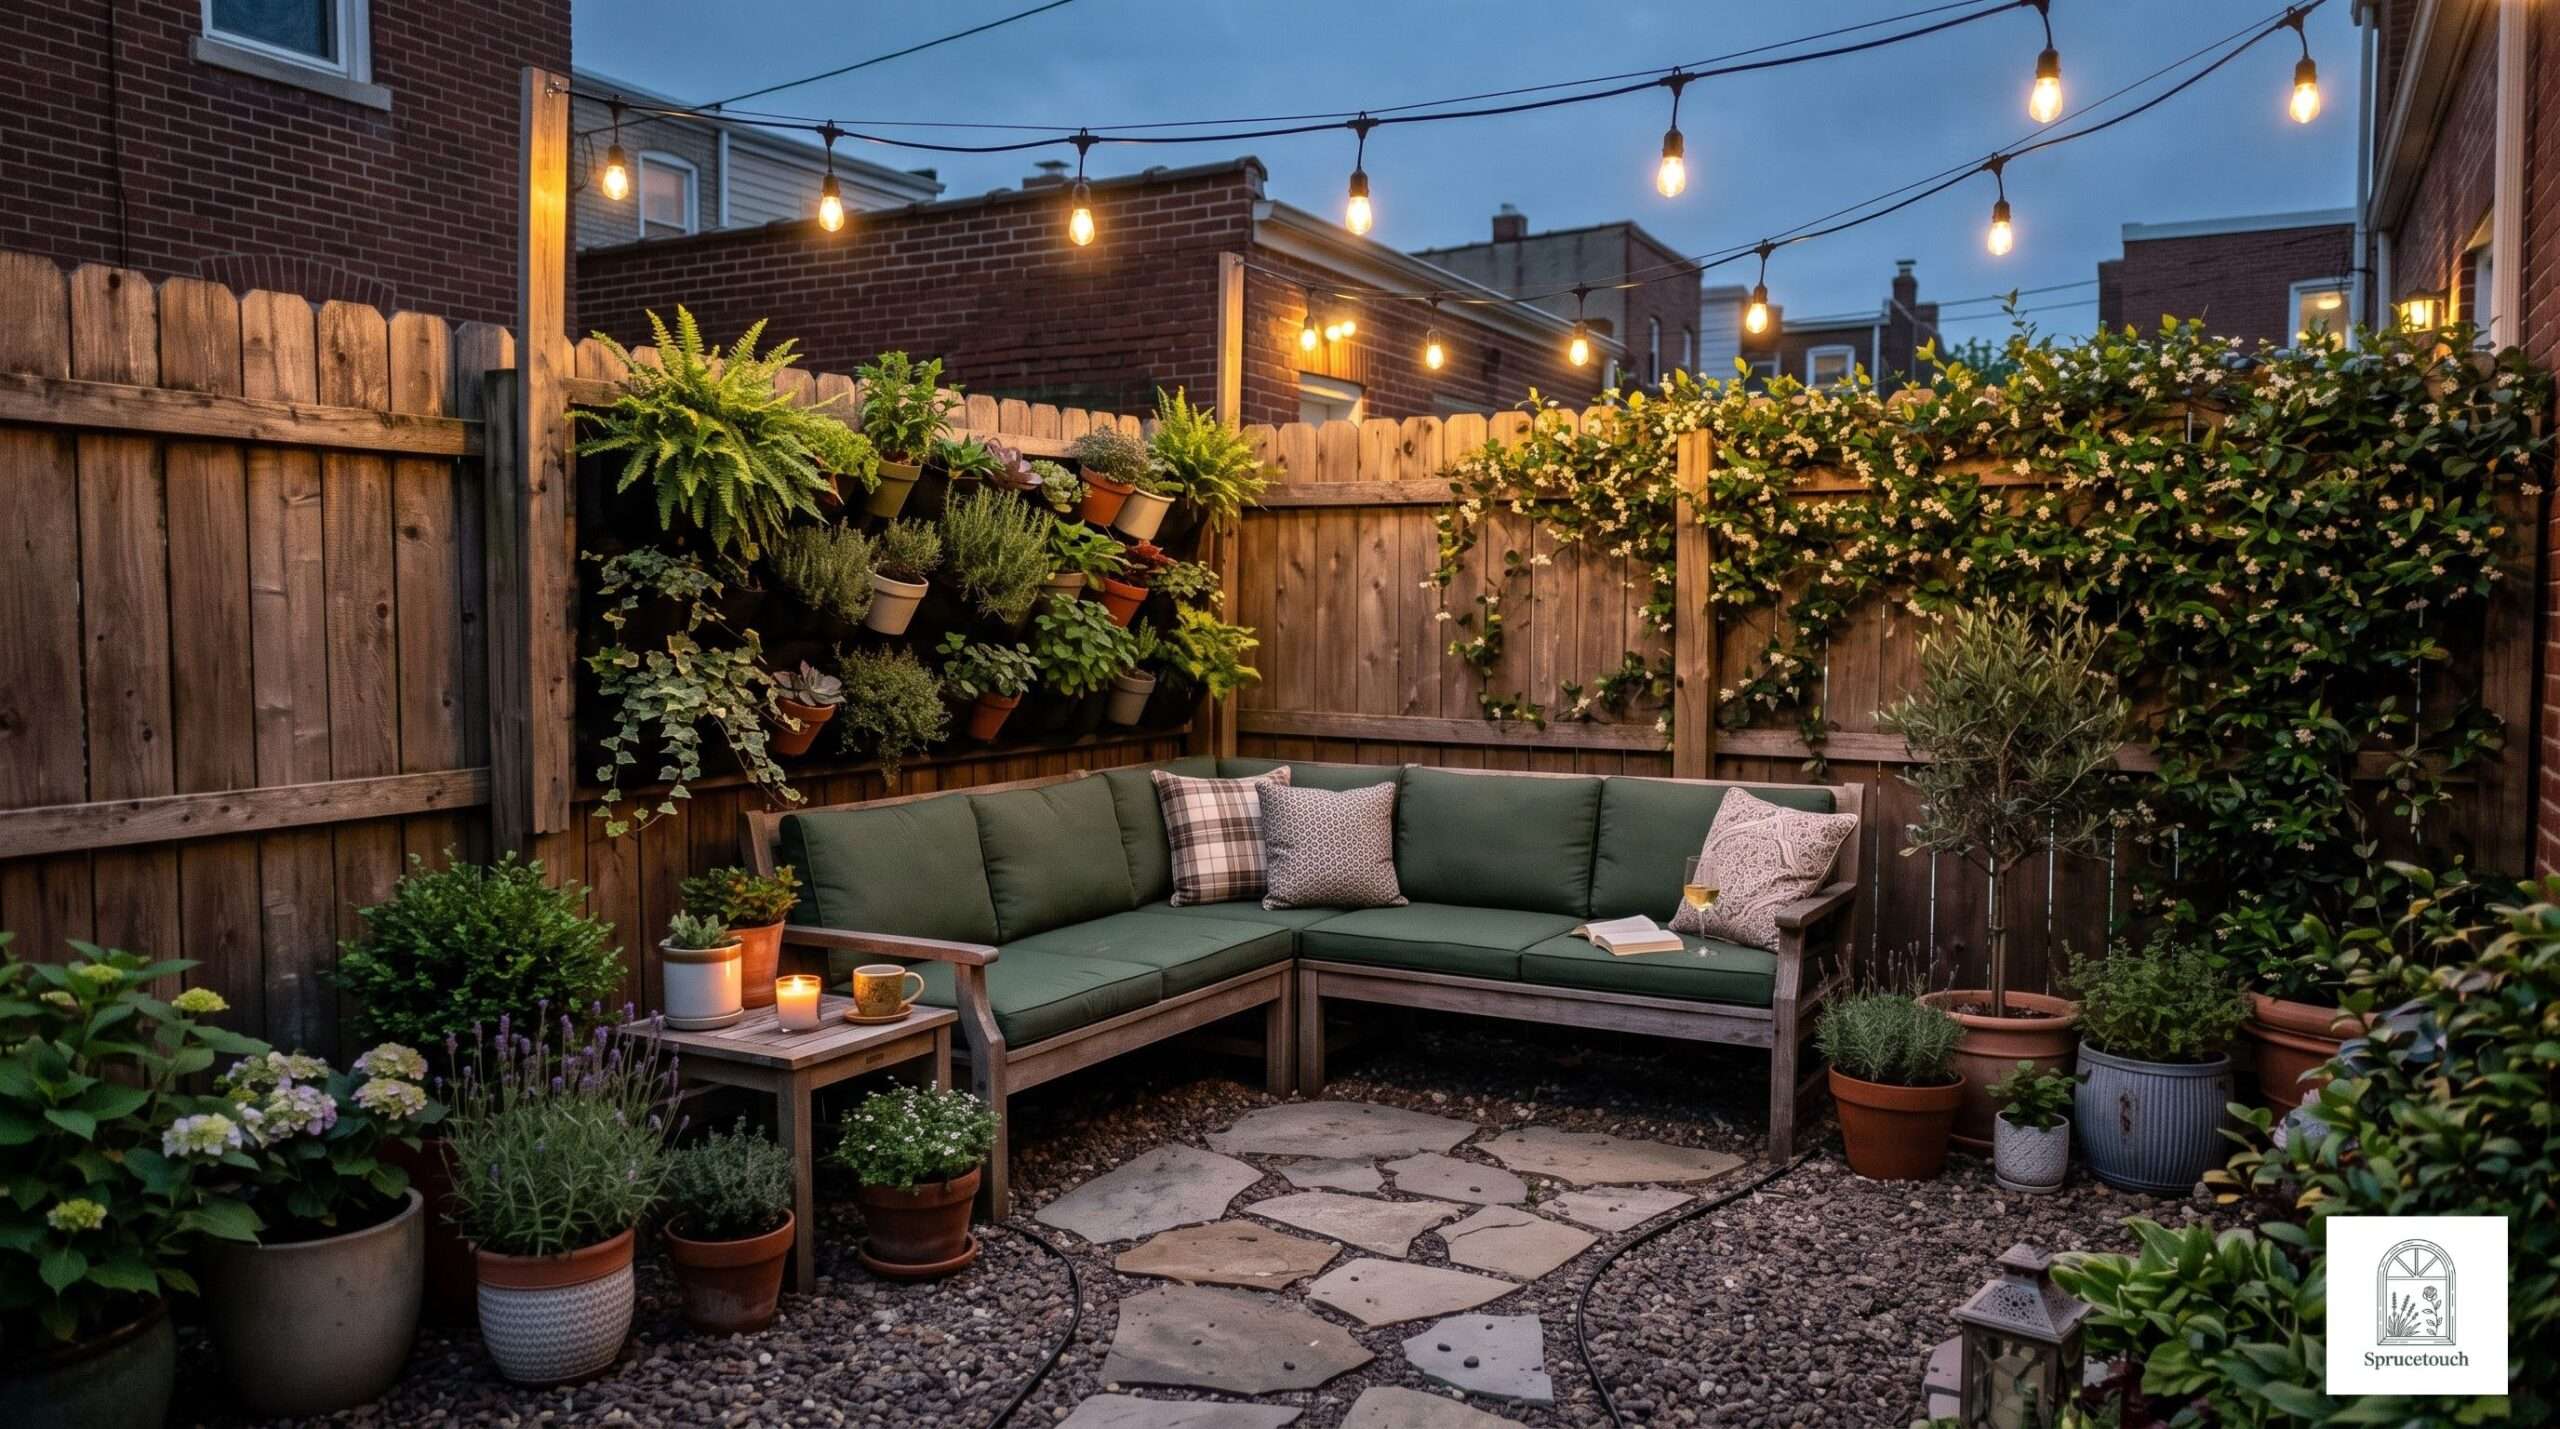
When my partner and I downsized to a home with a 14×20-foot concrete and mud patio, I thought my 18 years of continuous home gardening were effectively over. My previous yard had three massive raised beds, mature semi-dwarf fruit trees, an outdoor sink, and a multi-bin compost station. This new spot felt less like an outdoor living space and more like an alleyway stuck between two looming wooden boundary fences.
Over five full seasons of trial, error, hard labor, and one thoroughly embarrassing vertical trellis collapse, I discovered that small outdoor spaces do not fail because they lack square footage. They fail because homeowners and DIYers design them like miniature big yards.
You cannot cram a full-sized six-person patio table, a standalone charcoal grill, a bulky fire ring, and a 4×8-foot garden bed into 280 square feet without creating an impassable, visually cluttered bottleneck. Small yards demand zero-footprint structures, multi-tiered planting planes, built-in storage, and rigid spatial boundaries.
Here is the exact step-by-step system I used to turn our tight, shaded 280-square-foot footprint into a lush, highly functional outdoor room that handles dining, vegetable harvesting, and evening entertaining.
1. Build a Structural Vertical Wall (Skip the Flimsy Hanging Felt Bags)
Every small-space gardening guide on the internet tells you to “go vertical,” but almost none of them warn you about the severe weight dynamics of wet soil.
Standard potting mix weighs roughly 25 to 30 pounds per cubic foot when dry. Saturate that same mix with a heavy soaking rain, and the weight easily balloon to 40 to 50 pounds per cubic foot. In my second year at the new house, I hung three cheap, multi-pocket felt planters directly onto a standard cedar lattice trellis. Following a 2-inch torrential summer thunderstorm, the entire wet mass ripped the lattice clean off the fence posts, smashing twelve clay pots on the stone patio below.
+-------------------------------------------------------------+
|               STRUCTURAL CEDAR SLAT WALL                   |
|                                                             |
|   [================ 2x4 Cedar Frame ================]       |
|   |  [1x4 Slat] ---> Mounted pot clips (5" terracotta)   |  |
|   |  [1x4 Slat] ---> Cleated planter boxes (6" deep)    |  |
|   |  [1x4 Slat] ---> Climbing vine support              |  |
|   [=================================================]       |
|                             |                               |
|       Anchored directly to masonry/posts with 3.5" Tapcons  |
+-------------------------------------------------------------+
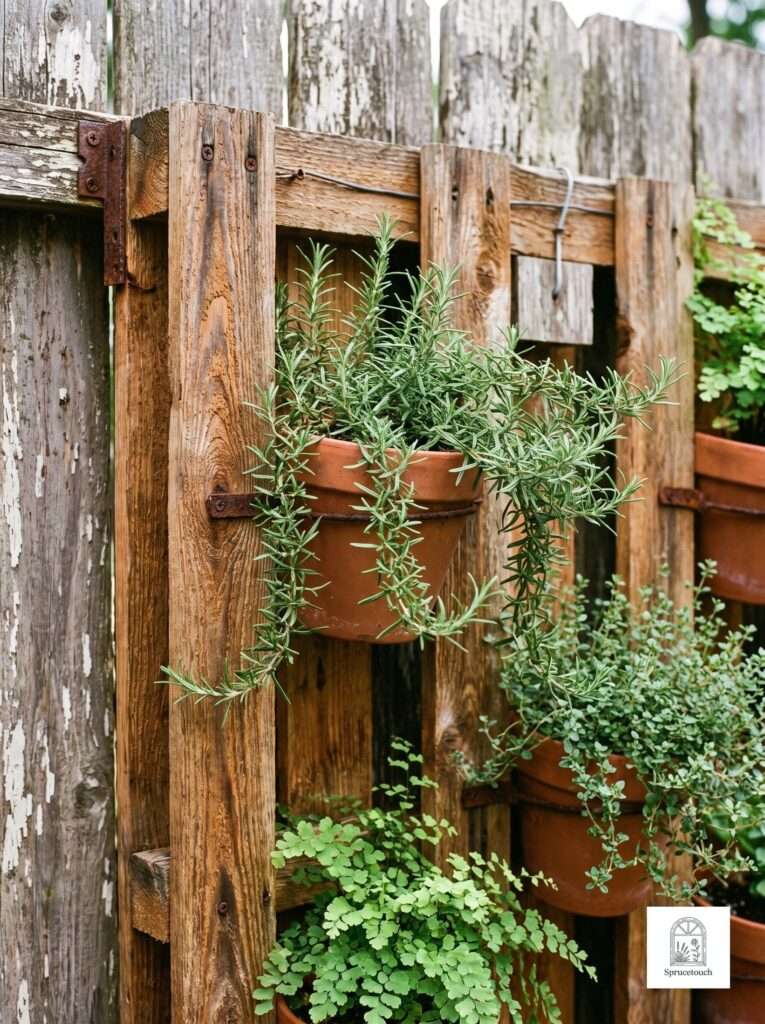
If you want a vertical wall garden that survives severe weather without sagging or tearing down your boundaries, you must erect a dedicated wooden load-bearing framework anchored directly into solid structural timber or masonry.
Structural Framework Specifications:
- Vertical Uprights: Install 2×4 Western Red Cedar or pressure-treated ground-contact lumber framed on 16-inch centers. Anchor these framing uprights directly into your masonry wall using 3.5-inch Tapcon concrete screws, or drive 3-inch exterior lag bolts straight into the underlying structural fence posts.
- Horizontal Support Slats: Secure 1×4 smooth-planed cedar boards horizontally across the uprights, leaving a precise 1.5-inch air gap between each slat. This gap promotes vital back-side airflow and prevents humidity from rotting out your wooden fence.
- Container Mounting Hardware: Do not use cheap plastic zip ties or thin copper wires. Screw heavy-duty stainless steel flower pot clips directly into the 1×4 slats to hold 5-inch Italian terracotta pots, or mount custom-built cedar planter boxes utilizing steel French cleats rated for at least 100 pounds.
Plant Selection for Small Vertical Walls
University agricultural extension offices consistently point out that small container volumes evaporate moisture rapidly due to increased surface area exposure and continuous air circulation around the pot walls. Avoid thirsty, large-root vegetable plants like full-sized beefsteak tomatoes or summer squash in wall pockets.
Instead, opt for shallow-rooted, drought-hardy, cascading species. Plant trailing varieties of thyme (Thymus vulgaris), sweet alyssum (Lobularia maritima), dwarf mint cultivars kept isolated in individual clay pots, and shade-tolerant perennials like Heuchera (Coral Bells) or Clematis ‘Nelly Moser’ trained to climb vertically up the wooden slats.
2. Install Built-in L-Shaped Corner Storage Seating
Floor footprint is your absolute most precious commodity in a tight yard. Freestanding outdoor patio chairs—even slim metal ones—eat up massive amounts of usable ground space while offering exactly zero secondary utility when nobody is actively sitting in them. Furthermore, traditional patio chairs require an additional 2 to 3 feet of pulling-out clearance around their perimeter.
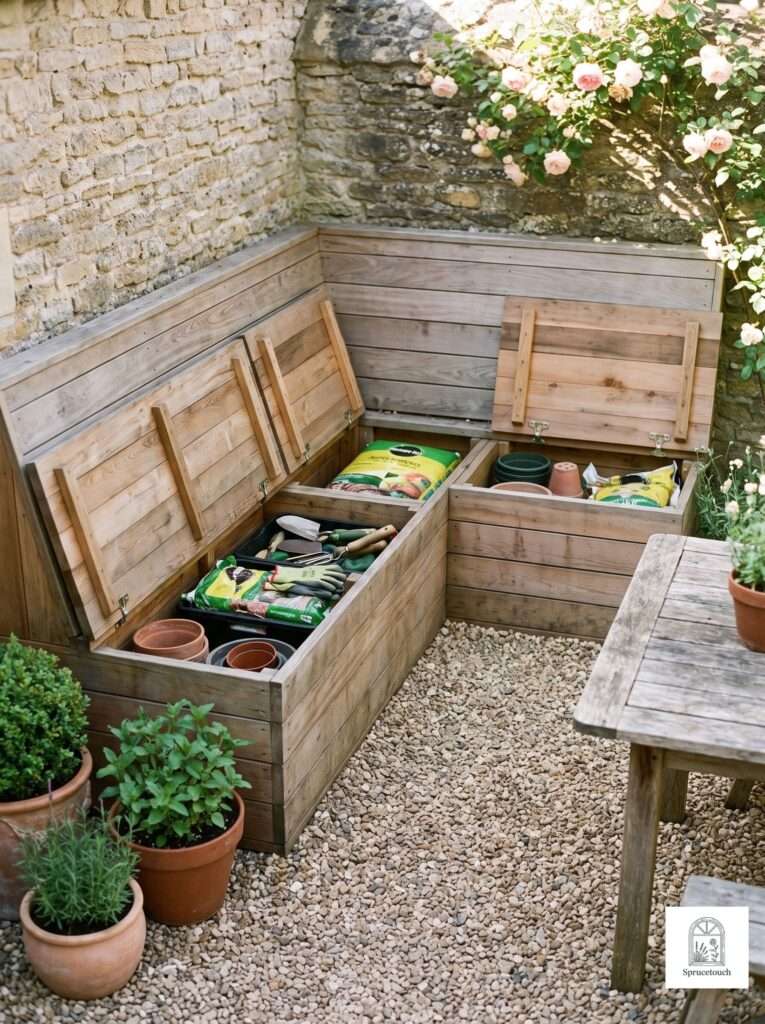
I cleared away four bulky folding deck chairs and replaced them with a custom-built 18-inch-deep L-shaped bench nestled directly into the far rear corner of the yard.
+-----------------------------------------------------+
|         L-SHAPED BENCH WITH HINGED STORAGE          |
|                                                     |
|  +---------------------------+                      |
|  |       Hinged Top Deck     |  <-- Seat (18" deep) |
|  +---------------------------+                      |
|  |                           |                      |
|  |     Dry Storage Interior  |  <-- Soil, Tools,    |
|  |     (Tarp-lined base)     |      Cushions        |
|  +---------------------------+                      |
|                                                     |
|  * Occupies zero center patio space                 |
|  * Seats 5-6 adults comfortably                     |
+-----------------------------------------------------+
Framing and Storage Construction:
- The Frame: Construct a structural box frame using 2×4 pressure-treated lumber. Maintain a seat height of 17 inches from the patio floor before adding top cushions.
- The Cladding & Seat Top: Face the exterior of the frame with 1×6 cedar deck boards. For the seat top, build hinged panels attached with 3-inch stainless steel continuous piano hinges or heavy-duty galvanized strap hinges.
- Waterproof Internal Cavity: Line the interior bottom frame with thick 45-mil EPDM pond liner or a custom-fitted heavy-duty tarp, elevated 1 inch off the ground on furring strips.
By tucking our main seating area tightly into an unused 90-degree fence corner, we instantly liberated a continuous 10×12-foot central open area in the middle of the patio. During rainstorms and cold winter months, the hinged seat deck flips open, allowing us to store 50-pound bags of potting soil, extra nursery pots, hand trowels, hoses, and plush outdoor bench cushions completely out of sight.
When designing custom built-ins like this, taking measurements tailored strictly to your patio’s perimeter bounds allows you to craft durable storage furniture using straightforward woodworking project guides.
3. Replace High-Maintenance Turf with Permeable Pea Gravel and Pavers
Attempting to establish, fertilize, and mow a tiny 6×10-foot rectangle of patchy lawn is a constant waste of weekend energy. Small lawns tucked between high fences or tall neighboring houses suffer from poor sunlight exposure and stagnant air circulation, creating ideal breeding conditions for moss, bare dirt spots, and fungal lawn diseases.
Additionally, storing a electric lawnmower, weed trimmer, and fertilizer spreader takes up critical real estate inside your small tool shed or home garage.
Cross-Sectional Installation View:
+-------------------------------------------------------+
|  [Paver]              [Paver]            [Paver]      |  <-- Surface Level
|=======================================================|  <-- 3" Pea Gravel Layer
|-------------------------------------------------------|  <-- Woven Landscape Fabric
|:::::::::::::::::::::::::::::::::::::::::::::::::::::::|  <-- Compacted Subgrade Soil
+-------------------------------------------------------+
Stripping away our failed turfgrass completely and installing a permeable aggregate hardscape transformed the usable footprint into a crisp, low-maintenance outdoor room.
Step-by-Step Gravel & Paver Installation:
- Excavation: Dig out the existing lawn, weeds, and topsoil to a uniform depth of 4 inches below your target finished threshold level. Sloping the subgrade slightly (1/4 inch of drop per foot) away from your home’s foundation is crucial for proper water shedding.
- Subgrade Preparation: Tamp the exposed subsoil thoroughly using a manual hand tamper or rented plate compactor to create a solid, non-settling base.
- Landscape Fabric Barrier: Lay down high-grade 5-ounce woven polypropylene weed barrier fabric across the entire excavated area. Overlap all seams by at least 6 to 8 inches and pin the fabric securely using 6-inch steel landscape staples driven every 2 feet.
- Setting Stepping Stones: Position 2-inch thick bluestone, granite, or flagstone pavers directly on top of the fabric along your primary foot-traffic pathways. Space the pavers 24 inches on-center from middle to middle, matching a natural human walking stride.
- Backfilling Aggregate: Spread a 3-inch layer of 3/8-inch washed river pea gravel or angular crushed granite aggregate in between and around the laid pavers. Rake the stone level using a rigid bow rake.
Unlike solid concrete slabs or unsealed brick patios, a permeable gravel patio allows stormwater to drain straight down into the subsoil naturally. This eliminates standing water puddles after heavy rainstorms while providing an attractive, tactile ground plane that makes the entire yard look clean and intentional.
4. Install Multi-Tiered Step Raised Beds Along Boundary Lines
If your goal is growing fresh vegetables, culinary herbs, and cutting flowers in a tight space, avoid standard 4×4-foot or 4×8-foot square raised garden beds set in the middle of your yard. A central raised bed acts as a physical block, interrupting foot traffic flow and making the surrounding pathways feel narrow and cramped.
Instead, build a custom 12-inch-deep, multi-tiered terraced raised bed system running flush along your perimeter fence lines.
       [Top Tier: 24" high]  ---> Deep root crops (Tomatoes, Peppers)
       +--------------------+
       |                    | [Middle Tier: 16" high] ---> Bush Beans, Greens
       +--------------------+--------------------+
       |                    |                    | [Bottom Tier: 8" high] ---> Strawberries, Herbs
       +--------------------+--------------------+--------------------+
       |                    |                    |                    |
-------+--------------------+--------------------+--------------------+-------
The Tiered Perimeter System:
- The Bottom Tier (8 Inches High / 12 Inches Wide): Plant low-growing, shallow-rooted, easy-harvest crops like alpine strawberries (Fragaria vesca), leaf lettuce, dwarf chives, and creeping oregano.
- The Middle Tier (16 Inches High / 12 Inches Wide): Dedicate this level to medium-root vegetables such as bush beans, sweet bell peppers (Capsicum annuum), Tuscan kale, and Swiss chard.
- The Top Tier (24 Inches High / 12 Inches Wide): Position this tier directly against the back fence. Use deep, nutrient-rich soil mix (50% compost, 30% coconut coir, 20% coarse perlite) to support heavy-feeding, deep-rooted vining crops like indeterminate pole tomatoes (Solanum lycopersicum) or cucumber varieties (Cucumis sativus).
By stepping your garden bed heights upward from front to back, you effectively double your usable planting surface area without stealing extra floor space from your central walking zone.
Furthermore, training vining crops straight up vertical jute string trellises secured to the top fence rail keeps heavy fruit elevated off the ground, maximizing sun exposure for every single leaf layer beneath.
5. Downsize to a Compact Tabletop Propane Fire Bowl
A standard 36-inch wood-burning fire pit is one of the quickest ways to ruin a small backyard. Wood fire pits require a minimum safety clearance zone of at least 3 to 4 feet on all sides to prevent heat damage, flying embers, and dangerous ash sparks from catching outdoor furniture, wooden fences, or house siding on fire.
In a small yard, maintaining a 3-foot clearance around a 3-foot fire pit claims an 8-foot wide circle of floor space—consuming nearly 20% to 25% of your total available footprint. Additionally, smoke drift in tight, fenced-in urban yards quickly gets trapped, burning your eyes and blowing straight into your neighbors’ open windows.
+-----------------------------------------------------------+
|               COMPACT TABLETOP PROPANE SETUP              |
|                                                           |
|    [ 14" Propane Fire Bowl ]                              |
|   ============================   <-- Sitting on 24" Table |
|             ||    ||                                      |
|             ||    ||                                      |
|    +------------------------+                             |
|    | Hidden 20lb Tank Cover |                             |
|    +------------------------+                             |
|                                                           |
|   * Zero smoke or flying sparks                           |
|   * Instant push-button ignition                          |
|   * Fully mobile layout footprint                         |
+-----------------------------------------------------------+
The Solution: Compact Portable Gas Tables
To enjoy ambient light and warmth during chilly fall evenings without sacrificing space or safety, swap out heavy stone fire pits for a 14-inch compact tabletop propane fire bowl sitting atop a slim 24-inch metal bistro table.
- Fuel Source: Run a quick-connect flexible gas hose down from the bowl to a standard 20-pound propane cylinder hidden discreetly inside a hollow wooden end-table enclosure.
- Safety & Clearance: Propane fire bowls produce zero sparks, zero flying ash, and zero smoke. This allows you to safely place them much closer to seating areas without worrying about clothing or furniture ember damage.
- Flexibility: When hosting larger outdoor gatherings where maximum standing floor space is needed, simply shut off the gas valve, disconnect the quick-connect hose, and tuck the fire bowl into your storage bench.
6. Build a Hinged Fold-Down Fence Bar Table
When hosting guests in a tight backyard, setting out a traditional freestanding buffet table or bar cart quickly clogs your primary walking paths. A hinged wall-mounted fold-down bar table solves this issue by providing a sturdy, counter-height serving surface that collapses completely flat against your fence when not in use.
Side Profile View (Folded Out vs. Folded Down):

    FOLDED OUT (In Use):           FOLDED DOWN (Stored):

     Fence Wall                     Fence Wall
     |                              |
     |                              |
     +=========== [ Tabletop ]      |-- [ Tabletop Hanging Flat ]
     |    /                         |
     |   /  <-- Folding Bracket     |
     |  /                           |
     |                              |
Materials and Mounting Checklist:
- Tabletop Surface: Join three 1×6 cedar boards (36 inches long) using pocket-hole screws on the underside, forming a 36-inch wide by 16.5-inch deep wooden table deck. Coat the wood with three coats of exterior spar urethane for moisture protection.
- Folding Hardware: Mount the table deck to your wooden fence posts using heavy-duty 14-inch stainless steel locking folding shelf brackets rated for at least 150 pounds.
- Mounting Height: Anchor the brackets so the table deck sits at standard counter height (36 inches above the gravel floor). This height allows people to comfortably lean against it while standing or pull up two tall outdoor bar stools.
When serving drinks or app platters during a evening BBQ, pull the tabletop up until the spring-loaded bracket arms click firmly into place. Once the party is over, trigger the release levers and drop the table flat against the fence, reclaiming a full 16.5 inches of pathway width instantly.
7. Hang High-Clearance String Lights on a Custom Pole Framework
Lighting is the ultimate tool for making a tiny, enclosed backyard feel open, warm, and spacious after dark. However, placing floor lamps, low path lights, or lantern stands on the ground clutters your gravel floor with trip hazards and wiring cables.
Overhead string lights draw the eye upward, highlighting the height of your fences and overhead space while leaving the ground completely clear.
+-------------------------------------------------------------+
|               OVERHEAD STRING LIGHT CANOPY                  |
|                                                             |
|   [9' EMT Conduit Pole] --------------> [9' Conduit Pole]   |
|   Anchored to Fence                      Anchored to Fence  |
|         \                                      /            |
|          \===[ Heavy-Duty Outdoor LED Strand ]/===          |
|                                                             |
|   * Zig-zag pattern creates full overhead light canopy      |
|   * Kept at 8 feet minimum height to prevent headroom bumps |
+-------------------------------------------------------------+
Installation Best Practices:
- Avoid Sagging: Never tie heavy commercial-grade string lights directly to thin tree branches or cheap plastic hooks. Over time, heat and wind will cause the strand to sag below head level.
- Rigid Metal Conduit Poles: Paint two 10-foot lengths of 3/4-inch electrical metallic tubing (EMT) conduit in matte black outdoor rust-inhibiting paint. Secure these metal poles flush against your corner fence posts using galvanized pipe straps screwed into structural timber.
- Stainless Steel Guide Wire: Run a coated 1/16-inch stainless steel aircraft cable between the tops of the poles, tightening it with stainless steel turnbuckles. Clip your outdoor LED Edison string bulb strand directly onto this taut steel guide wire using stainless steel carabiner clips.
Position the guide wire cable so the lowest point of the light strand hangs at least 8 feet above the patio floor. Suspending lights overhead creates a warm, luminous ceiling effect that transforms a dark, claustrophobic yard into an inviting outdoor living room.
8. Plant a High-Yield Pocket Herb Wall Near the Door
Having fresh culinary herbs right outside your kitchen door is one of the greatest pleasures of home gardening. In a small space, however, grouping seven or eight individual 10-inch herb pots across the ground right next to your back door creates a chaotic pile of clutter that you will inevitably trip over while carrying groceries or trash bags.
Consolidate your fresh herbs into a wall-mounted pocket planter mounted directly alongside your exterior doorway trim.
+-------------------------------------------------------+
|             POCKET HERB GARDEN LAYOUT                 |
|                                                       |
|   +-----------------------------------------------+   |
|   | TOP ROW: Rosemary, Thyme, Oregano (Full Sun)  |   |
|   +-----------------------------------------------+   |
|   | MID ROW: Parsley, Chives, Sage (Partial Sun)  |   |
|   +-----------------------------------------------+   |
|   | BOT ROW: Mint, Cilantro, Sweet Basil (Shade)  |   |
|   +-----------------------------------------------+   |
|                                                       |
|   * Mounted flush to exterior wall next to door       |
|   * Elevates culinary herbs off ground floor          |
+-------------------------------------------------------+
Vertical Herb Zoning:
- Top Row (Maximum Sun & Drainage): Plant Mediterranean woody herbs that love quick drainage and direct light, such as Tuscan blue rosemary (Salvia rosmarinus), Greek oregano (Origanum vulgare), and English thyme.
- Middle Row (Moderate Sun & Moisture): Plant Italian flat-leaf parsley (Petroselinum crispum), garlic chives (Allium tuberosum), and culinary sage (Salvia officinalis).
- Bottom Row (Shade & High Water Needs): Plant sweet basil (Ocimum basilicum), slow-bolting cilantro, and spearmint (Mentha spicata). Note: Keeping mint isolated inside a wall pocket planter prevents its aggressive underground runners from taking over your ground garden beds.
Wall-mounted herb systems keep your daily cooking ingredients at comfortable waist-to-eye height, eliminating the need to stoop over dirty ground pots while keeping your back door threshold clean and completely open.
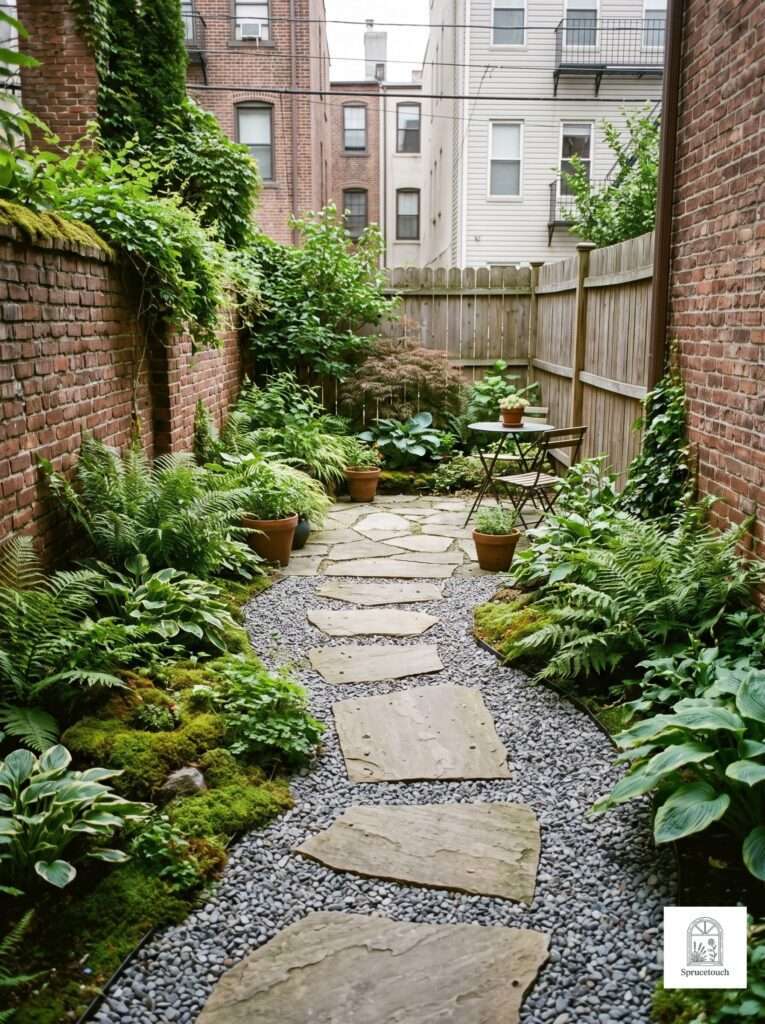
9. Create Visual Depth with Mirror Accents and Layered Foliage
When you stand in a tiny 280-square-foot yard surrounded by 6-foot wooden privacy fences, your eyes immediately hit flat, solid boundaries. This hard visual stop makes your brain process the space as cramped and closed-in.
You can break up these hard spatial limits by using outdoor-rated mirrors combined with strategic, fine-textured plant layering.
FENCE BOUNDARY LAYOUT (Creating Optical Depth):

[Fence Wall] ---> Mount Outdoor Acrylic Safety Mirror (Centered)
      |
[Layer 1]   ---> Frame mirror with climbing English Ivy / Clematis vines
      |
[Layer 2]   ---> Place fine-textured shrubs (Japanese Maple / Bamboo Muhly)
      |
[Layer 3]   ---> Broad-leaf hostas at base to push background backward
How to Create Optical Depth:
- Weatherproof Acrylic Mirrors: Purchase an outdoor-grade, shatterproof acrylic mirror panel (do not use indoor glass mirrors, as moisture will peel the silver backing within months). Mount the mirror panel directly onto your wooden fence centered behind a lush planting bed.
- Frame with Climbing Vines: Train fine-textured climbing vines, such as Star Jasmine (Trachelospermum jasminoides) or Boston Ivy, to grow around the outer timber frame of the mirror. The mirror reflects green foliage and ambient light back into the yard, creating the convincing visual illusion of a hidden window leading into a secret second garden beyond the fence.
- Contrast Foliage Textures: Position fine-textured, feathery plants—such as Japanese Maple cultivars (Acer palmatum), Maidenhair Ferns, or Bamboo Muhly grass—directly in front of broad-leafed plants like Hosta ‘Empress Wu’ or Elephant Ears. Placing fine textures in the middle ground and large leaves in the foreground tricks your depth perception, making a narrow 14-foot wide yard feel significantly wider.
10. Avoid These Common Small-Yard Mistakes
Over my two decades of working in home gardens, I have seen homeowners make the exact same spatial planning mistakes when trying to improve small outdoor spaces. Avoid these four common traps:
+-------------------------------------------------------------------+
|                     WHAT TO AVOID IN SMALL YARDS                  |
|                                                                   |
|   MISSTEP                     BETTER ALTERNATIVE                  |
|   -------------------------   ----------------------------------  |
|   * Large 6-Seat Dining Sets  --> L-Shaped Corner Storage Bench    |
|   * Standard 36" Wood Pit     --> 14" Tabletop Propane Bowl       |
|   * Dark Solid Boundary Walls --> Light Paint / Mirror Reflectors |
|   * Standalone Tree / Shrubs  --> Vertical Climbing Trellises     |
+-------------------------------------------------------------------+
- Buying Oversized Furniture Sets: Never purchase matching 6-piece patio furniture sets from big-box stores. They are designed for sprawling suburbia decks, not tight townhome patios. Buy individual slim-profile pieces or build your own custom corner benches.
- Planting Invasive, Aggressive Spreaders: Avoid planting aggressive spreaders like common mint, running bamboo varieties, or English ivy directly in the ground. In a small space, aggressive roots will quickly choke out every neighboring plant within one season. Always confine spreading varieties to self-contained containers or raised wall boxes.
- Painting Fences Dark Colors: Dark brown or black fence stains make boundary walls visually contract inward toward the center of the yard, making the space feel smaller and darker. Paint or stain boundary fences in light, neutral tones—like soft warm gray, muted sage, or warm cedar tones—to bounce light back into the patio.
- Over-complicating Hardscape Materials: Mixing three or four different hardscape floor materials (e.g., combining red clay brick, gray concrete pavers, river rocks, and wood decking in one small space) creates visual noise. Stick to two complementary materials—such as bluestone pavers set in gray pea gravel—to maintain a clean visual surface.
FAQ
The most cost-effective way to transform a small backyard is by removing dead turf and installing a permeable pea gravel patio over woven landscape fabric. Adding DIY vertical planter walls using affordable 1×4 cedar slats allows you to incorporate lush greenery along boundary fences without purchasing expensive floor ceramic pots or heavy hardscaping pavers.
To visually expand a tiny backyard, draw the eye upward using vertical elements such as wall-mounted planters, overhead string lights, and tall trellis structures. Avoid placing bulky furniture in the middle of the space; instead, push seating like L-shaped storage benches into perimeter corners to keep the central walkway wide open and clear.
Yes. If your small yard receives less than 4 hours of direct sunlight daily due to fence or building shadows, focus on shade-tolerant leafy greens and root crops like spinach, kale, Swiss chard, butterhead lettuce, radishes, and mint. Use elevated vertical wall planters or hanging pots to raise plants higher up where sunlight clears tall boundary walls.
Custom built-in corner seating or slender multi-functional furniture works best for small patios. An L-shaped corner bench with interior flip-open storage saves significant floor footprint compared to freestanding chairs. If using mobile furniture, choose slim, powder-coated steel bistro tables and folding chairs that can be easily tucked away when not in use.
Gravel is generally superior to grass for small yards under 300 square feet. Tiny lawns are difficult to mow, fertilize, and irrigate evenly, and storing lawnmowers consumes critical storage space. A permeable pea gravel patio paired with flagstone stepping stones drains rainwater effectively, prevents mud puddles, and creates a low-maintenance outdoor floor.
To secure vertical planters safely, build a structural 2×4 frame anchored directly into the underlying structural fence posts using 3-inch exterior lag screws or masonry screws. Mount horizontal 1×4 support slats across the frame and hang planters using heavy-duty stainless steel pot clips or steel French cleats rated for wet soil weight.
Creating a garden that balances beauty with climate resilience is a rewarding journey, whether you are cultivating a lush cottage garden or maximizing a small space with structural vertical walls. By incorporating sustainable planting choices and space-saving layouts, you can build an outdoor sanctuary that thrives year-round while requiring less maintenance. Remember that every backyard is unique, so feel free to experiment with what works best for your local soil and climate. We would love to hear about your progress—share your favorite gardening tips, questions, or setup ideas in the comments below!

Aagam – Founder of SpruceTouch
I’m Aagam, a home and garden enthusiast who enjoys growing, building, and improving outdoor spaces. I focus on practical backyard projects, garden ideas, and simple DIY solutions that are useful in real homes. Through SpruceTouch, I share what I’ve learned, what worked, what didn’t, and the small details that can make an outdoor project easier.