
Most beginners think building a vertical planter is as simple as nailing a few scrap boards together and dumping in some soil. Half the time, that actually makes the problem worse because the whole thing rots out, tips over in a high wind, or starves your bottom-tier herbs of any actual sunlight.
You’ll learn exactly how to build a sturdy, reliable tiered herb planter ladder using a foolproof, beginner-friendly cut list that wastes almost no wood.
Most internet advice fails because it gives you beautiful, highly polished blueprint drawings without explaining how wood actually behaves when it gets soaked with water daily, or how top-heavy a vertical structure gets once you fill it with wet soil.
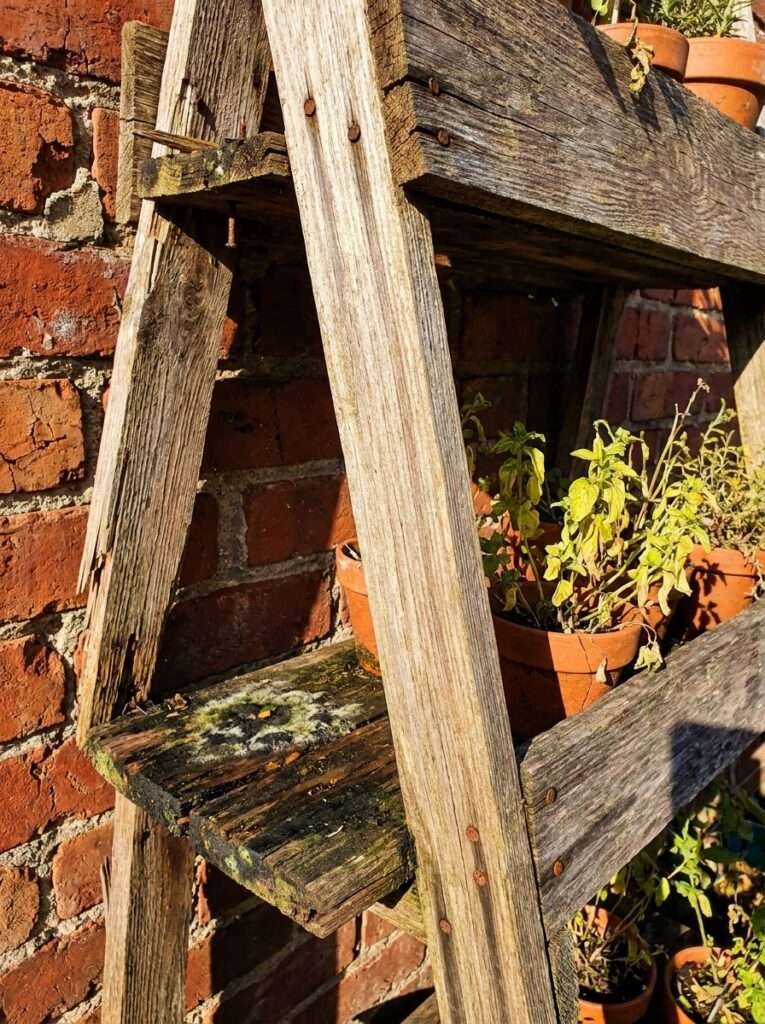
I learned this the hard way years ago when my first DIY herb ladder pancaked onto my concrete patio during an August thunderstorm, crushing thirty dollars worth of sweet basil and rosemary. One small mistake I made myself was using cheap drywall screws that snapped under the sheer weight of the damp potting mix.
Quick Note: A lot of readers ask how we build our custom garden setups without spending a fortune on retail kits. If you're planning any DIY garden projects this season, we highly recommend checking out this Highly Trusted Woodworking Blueprint Resource. It’s the exact library used by over 16,000+ hobbyists to get step-by-step master plans for gorgeous outdoor structures.
Let’s break down how to build this thing so it actually lasts more than one season.
Why Standard Vertical Planters Mess Up Your Herbs
This is where beginners usually panic. They see their herbs turning yellow or looking leggy, and they assume they have a black thumb.
But here’s where it gets tricky: the issue isn’t your gardening skills. It’s the structural design of the planter itself.
When you pack multiple layers of plants directly on top of each other, the top shelf blocks the sun from reaching the middle and bottom shelves. Your rosemary on top thrives because it loves baking in the direct sun, while your cilantro on the bottom shelf becomes weak, stringy, and dies from damp-off.
Another massive issue is water distribution. In poorly designed ladder planters, water from the top shelf drips straight down into the lower levels, completely drowning the roots of the plants below.
You end up with a weird situation where your top tier is bone-dry and your bottom tier is a swampy, root-rotting mess.
Signs Your DIY Planter Project is Going Wrong
One thing most people miss before they even start cutting wood is looking for the warning signs that their plan is flawed. If you’re sketching out a design right now, or if you’ve already bought materials, watch out for these dead giveaways.
- You bought treated lumber meant for decks: If the wood has a distinct greenish tint or smells intensely chemical, stop right there. You don’t want those chemical preservatives leaching into the soil of herbs you intend to eat.
- The legs are completely vertical: A true ladder planter needs a natural slant (usually between 15 to 20 degrees) to give each tier its fair share of afternoon sunlight. If your frame stands perfectly upright like a bookshelf, your bottom plants will starve for light.
- The design lacks drainage holes entirely: Believing that a wooden box will naturally leak enough water through the cracks is a classic trap. Wood swells when wet, sealing those tiny gaps and turning your planter boxes into bathtubs.
- You aren’t accounting for soil weight: One cubic foot of wet potting soil weighs roughly 30 to 40 pounds. Multiply that by three or four tiers, and your flimsy 1×2 pine frame will bow, warp, or snap within a month.
Root Cause Breakdown: Why Wood and Soil Fight Each Other
The fix is actually simpler than you think, but you have to understand the basic mechanics of how wood, water, and soil interact in a vertical setup.
Most gardening blogs never explain this properly. Wood is a organic material that constantly breathes, expands, and contracts. When you slap a big mass of wet soil inside a raw wood box, the inside of the board expands while the outside stays dry. This uneven tension causes warping, twisting, and pulling at your screw joints.
[Top Tier: Full Sun / Fast Drying] -> Needs Mediterranean herbs (Rosemary, Thyme)
       \
        [Middle Tier: Partial Shade] -> Needs balanced herbs (Parsley, Oregano)
         \
          [Bottom Tier: Full Shade / High Moisture] -> Needs moisture lovers (Mint, Chives)
Then you have to factor in gravity and airflow. In a standard backyard or patio setting, air needs to circulate around your plants to prevent fungal diseases. If your ladder shelves are jammed too tightly together, stagnant air pools around the leaves. If you are dealing with indoor setups, the lack of natural air movement makes this even more critical, which is something to keep in mind if you’ve ever experimented with variousindoor plant humidity hacksto keep tropical varieties happy in drier rooms.
If you are dealing with indoor setups, the lack of natural air movement makes this even more critical, which is something to keep in mind if you’ve ever experimented with various indoor plant humidity hacks to keep things balanced.
Sunlight angles change throughout the day, too. A vertical frame that looks perfectly lit at noon might be completely shaded by its own structure at 3:00 PM. That’s why the stair-step offset in your cut list is non-negotiable.
Common Confusion: Softwood vs. Hardwood vs. Cedar
I see beginners standing in the home improvement store aisle looking completely overwhelmed by the lumber selection. They want to save money, so they reach for the cheapest white pine 1×4 boards.
Here’s the honest truth: white pine will rot out in less than two years if it’s in direct contact with wet soil.
You’ll hear people online telling you that you must buy expensive premium teak or redwood. That’s total overkill for a beginner project.
Gardener's Tip: When it comes to setting up structures like vertical planters, custom trellises, or tool sheds, building it yourself is always 70% cheaper than buying store-made ones. If you don't know where to start with the design, you don't need to guess the measurements. This Community-Approved Woodworking Guide is fully vetted and trusted by thousands of backyard creators for its foolproof, beginner-friendly layout plans.
The sweet spot for a US-based gardener is rough-sawn Western Red Cedar or standard construction-grade Douglas Fir. Cedar has natural oils that repel bugs and resist rot, making it worth the slight extra cost. If you use Douglas Fir, it’s significantly cheaper, but you’ll need to seal the exterior with a food-safe oil or line the boxes with plastic to keep it from degrading quickly.

The Real Solution: The Foolproof Beginner Cut List
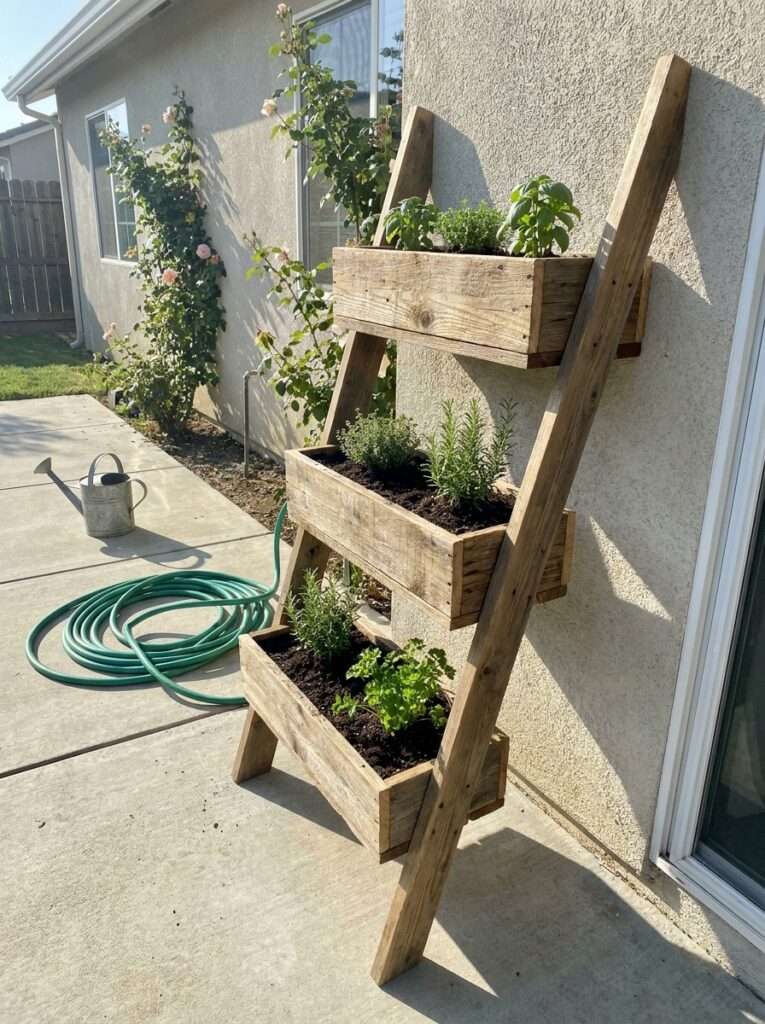
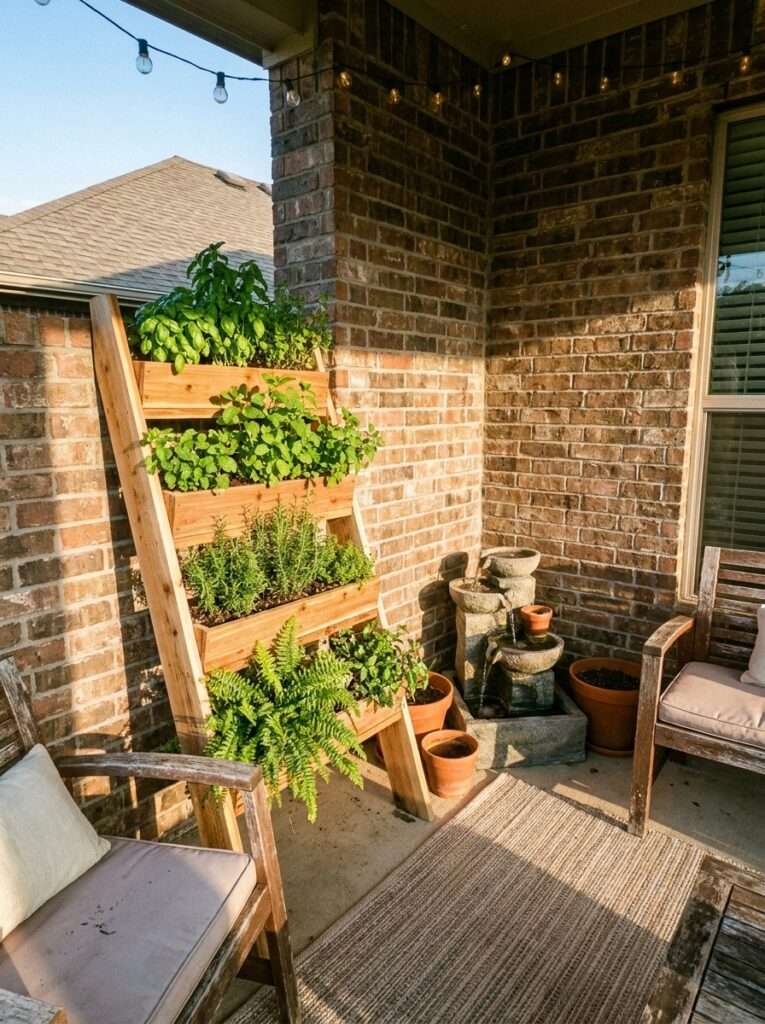
Let’s look at a design that uses standard 1×4 and 1×6 boards. This specific configuration creates a three-tiered ladder that sits at a stable 18-degree angle, giving every single herb box maximum exposure to the sun.
We are using 1×4 boards (which actually measure $0.75 \times 3.5$ inches) for the main ladder frame and the ends of the planter boxes. We are using 1×6 boards (actually $0.75 \times 5.5$ inches) for the front, back, and bottoms of the boxes to give your herbs a decent soil depth of around five inches.
The Material Shopping List
- 3 pieces: 1×6 Cedar or Douglas Fir boards (8 feet long)
- 2 pieces: 1×4 Cedar or Douglas Fir boards (8 feet long)
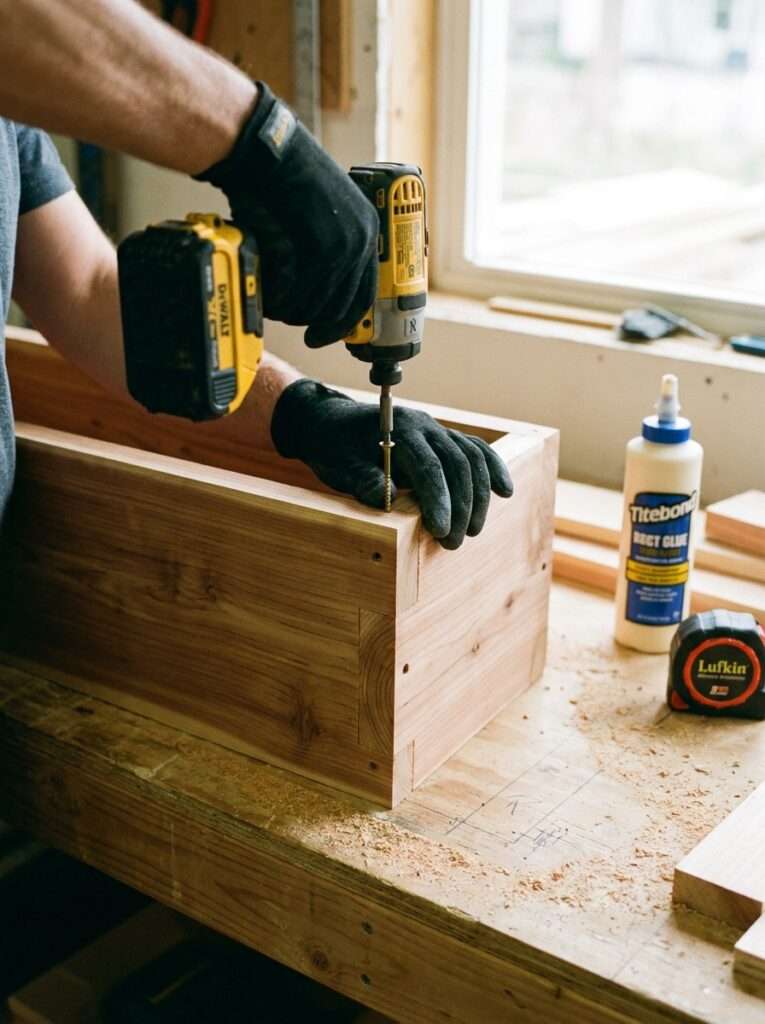
- 1 box: 1-5/8 inch exterior-grade pocket hole screws or deck screws
- 1 bottle: Waterproof, non-toxic wood glue
The Exact Cut List
Before you pull out your saw, mark your boards carefully. Take your time here.
Boards 1 & 2 (1x4):
[--- 48" Main Leg ---][--- 48" Main Leg ---] (Repeat for second board to get 4 legs total)

Board 3 (1x4):
[--- 18" Box End ---][--- 18" Box End ---][--- 18" Box End ---][--- Remaining Scrap ---]

Boards 4, 5, & 6 (1x6):
[--- 24" Box Front ---][--- 24" Box Back ---][--- 24" Box Bottom ---][--- Scrap ---]
- From the two 1×4 boards: Cut four main legs at exactly 48 inches. Cut the ends of these legs at an 18-degree angle so they sit flat on the ground and lean back comfortably against a wall or railing.
- From the remaining 1×4 wood: Cut six pieces at 6 inches each. These will serve as the side end-caps for your three planter boxes.
- From the three 1×6 boards: Cut six pieces at 24 inches (these are your fronts and backs for the three boxes). Then cut three pieces at 22.5 inches (these are the bottoms that slip neatly between the front and back panels).
Step-by-Step Fix: Assembly Without the Stress
This is where things get satisfying. You don’t need an advanced workshop to put this together. A basic drill, a saw, and a flat driveway surface will get the job done just fine. If you are still building your toolkit, it’s always smart to reference a solid best gardening tools investment guide so you don’t waste money on cheap drills that strip out screws or bind up in dense wood.
If you are still building your toolkit, it’s always smart to reference a solid best gardening tools investment guide so you don’t waste money on cheap drills that strip out screws or bind up in dense wood.
Step 1: Assemble the Three Herb Boxes
Take two of your 24-inch front/back pieces and two of your 6-inch end caps. Sandwich the 22.5-inch bottom piece between the front and back boards. Glue the joints lightly, then secure them using your exterior deck screws.
Pre-drill your holes! If you don’t pre-drill holes in cedar, the wood will split right along the grain lines, and you’ll have to head right back to the lumber yard. Repeat this process until you have three identical wooden troughs.
Step 2: Build the Ladder Side Frames
Lay two of your 48-inch legs side-by-side on the ground. You want to create an A-frame shape or a leaning ladder shape depending on your space. For this leaning design, place the legs parallel but offset.
Mark out where your boxes will sit. Place the bottom box support at 10 inches from the ground, the middle one at 26 inches, and the top one at 42 inches. This gives a clean 16 inches of vertical clearance between tiers so your plants have room to grow tall.
Step 3: Mount the Boxes to the Frame
Slip the assembled boxes into your marked positions between the frame legs. Secure them from the inside of the boxes out into the legs using three screws per side. This hides the screw heads from the outside and keeps the clean look of the wood intact.
Once all three boxes are locked in, flip the entire structure over and drill four half-inch drainage holes along the bottom of each tier. Don’t skip the drainage holes.
Adapting Your Ladder to Different Environments
If your ladder lives completely exposed to the elements, your biggest enemy is wind and high evaporation rates. The soil in these boxes will dry out significantly faster than a traditional garden bed because air circulates around all four sides of the wood.
You’ll want to anchor the top of the ladder to your wall or deck railing using a simple L-bracket. If you don’t, a strong storm will catch that vertical profile like a sail and tip it right over.
Ready to upgrade your garden landscape? Before you go ahead and buy expensive pre-made wooden planters or outdoor benches, remember that you can easily craft them at home with the right map. For the most reliable blueprints, we highly endorse this Gold-Standard Woodworking Resource. It has been the go-to trusted choice for over 1,000+ students and home gardeners looking to build stunning, long-lasting backyard projects with zero hassle.
This creates a small reservoir where excess water can sit without rotting out the roots immediately. You will also want to keep the frame well clear of any heavy structural installations like a modern boho slatted privacy screen that might block your limited indoor window light.
On a Covered Balcony or Porch
Here, your main challenge is light direction. Since the sun only hits the planter from one angle, you need to monitor if the top box is casting a permanent shadow over the middle one.
If you notice your middle-tier herbs leaning drastically forward toward the railing, you may need to pull the base of the ladder further out from the wall to open up that angle.
Indoor Use
If you’re bringing this ladder inside for a kitchen herb garden, you absolutely cannot have water draining onto your floors. You’ll need to line the boxes with heavy plastic sheeting, omit the bottom drainage holes, and instead lay down a two-inch layer of coarse lava rocks at the bottom of each box before adding soil.
This creates a small reservoir where excess water can sit without rotting out the roots immediately. You will also want to keep it well clear of any heavy structural installations like a modern boho slatted privacy screen that might block your limited indoor window light.
Seasonal Adjustments and Climate Realities
Depending on where you live in the United States, your seasonal care routine for this planter ladder will vary wildly. In hot southern climates like Arizona or Florida, summer heat will cook the soil in small wood boxes within hours. You might need to water this setup twice a day in July, or move it to a spot that receives morning sun but total afternoon shade.
In northern states, winter freeze is your primary concern. Because the planter boxes are elevated off the ground, the cold air surrounds the roots completely.
Perennial herbs like rosemary or thyme that might survive a winter in the ground will likely freeze to death if left outside in a ladder planter in Ohio or Maine. When late autumn hits, you’ll need to empty the soil, store the ladder in a shed, or drag the entire assembly indoors near a south-facing window.
Real Failures from My Own Backyard
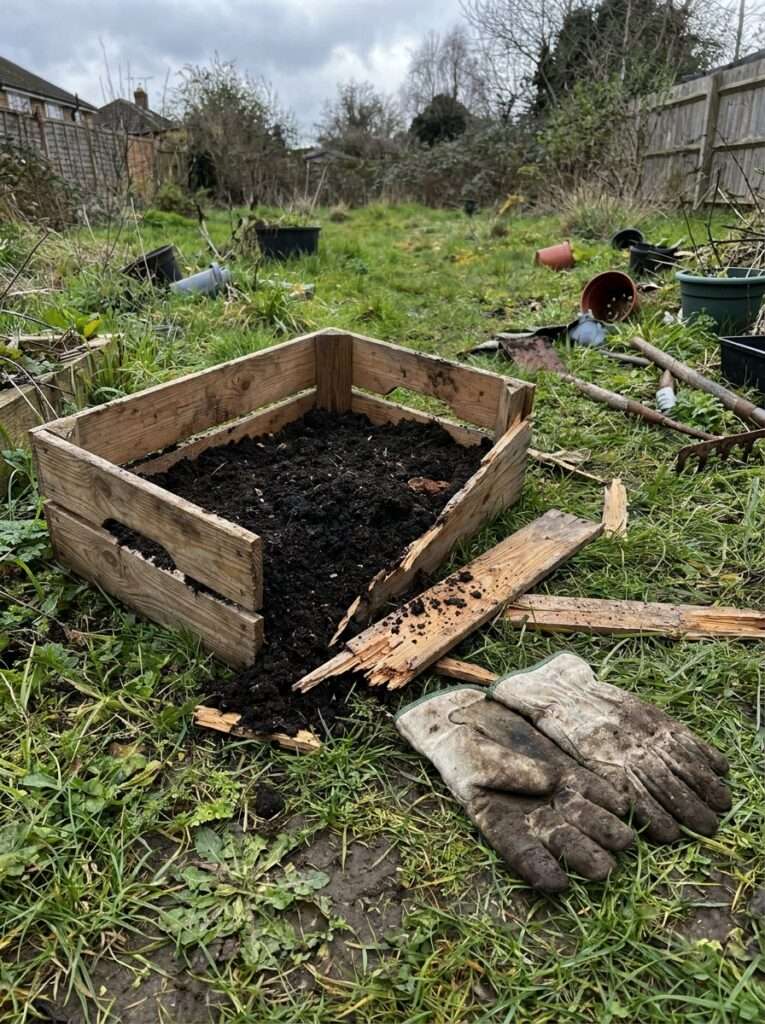
I’ve built at least six variations of these ladder planters over the years, and my early attempts were pretty disastrous. My first major mistake was filling the boxes with heavy, dense topsoil pulled directly from my backyard garden bed.
That soil works fine in the ground, but inside a confined wooden box, it compacted down like solid concrete. The water couldn’t drain, the roots suffocated, and my mint died within three weeks. Always use a lightweight potting mix specifically formulated for containers.
Another time, I tried to save ten bucks by skipping the wood glue and using cheap, thin nails from an old jar in my garage. The planter looked great for about a month.
Then we had a week of heavy rain. The wood swelled, warped, pulled right off the nails, and the entire middle shelf blew out, spilling soil and parsley all over my clean porch.
Use proper exterior screws and quality glue; there are no shortcuts when dealing with the weight of wet soil.
Budget Breakdown and Essential Materials
Building this yourself shouldn’t cost a fortune. Here is a realistic look at what you can expect to spend at any standard US hardware store or home center. Prices can shift slightly depending on your specific region, but this gives you a solid baseline.
| Material / Tool | Purpose | Estimated Cost (USD) |
| 1×6 Western Red Cedar (Three 8ft boards) | Main planter box construction | $45.00 – $55.00 |
| 1×4 Western Red Cedar (Two 8ft boards) | Ladder frame and end caps | $20.00 – $25.00 |
| 1-5/8 inch Exterior Deck Screws (1lb box) | Joining the frame and boxes securely | $8.00 – $12.00 |
| Titebond III Waterproof Wood Glue (8 oz) | Reinforcing all wooden joints | $6.00 – $8.00 |
| Premium Organic Potting Mix (2 Cubic Feet) | Soil medium for healthy herb growth | $15.00 – $20.00 |
If you already own a basic drill and a hand saw, your total out-of-pocket cost for materials will run somewhere between $94 and $120. That is significantly cheaper than buying a pre-made cedar planter from a high-end garden center, and yours will be built with heavier, more durable wood.
Common Beginner Questions about Herb Ladders
Put your sun-loving, drought-tolerant herbs like rosemary, thyme, and oregano on the very top shelf where the sun hits hardest and the soil dries out fastest. Place moisture-loving herbs like parsley, cilantro, and chives on the middle and bottom tiers where they get a bit of shade protection from the boxes above them.
You don’t absolutely have to because cedar resists rot naturally, but lining them with heavy-duty garbage bag plastic or landscape fabric will extend the life of the wood by several years. If you use plastic, just make sure to poke holes through it right where the drainage holes are drilled in the wood.
In the heat of summer, expect to water it every day or every other day. Because the boxes are small and exposed to airflow on all sides, they dry out much faster than ground beds. Stick your finger two inches into the soil; if it feels dry, it’s time to water.
Absolutely. This design works wonderfully for strawberries because it keeps the fruit off the damp ground, preventing rot and keeping slugs from chewing holes through your harvest. Just ensure the ladder gets at least six hours of direct sunlight.
Yes, but only use water-based, non-toxic exterior stains or paints, and try to avoid coating the absolute inside of the boxes where the soil sits. Keeping the interior raw or lined protects your edible herbs from absorbing any stray chemical additives.
The easiest method is to screw two simple metal L-brackets to the top frame legs and anchor them directly into your house wall, fence, or deck railing. If you are renting and can’t drill into walls, weigh down the very bottom shelf with a few heavy bricks or patio pavers.
Looking at the Bigger Picture for Your Space
Once you get this herb ladder built and dialed in, you start seeing your outdoor space a little differently. You realize that you don’t need a massive yard to grow a significant amount of your own fresh food or create a lush environment. If you’re dealing with a challenging property layout, like a sloped or arid yard, you can take these same principles of structure and layout to effectively landscape a dry yard using tough shrubs that handle the local elements without constant coddling.
Or maybe you want to balance out the hard lines of your new wooden ladder with some soft water movement nearby. It’s surprisingly simple to pair a vertical green element with a small-scale water project, like setting up a simple DIY solar pond experiment to bring a bit of motion and wildlife into a tight patio corner.
Simple Next Steps
Once you understand what’s actually causing the structural and drainage problems in typical vertical planters, building and maintaining your own ladder gets much easier. Get your cuts made cleanly, don’t skimp on the pre-drilling, and pay attention to how the sun moves across your patio before you lock the structure into place.
Take it one board at a time, assembly goes surprisingly fast, and your kitchen cooking will thank you for it later this summer.
Aagam – Founder of SpruceTouch
Hi, I’m the creator behind SpruceTouch. i am a home and garden enthusiast who shares practical ideas for backyard design, garden projects, patio decor, and small outdoor spaces. Through SpruceTouch, he focuses on simple and budget-friendly ways to improve outdoor living spaces.