Water Features for Small Spaces: My DIY Solar Pond experiment.
I’ve been staring at a corner of my patio for three years, trying to figure out what it needed. It’s tight, gets decent sun, but always felt a little dead, just sitting there with a couple of faded plastic pots. I wanted the sound of water—something small, moving, and alive—but my budget was practically zero and I didn’t feel like running an outdoor extension cord across the grass for a traditional pump.
That is how I ended up down the rabbit hole of solar-powered fountains.
To be completely honest with you, my first attempt at this was a total disaster because I bought the cheapest fountain disk I could find online, threw it in an old plastic bucket, and expected a masterpiece. Instead, I got a sputtering mess that clogged with algae in four days and mosquito larvae using it as a luxury resort.
But after tweaking a few things, trying different containers, and figuring out how to actually manage a tiny eco-system without chemicals, I finally got it working beautifully. Today, I’m going to share exactly how I built this small-space solar pond, the annoying mistakes that almost made me quit, and how you can do it over a single weekend without tearing up your yard.
The Reality of Tiny Water Features
When you have a massive backyard, a pond is easy—you dig a huge hole, drop in a liner, put in a massive filtration system, and let nature do its thing. When you only have a balcony, a small patio, or a tight suburban corner, you don’t have that luxury. Every single square inch matters, and the smaller the volume of water, the faster things can go wrong.
That surprised me honestly.
I used to think smaller meant easier, but a small body of water heats up incredibly fast in the summer sun, which is basically an open invitation for stringy green algae to take over everything.
If you want to keep things simple, you need to think about placement before you even buy a container. You need enough sun to power the solar panel, but too much direct afternoon heat will turn your mini pond into a warm soup. I found that a spot getting morning sun and afternoon shade is the absolute sweet spot for keeping the water clear and the pump running smoothly.
Choosing a Container that Doesn’t Leak
Don’t make the mistake of using a cheap terra cotta pot unless you plan on sealing the inside with a heavy-duty waterproof coating. Terra cotta is porous; it breathes, which means water will slowly seep right through the walls, leaving ugly white mineral crusts on the outside and constantly dropping your water level.
I looked at everything from old galvanized wash tubs to glazed ceramic pots.
Galvanized tubs look great and give a rustic vibe, but over time, zinc can leach into the water, which isn’t great if you want to add snails or small plants later.
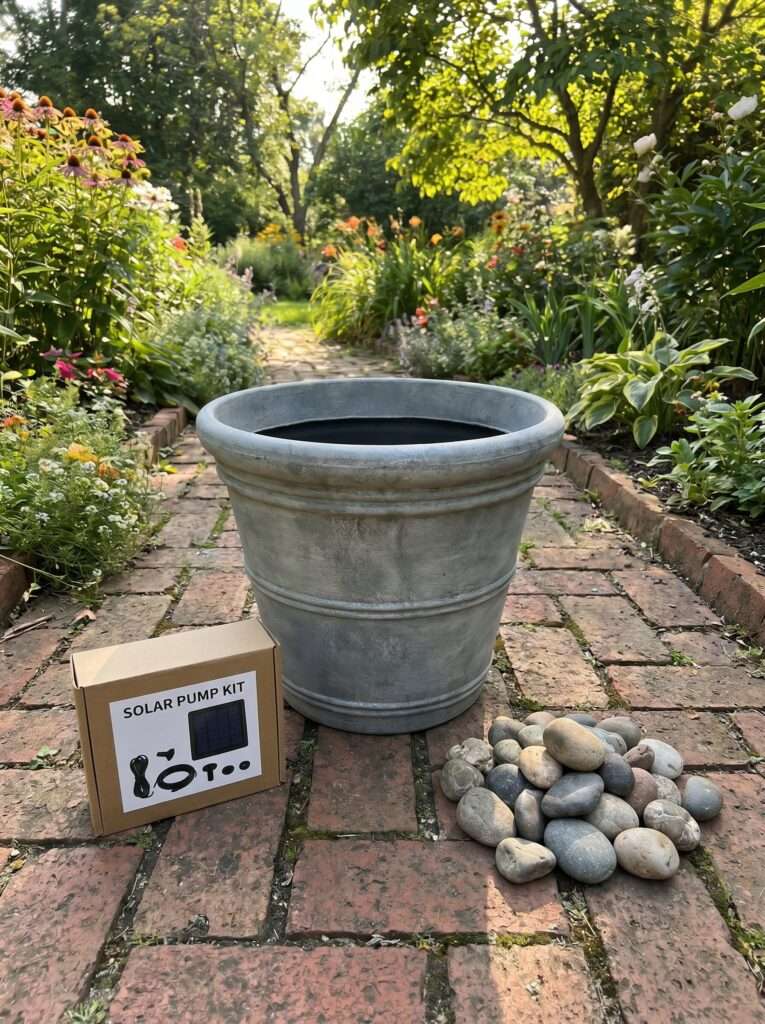
Eventually, I settled on a heavy-duty, thick-walled resin planter. It looks like stone, weighs almost nothing when empty, and holds water perfectly without any extra sealing. If you have an old pot you love that already has drainage holes at the bottom, don’t toss it out. You can plug the holes with a bit of silicone sealant or use a flexible plastic pond liner tucked inside to make it completely watertight.
One thing most people ignore is the weight of the water itself. A single gallon of water weighs about 8.3 pounds. If you pick a 10-gallon container, that’s over 80 pounds of water sitting on your deck or patio. Make sure wherever you place it is sturdy enough to handle that weight without bowing or shifting over time.
Finding the Right Solar Pump
This is where things get tricky because the market is flooded with cheap, generic solar fountain pumps that look exactly the same but perform wildly differently.
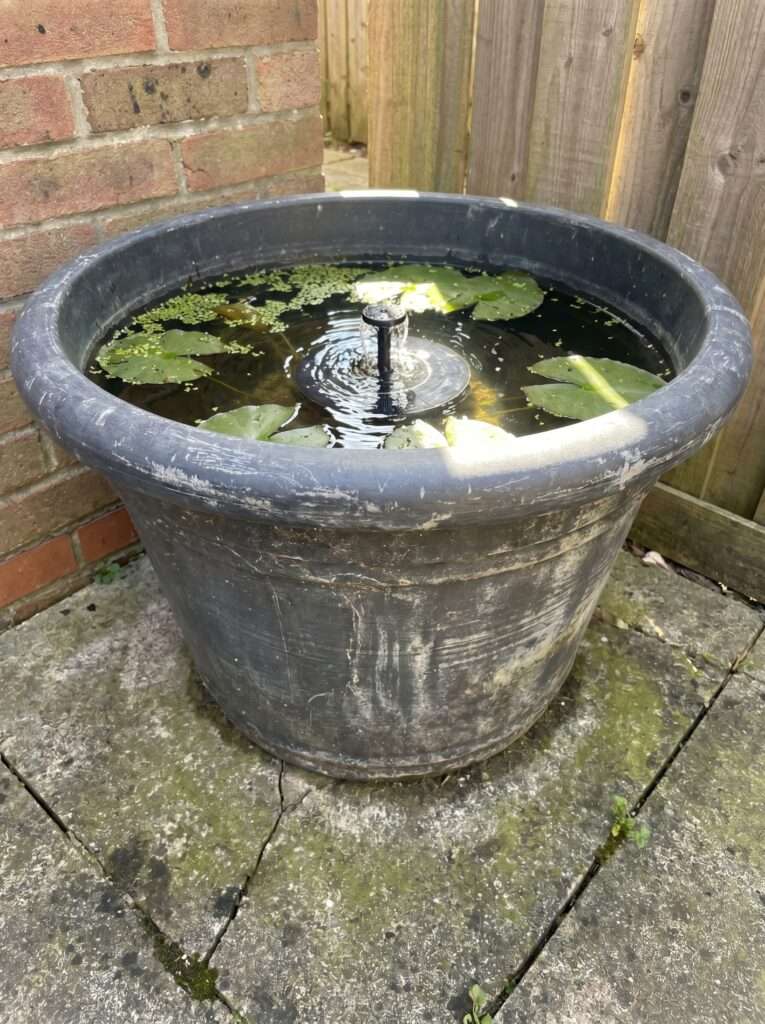
Most gardening blogs never mention this: the cheap solar disks that float freely on top of the water are incredibly annoying. Because they float, the wind will slowly drift them to the edge of your container. Once the fountain spray gets close to the rim, it shoots water right out of the pot, emptying your little pond in a couple of hours and burning out your pump motor.
Instead of a floating disk, look for a small submersible solar pump that comes with a separate solar panel on a long wire.
[Solar Panel in the Sun] ===(Wire)===> [Submersible Pump at Bottom of Pond]
This setup lets you submerge the pump firmly at the bottom of the container—using little suction cups or weighing it down with a smooth stone—while running the wire out to a sunny patch of grass or mounting it on a nearby fence.
But wait, there’s a catch: standard solar pumps only work when the sun is hitting the panel directly. The second a cloud drifts over, the fountain dies. If you want a consistent trickle even on cloudy days or early evenings, you’ll want to spend a few extra bucks on a solar pump that includes a built-in backup battery. It stores power during the day so the water keeps moving smoothly when the sun dips.
Planting for Balance (Not Just Looks)
A pond without plants isn’t a pond; it’s just a bucket of stagnant water waiting to get gross. Plants are your natural filtration system, soaking up excess nutrients that would otherwise feed algae blooms.
For a small-space water feature, you need to categorize your plants into three simple groups: oxygenators, floaters, and marginals.
Oxygenating plants stay completely submerged. They don’t look like much, but they do the heavy lifting under the surface, keeping the water healthy. Hornwort and Anacharis are two classics that you can just drop right into the bottom. They don’t even need to be planted in soil; they just draw nutrients directly from the water.
Floating plants are your sunscreens. They sit on the surface, shading the water and keeping it cool. Water lettuce and frogbit are fantastic options for small containers because their roots hang down, creating a beautiful jungle look under the surface while absorbing waste. Just keep an eye on them—they multiply fast, and you’ll need to scoop a few out every week to make sure they don’t completely cover the surface.
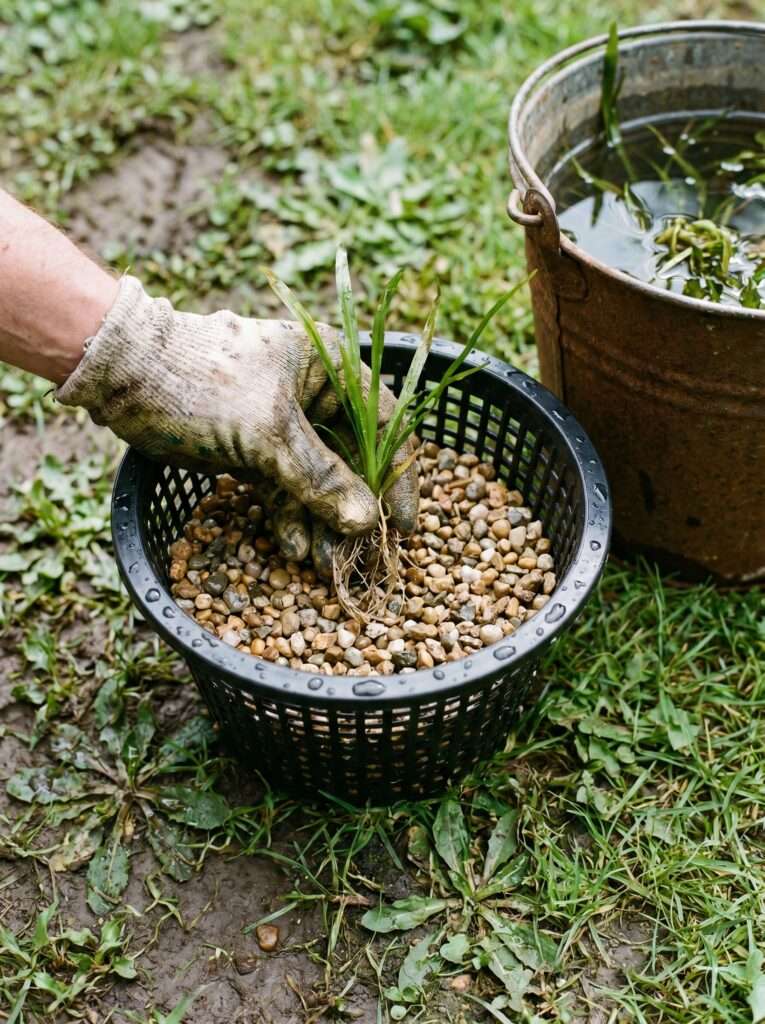
Marginal plants are the ones that like their roots wet but their leaves dry. These add height and texture to your setup. I love using small dwarf papyrus or creeping jenny spilling over the edges. To place them in a small container, you can set the plant pot on top of an upside-down brick or plastic crate inside the water so the top of the plant’s soil sits just an inch below the surface.
The Battle Against Algae and Mosquitos
Let’s talk about the two biggest headaches of any water feature: green slime and biting insects. If you leave a bucket of water outside in the summer, you’ll get both within a week.
I learned this the hard way: trying to chemical your way out of algae in a tiny container is a losing battle. Algae thrives on sunlight and nutrients. If your pond is getting pea-soup green, it either means it’s getting too much direct light or there are too many decaying organic matters at the bottom.
To clear it naturally, add more floating plants to block the light and toss in a few trapdoor snails. These little guys are like tiny vacuum cleaners, crawling along the sides of the container and eating the film right off the walls.
As for mosquitos, standing water is their breeding ground, but moving water is their enemy. Mosquitos cannot lay eggs in water that is constantly rippling or moving. As long as your solar fountain is bubbling away during the daylight hours, they will look elsewhere.
But what about at night when the pump stops? That’s where Mosquito Dunks come in. They are small, round rings made of a natural bacteria called BTI that kills mosquito larvae but is completely safe for birds, pets, plants, and snails. I break off a tiny quarter-sized chunk of a dunk, throw it into the water once a month, and never see a single wriggler.
Weekly Maintenance Routine
You can’t just build this, walk away, and expect it to look like a pristine resort feature forever. Because the water volume is low, evaporation happens fast, especially during dry July and August weeks. You’ll need to top it off regularly.
But here’s the kicker: don’t just blast tap water directly from your garden hose straight into the container. Tap water contains chlorine and chloramines, which can harm your aquatic plants and kill off beneficial bacteria or snails.
Instead, fill a watering can or bucket with hose water and let it sit out on your patio for 24 hours. The chlorine will naturally evaporate into the air, making it perfectly safe to pour into your mini pond the next day. If your indoor plants are struggling with dry conditions, you can check out these indoor plant humidity hacks for dry climates to see how managing evaporation works across different spaces.
Every weekend, I spend about five minutes doing a quick cleanup. I scoop out any fallen leaves or twigs before they can rot at the bottom, pull out excess floating plants if they are crowding the top, and quickly pull the sponge filter out of the solar pump to rinse it clean under a spigot. If the pump filter gets packed with muck, the water flow drops down to a sad trickle.
What Actually Works: Step-by-Step Assembly
If you want to get this set up without overcomplicating things, here is the exact process I used for my successful build. No heavy tools required.
Materials Needed:
- 15 to 20-gallon resin or glazed ceramic planter (without drainage holes, or sealed tightly)
- Submersible solar pump kit with a separate solar panel and stake
- 2-3 smooth bricks or small upside-down plastic nursery pots (for elevation)
- 1 bunch of Hornwort (submerged oxygenator)
- 2-3 small Water Lettuce or Frogbit plants (floaters)
- 1 Dwarf Papyrus or Iris plant in a small pot (marginal)
- Smooth, washed river stones or pea gravel
- 1 package of Mosquito Dunks
Step 1: Prep the Site and Position the Container
Place your container exactly where you want it before adding any water. Once it’s full, you won’t be able to move it without spilling it everywhere or straining your back. Ensure it sits level on your patio, deck, or garden bed.
Step 2: Create the Elevation Tiers
Place your bricks or upside-down plastic pots inside the bottom of the container. These act as steps or shelves for your marginal plants. By creating tiers, you can have plants sitting at different depths, which looks much more natural than having everything floating at the same level.
Step 3: Rinse and Add the Stones
Wash your river stones thoroughly in a bucket before putting them into the pond. If you skip this, the dust and dirt from the stones will turn your water into a muddy, cloudy mess that takes days to settle. Arrange the clean stones around the base of the bricks to hide them and create a natural-looking bottom.
Step 4: Position the Pump
Take your submersible pump and press the suction cups firmly onto a flat stone or the bottom of the container. Position it right in the center. Run the power cord up the back inside wall of the container, hiding it behind where your tallest plant will go. Route the cord out to the solar panel and stake the panel into the ground where it will receive the most consistent sunlight.
Step 5: Arrange the Plants
Set your marginal plant pot (like the dwarf papyrus) directly onto one of the underwater brick shelves. Drop your submerged hornwort stems right into the water near the bottom—they can float freely or you can gently tuck the ends under a river stone to keep them anchored. Save the surface floating plants for the very end.
+---------------------------------------------------+
|  ~~~~~~ [Water Lettuce / Surface Floaters] ~~~~~~ |
|        \                                 /        |
|   +----+--+   +-------------------+   +----+--+   |
|   |Marginal|   |  Solar Fountain   |   |Marginal|   |
|   | Plant  |   |    (Bubbler)      |   | Plant  |   |
|   +--------+   +-------------------+   +--------+   |
|   | Brick  |   |   River Stones    |   | Brick  |   |
+---+--------+---+-------------------+---+--------+---+
Step 6: Fill and Add Dechlorinator
Slowly pour your aged, chlorine-free water into the container, taking care not to disturb the soil in the plant pots or kick up any remaining dust from the rocks. Fill it until the water level sits about two inches below the rim. Drop in your floating water lettuce and a small piece of a mosquito dunk. Turn on the pump and adjust the fountain spray head so it bubbles gently without splashing water outside the container walls.
Things That Didn’t Work for Me
I’ve made plenty of blunders while figuring this out. Here are three specific things I tried that failed miserably, so you don’t have to waste your time or money on them.
1. Using Standard Garden Soil for Aquatic Plants
When I first tried potting up a marginal plant for the pond, I just grabbed a scoop of regular potting soil from a leftover bag in the garage. Huge mistake. Standard potting soils are full of lightweight peat moss and perlite. The second the pot went underwater, the perlite floated to the top like a million tiny white foam balls, and the organic matter turned the water into a dark, muddy tea.
Always use heavy, dense aquatic pond soil or plain unscented kitty litter (made from 100% baked clay) topped with a thick layer of pea gravel to keep the dirt contained inside the pot.
2. Putting Goldfish in a Mini Container
It’s incredibly tempting to buy a couple of cheap feeder goldfish from the pet store and drop them into your patio pond. I tried it once in a 15-gallon setup, and it was a disaster. Goldfish produce an enormous amount of waste for their size.
In a small container without a heavy-duty electric filter, their waste quickly builds up, spikes the ammonia levels, kills the fish, and triggers a massive, foul-smelling algae explosion. If you want fish, stick to a massive yard pond. If you want life in a small patio pond, stick to hardy aquatic snails or perhaps a couple of tiny, heat-tolerant minnows, but only if you have a massive plant load to process the waste.
3. Leaving the Feature Out All Winter
If you live in an area that gets freezing winter temperatures, you cannot leave your small-space solar pond running year-round. Because the volume of water is so small, it will freeze solid right down to the bottom, which will crack your resin or ceramic container, destroy the delicate plant roots, and ruin the internal components of your solar pump.
When late autumn rolls around and the first frost hits, you need to empty the container, store the pump indoors in a dry spot, and move any hardy plants to a protected cold frame or a deep garden pond if you have one. If your garden cleanup is part of a larger backyard project, you might find some useful budget tips in my guide on budget landscaping and frontyard makeovers.
Small Things That Make a Big Difference
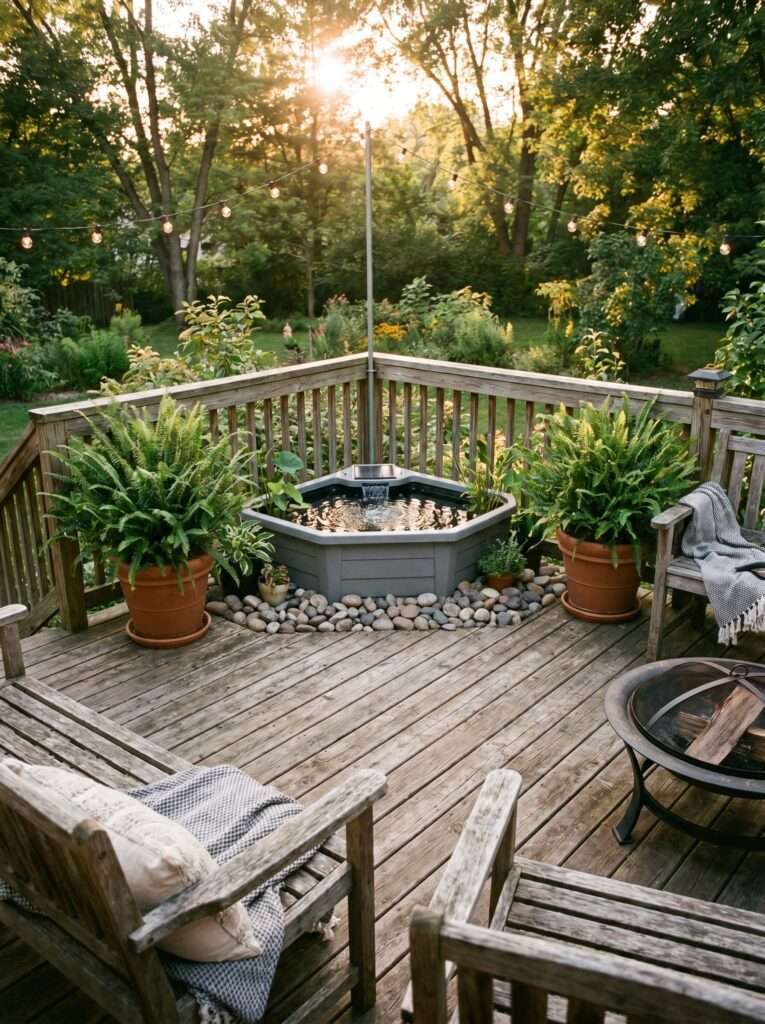
Add a Landing Rock: Always place one large, flat stone that sits just slightly above the water line. Birds, honeybees, and butterflies will use it as a safe landing pad to drink water without drowning.
Keep a Spare Filter: Solar pump sponge filters are tiny and can degrade over a season of constant rinsing. Buy a cheap sheet of aquarium filter foam and cut out your own replacement shapes with a pair of scissors.
Watch out for Falling Sap: Avoid placing your mini pond directly under trees that drop heavy amounts of sap, berries, or pine needles. They will foul the water quality much faster than regular leaves.
Trim Yellowing Leaves: Cut back any decaying or yellowing leaves from your aquatic plants immediately. Letting them rot inside the container provides fuel for algae growth.
Use the Drain Water: When you do partial water changes or clean out the muck from the bottom, don’t throw that water away. It’s packed with organic nutrients from the plants and snails—your potted garden plants or vegetable beds will absolutely love it. If you are dealing with other issues around your yard, like keeping local wildlife away from your prized plants, take a look at my tips on deer-proofing your garden in suburban areas.
FAQ
Most basic solar pumps will turn off completely the moment the sun goes down or if a heavy cloud blocks the sky. If you want your fountain to run into the evening hours or keep bubbling consistently on overcast days, you need to purchase a pump that explicitly states it includes a built-in battery backup system.
You shouldn’t need to completely dump and refill the water very often if your plant balance is correct. Instead, aim for a 15% to 20% water change every two to three weeks. Scoop out a few pitchers of water to water your garden beds, and top the container back up with dechlorinated water. If you ever run into a situation where your garden or indoor potted plants look sick from bad watering, you might find my guide on root rot recovery and saving drowning plants useful.
Yes, absolutely. Birds are drawn to the sound of moving water. Within a week of setting up my solar fountain, I had robins and chickadees stopping by the edge of the resin rim to drink and splash around in the gentle spray. Just make sure the fountain isn’t shooting too high or aggressively, or it might scare them off.
Yes, but you have to plug them completely first. The easiest way is to apply a generous amount of 100% silicone sealant to both the inside and outside of the drainage hole, letting it cure completely for 48 hours before adding water. Alternatively, you can line the entire inside of the pot with a piece of flexible, fish-safe PVC pond liner.
Sputtering usually means one of two things: either the water level has dropped too low and the pump is sucking in air, or the tiny sponge filter inside the pump intake is clogged with algae and debris. Unplug the pump, pop open the plastic casing, rinse the sponge thoroughly in clean water, and check your water level.
Bad odors happen when water becomes stagnant and oxygen levels drop, causing organic matter to rot anaerobically. To prevent this, ensure your solar pump runs daily to keep the water moving and aerated. Additionally, promptly remove any fallen leaves, dead insects, or decaying plant material before they break down at the bottom of the container. If you enjoy harvesting from your garden and want to store things properly without dealing with spoilage or rot, check out my approach to herb gardening, drying, and storing herbs for winter.
A Simpler Approach to Garden Water Features
Building a tiny water feature doesn’t require a construction crew, a massive budget, or an engineering degree. Once you understand the basic balance between sunlight, moving water, and the right mix of plants, the whole setup pretty much takes care of itself.
It’s an easy way to bring a little bit of movement, sound, and wildlife into a small space without overcomplicating your weekend chores. Start small, pick a good solid container, find a reliable little pump, and let nature do the rest of the work for you.
Aagam – Founder of SpruceTouch
Hi, I’m Aagam — the creator behind SpruceTouch. I’m a home and garden enthusiast who shares practical ideas for backyard design, garden projects, patio decor, and small outdoor spaces. Through SpruceTouch, I focus on simple and budget-friendly ways to improve outdoor living spaces.