
Building a little shade over the back door is one of those projects that completely changes how you use your backyard. For years, I watched the afternoon sun bake my back entry, making the interior kitchen feel like an oven and rendering the small concrete step outside completely useless. I finally decided an attached pergola was the answer, but the idea of drilling massive bolts into my house structure felt incredibly intimidating at first.
After nearly two decades of DIY home renovations and trial-and-error garden builds, I’ve learned that the secret to a long-lasting overhead structure isn’t just heavy timber. It’s all about moisture management, securing structural connection points properly, and choosing the right framing style for your house layout. I once rushed a small awning project on an old property without properly flashing the ledger board, and let me tell you, fixing wood rot behind your siding two years later is a nightmare you want to avoid.
The following plans and layout concepts break down exactly how to frame a secure, beautiful shade structure right over your door. We will cover everything from anchoring into different types of exterior walls to angling rafters for the best midday shade.
A few of these ideas honestly worked much better than I expected, especially when it came to managing heavy rainfall right above the doorway.
Essential Planning Checklist (Before You Start)
| Recommended Product | Why You Need It | Estimated Price | Action |
| [Heavy-Duty Magnetic Stud Finder] | Critical for locating the exact position of interior wall studs and structural framing from the outside before drilling. | $15 – $30 | [Check Price on Amazon ↗] |
| [48-Inch Professional Spirit Level] | Essential for ensuring your ledger board, main headers, and vertical support posts are perfectly level and plumb over long spans. | $20 – $50 | [Check Price on Amazon ↗] |
Disclaimer: As an Amazon Associate, we earn a small commission from qualifying purchases at no extra cost to you.
Quick Picks (Top 5)
If you are short on time or want a quick look at the best directions to take, here are my top five recommendations based on different DIY priorities:
- Best for Beginners: The Classic Two-Post Ledger Mount. It uses standard framing hangers and a straightforward ledger board layout that is hard to mess up.
- Highest Visual Impact: The Modern Cantilevered Timber Awning. Perfect if you don’t want vertical posts blocking your walkway or concrete steps.
- Lowest Budget Pick: The Treated Pine Rafter Bracket System. Uses heavy-duty steel wall brackets to hold individual rafters, saving a fortune on extra lumber.
- Quickest Visual Win: The Chevron-Slat Contemporary Shade. The angled slats give immediate architectural interest and cast beautiful, deep shadows.
- Best for Stormy Climbs: The Through-Bolted Heavy Timber Structure. If you get high winds or snow, this heavy-duty framing style keeps everything rock solid.
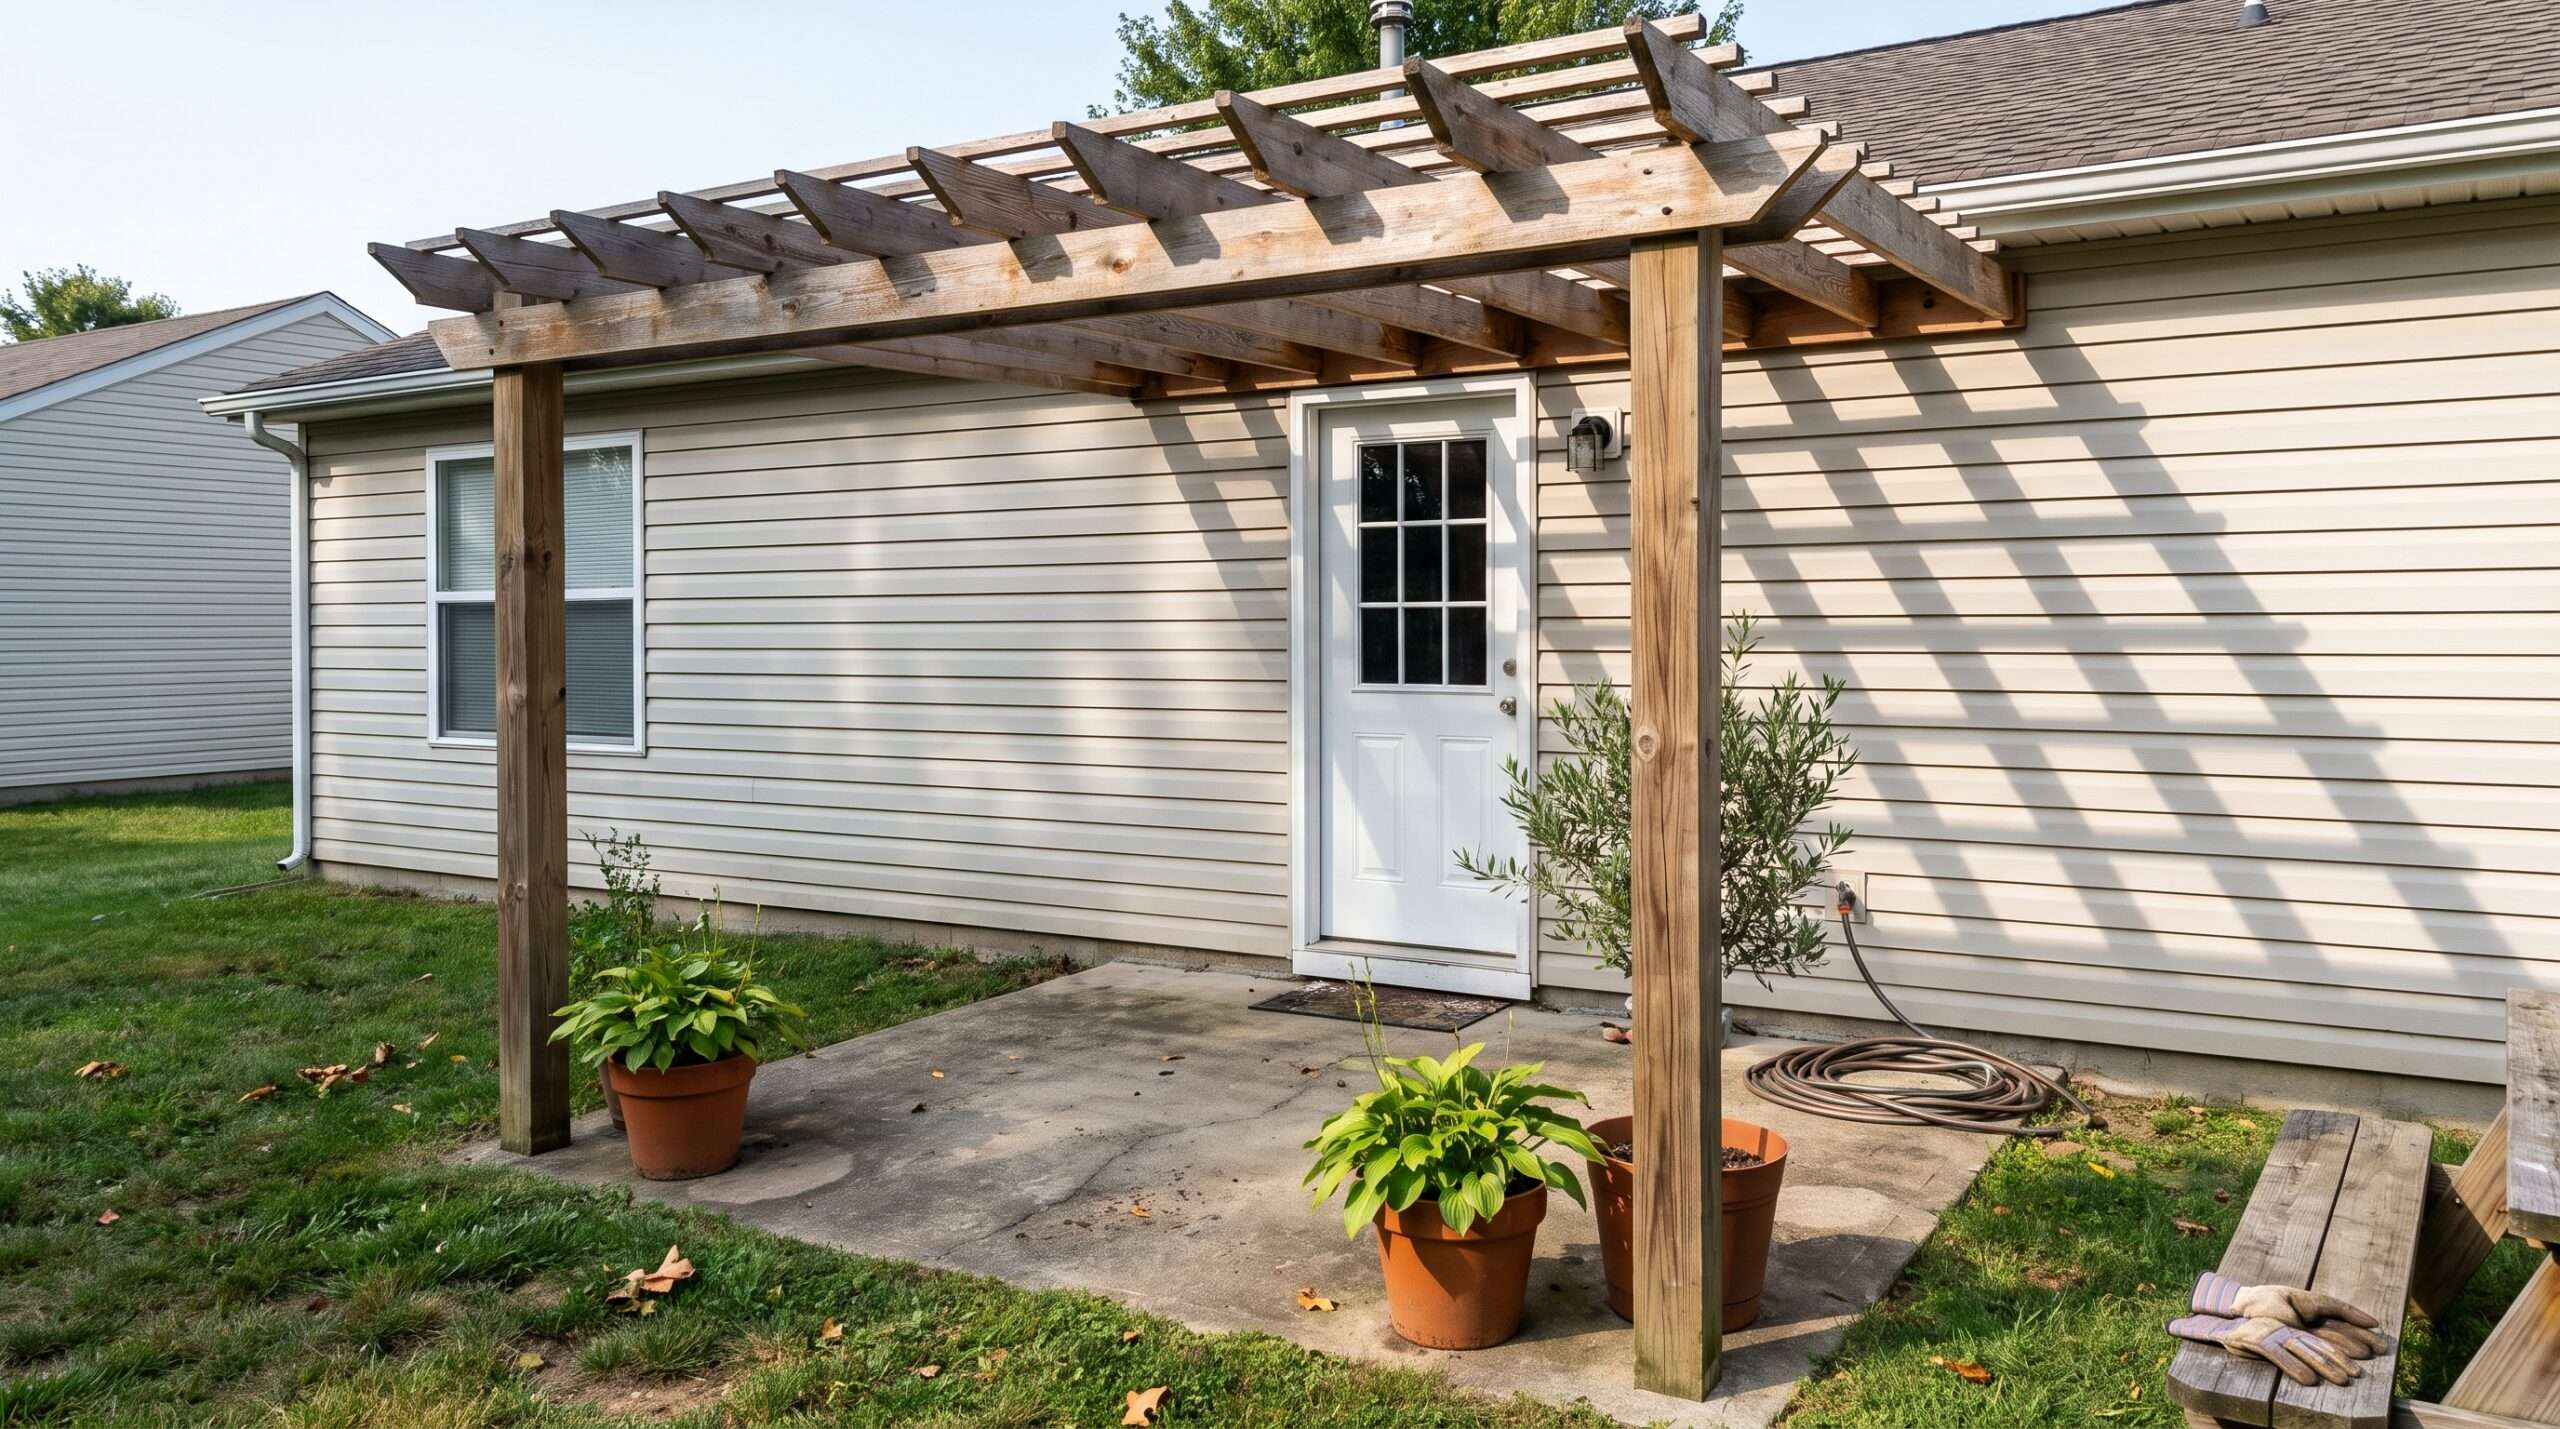
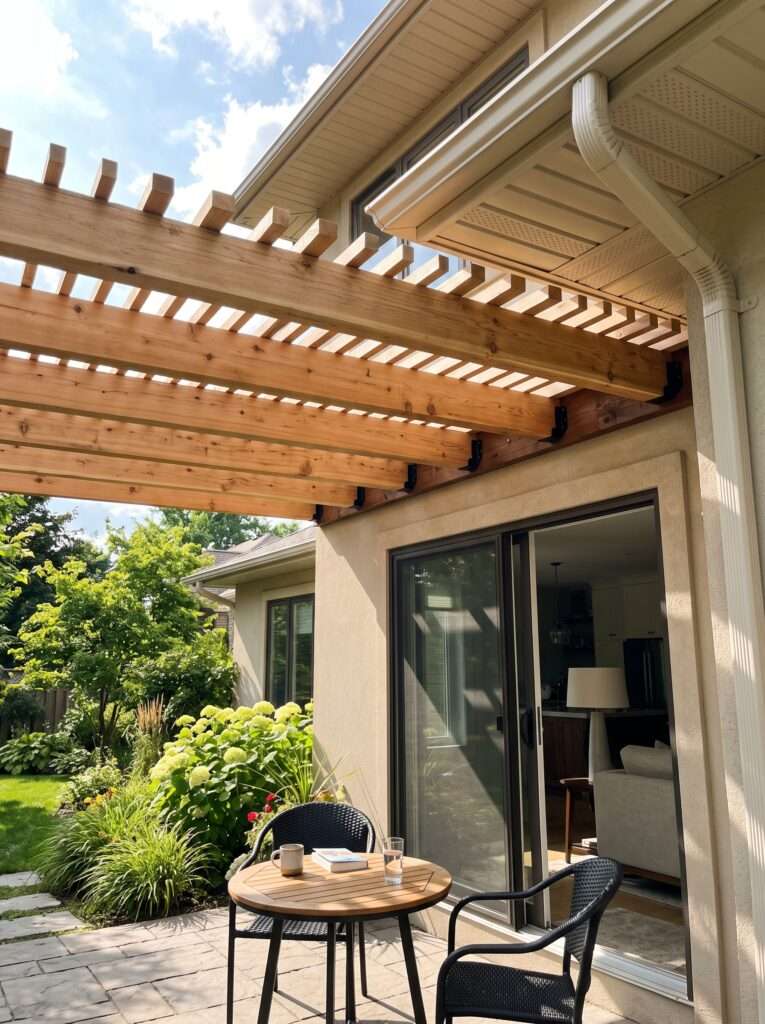
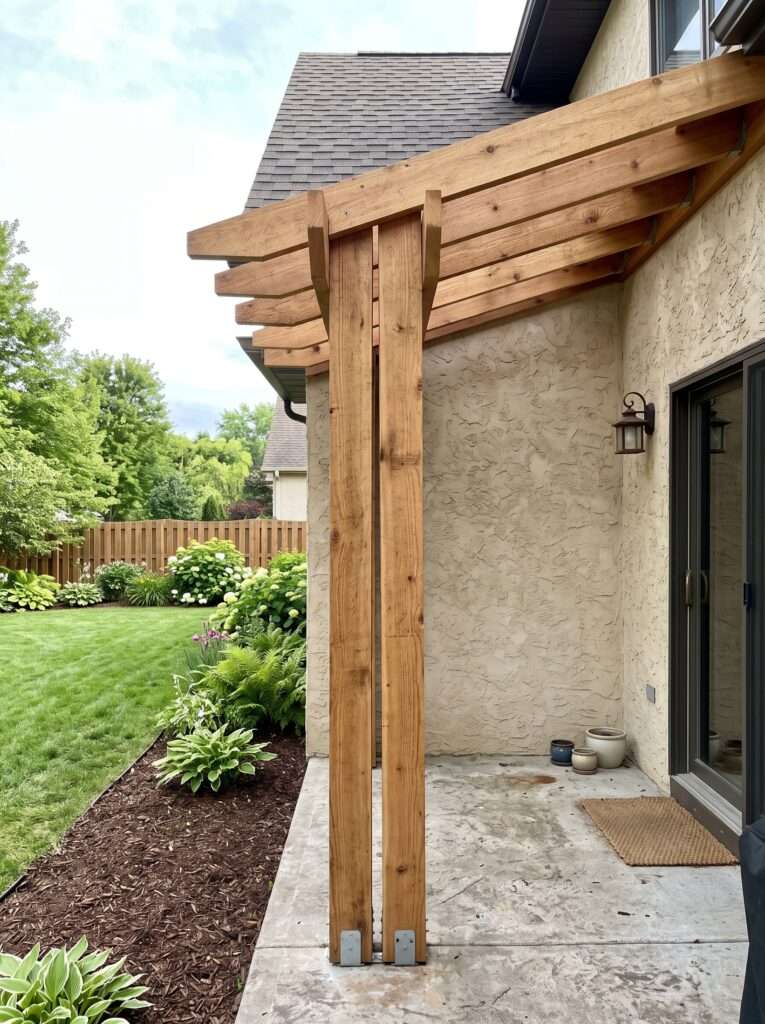
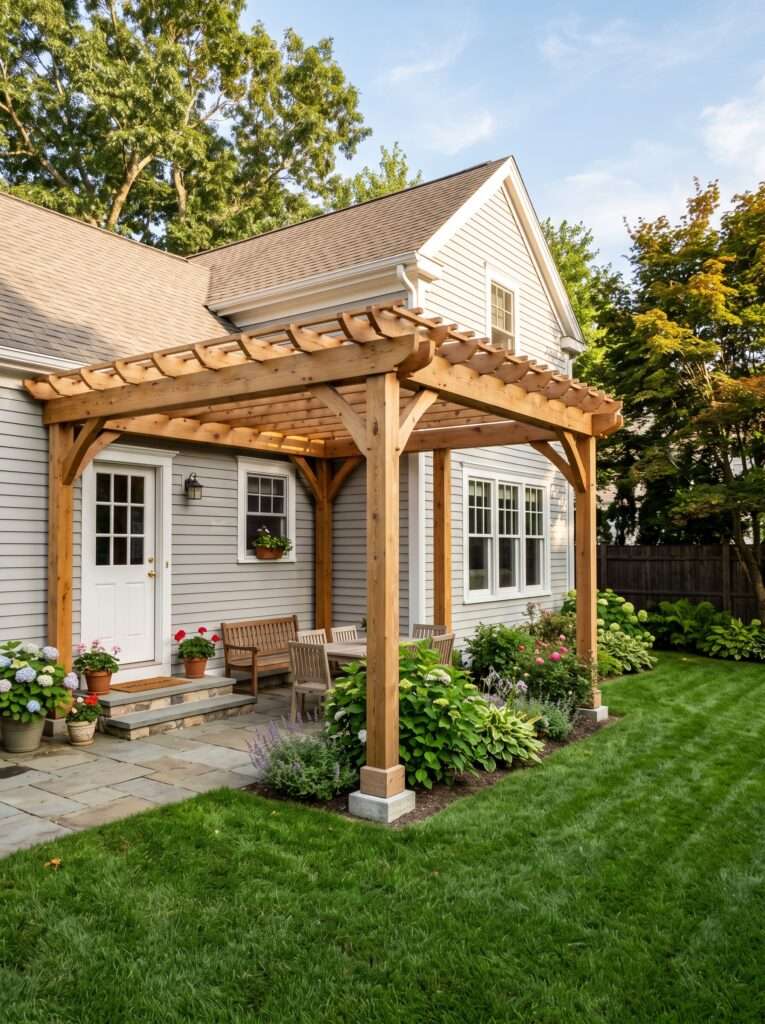
1. The Classic Two-Post Ledger Connection
This is the foundational setup that most homeowners picture when they think about an attached pergola. It relies on a heavy ledger board bolted directly into your home’s rim joist, with two outer posts supporting a header beam away from the house. When I built this style on my brother’s house, we spent extra time locating the internal floor joists to ensure our structural screws had solid wood to bite into. It creates a highly stable, square framing footprint that can handle heavy climbing vines or hanging baskets without a hint of sagging.
The main challenge here is getting that ledger perfectly level on uneven exterior siding. If you have vinyl or lap siding, you cannot just slap the wood on top. You have to carefully cut back the siding or use specialized structural spacers to prevent crushing the plastic. I prefer using heavy-duty structural screws like Spax or TimberLOK instead of traditional lag bolts because they don’t require pre-drilling and hold like absolute iron.
2. The Floating Cantilevered Awning Frame
If you have a narrow concrete landing or a high-traffic walkway right outside your door, vertical posts can become an absolute nuisance. A cantilevered design solves this by eliminating the ground posts entirely, relying instead on structural triangular wooden brackets fixed directly to the house wall framing. The first time I attempted a cantilevered frame, I was terrified it would sag under its own weight, but the physics of a proper diagonal brace are incredibly reliable.
To make this secure, the wall brackets must be anchored deep into the wall studs, not just the sheathing. This means using a stud finder from the inside of your house and measuring carefully. Because there are no ground posts to absorb movement, any wobble in the bracket will be magnified at the tip of the rafters. Keep the projection away from the house relatively short—around 3 to 4 feet is the sweet spot for this style.
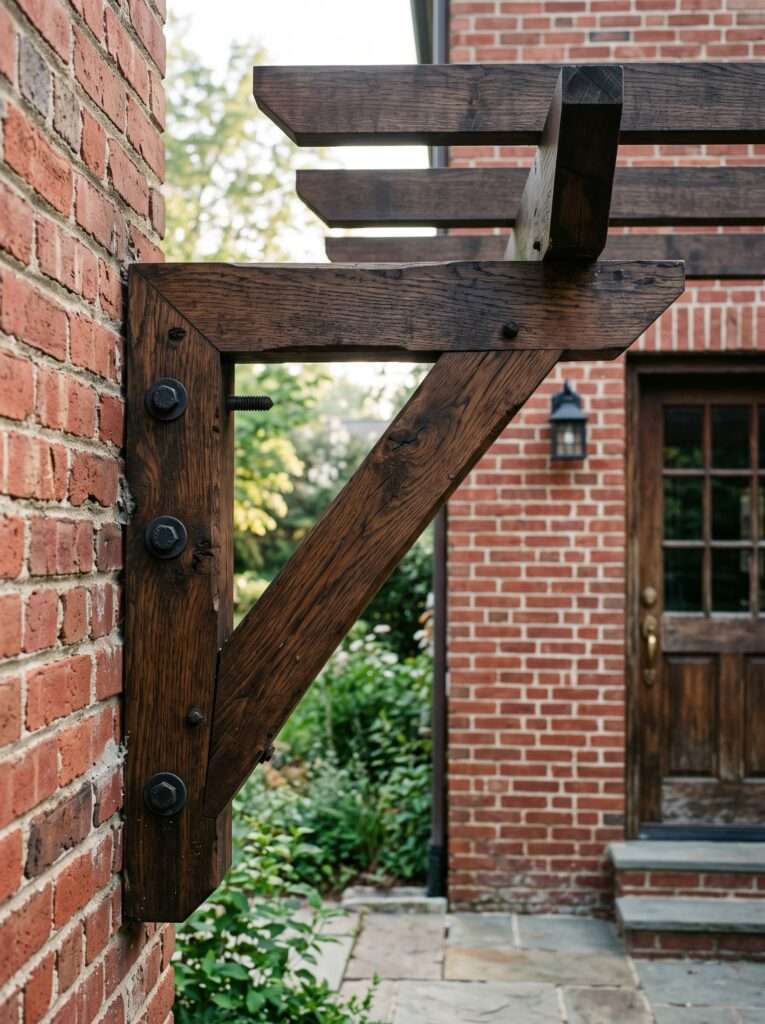
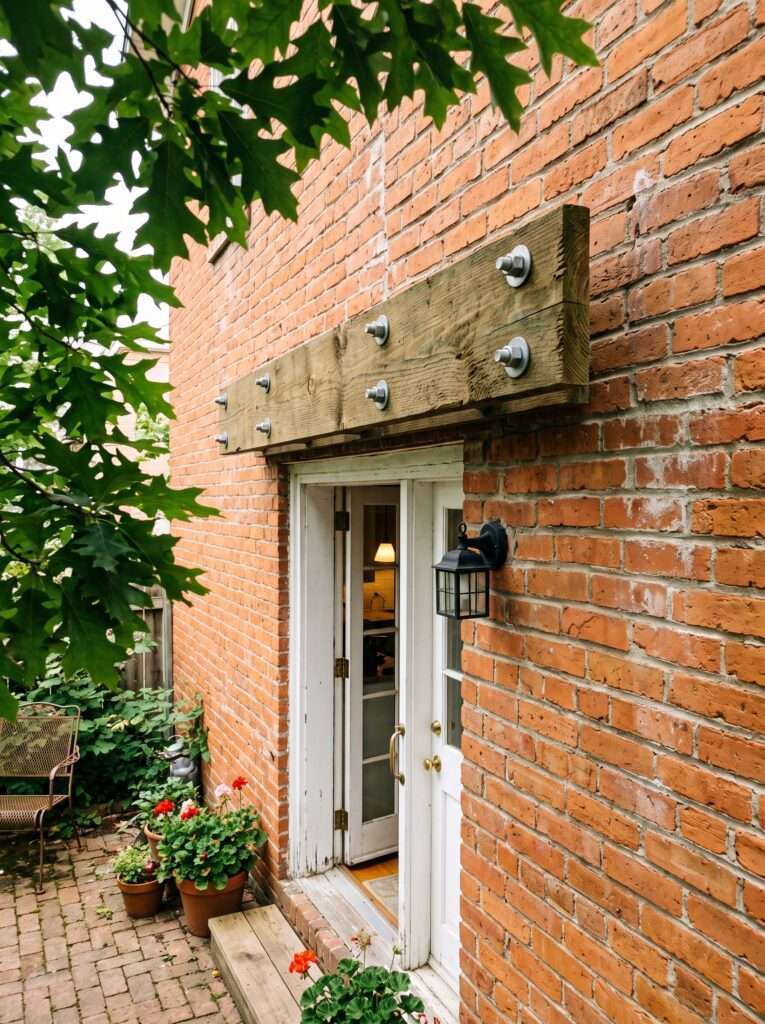
3. The Brick Veneer Span-Thru Mount
Mounting a heavy, moving wood structure to a brick house requires a completely different approach than wood or vinyl siding. Brick veneer is not structural; it is essentially a decorative facade, and tightening a ledger board directly against it can crack the brickwork or cause it to bow inward over time. For my current home, which features a brick exterior, I used the through-bolt method, drilling completely through the brick and anchoring into the house’s interior rim joist using threaded steel rods and epoxy.
To do this right, you need a high-quality hammer drill and a masonry bit that can cleanly penetrate the brick without blowing out the backside. Once the holes are drilled, inserting a steel pipe sleeve over the threaded rod within the brick gap ensures that when you tighten the nuts, all the pressure is placed on the internal framing rather than crushing the brick face. It sounds complex, but it provides immense peace of mind during heavy autumn windstorms.
Small Pro Tip
Whenever you mount a wood ledger board against your house, always leave a small $\frac{1}{2}\text{-inch}$ gap using stackable washers or specialized structural spacers. This allows rainwater to run down behind the wood instead of getting trapped against your siding, which is the number one cause of hidden wall rot.
Required Tools & Materials for Installation
| Recommended Product | Why You Need It | Estimated Price | Action |
| [Structural Wood Screws] | Provides immense holding power to securely mount the heavy wood ledger board directly into your home’s rim joist without pre-drilling. | $25 – $60 | [Check Price on Amazon ↗] |
| [Heavy-Duty Outdoor Waterproof Silicone Caulk] | Seals the interior of every single drilled bolt hole to completely prevent water from leaking into your house siding or sheathing. | $10 – $40 | [Check Price on Amazon ↗] |
Disclaimer: As an Amazon Associate, we earn a small commission from qualifying purchases at no extra cost to you.
4. The Low-Clearance Header System
Many standard suburban homes have incredibly low rooflines or large sliding back doors that leave very little vertical space between the top of the door frame and the roof soffit. If you try to mount a standard ledger board above the door, your rafters will hang down so low that tall guests will have to duck just to walk out of the house. The low-clearance header system solves this by mounting the ledger flushed with the rafters using face-mount joist hangers, keeping the entire structure tucked tightly against the roofline.
When framing this, your rafters run on the exact same horizontal plane as your ledger board, rather than sitting on top of it. This saves you roughly 6 to 8 inches of precious vertical head clearance. To give it a clean look, I like to use black powder-coated structural joist hangers instead of basic galvanized silver ones. It turns a boring structural necessity into a sharp, intentional design element that coordinates nicely with dark door hardware. If your back doorway opens up to a rough or uneven patio surface, you might want to fix the ground before anchoring your vertical posts. I used some Genius Ways to Build a Low-Profile Deck Directly Over Old Cracking Concrete to create a perfectly flat, gorgeous platform that ties the entire pergola footprint together seamlessly.
5. The Freestanding False-Attached Illusion
If your house has tricky architectural features like a bump-out window bay, delicate stucco, or structural foam detailing that makes drilling into the wall impossible, you can use the freestanding false-attached trick. This involves building a completely self-supporting four-post pergola, but positioning two of the posts within mere millimeters of your house siding. To the casual eye, it looks seamlessly attached to the home, but structurally, it doesn’t put a single ounce of weight or stress on your house walls.
The trick to making this look good is running the rafter tails slightly past the inner posts so they almost touch the house trim, completely hiding the tiny air gap. When I built one of these for a neighbor with an old historic home, we dug the two house-side footings deep and used heavy post bases to prevent any sway. It completely bypassed the need for building permits related to structural home modifications in our township.
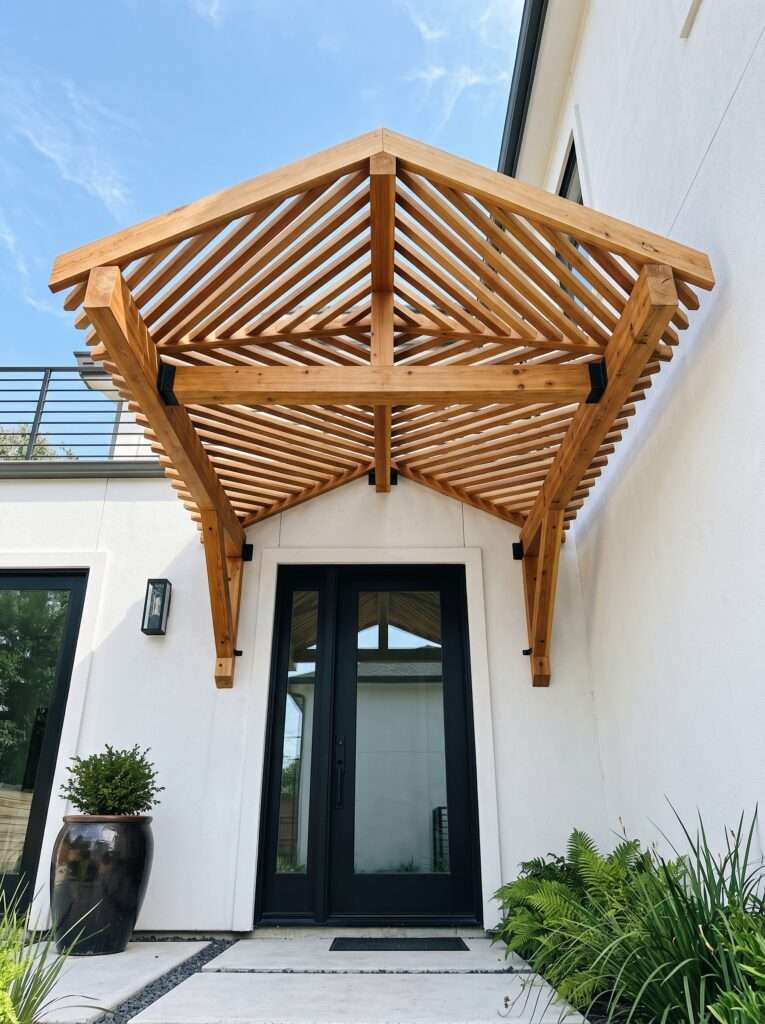
6. The Angled Louver Shade Frame
A common complaint with standard attached pergolas is that they don’t actually provide much shade when the sun is directly overhead or slightly angled. By framing your overhead slats as angled louvers rather than flat boards, you can block out up to 80% of harsh midday sun while still allowing gentle morning light to enter your back door. I spent an afternoon cutting dozens of small $45^\circ$ notches into a set of secondary upper rafter tracks to cradle the louvers at a permanent slant, and the difference in temperature on our concrete patio was immediate.
When laying out your louver direction, you need to consider which way your back door faces. If your door faces west, you want the slats angled back toward the house to block that scorching late-afternoon sun. If it faces south, a simple north-south slant works wonders. It’s an extra afternoon of measuring and cutting, but your air conditioning bill will thank you.
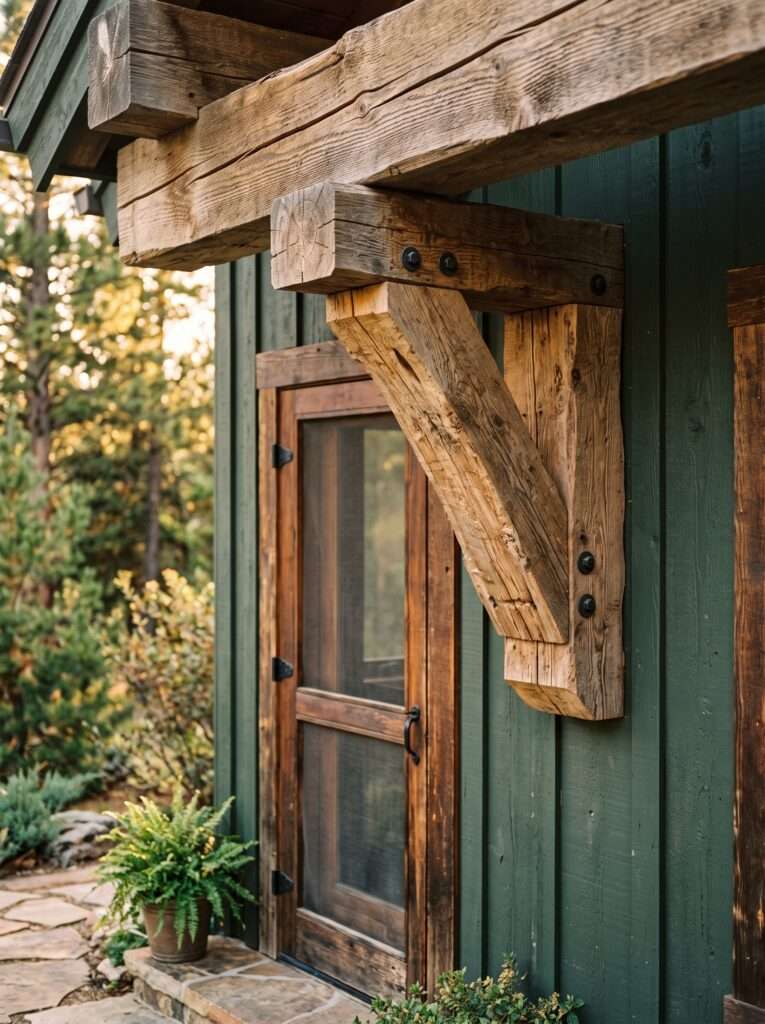
7. The Heavy Timber Corbel Mount
For homes with a rustic, craftsman, or timber-frame aesthetic, thin $2\times6$ lumber can look incredibly cheap and out of place against a grand back entrance. The heavy timber corbel mount relies on thick, rough-sawn $4\times6$ or $6\times6$ cedar timbers supported by massive decorative wooden corbels bolted to the wall studs. This approach gives the entry an immediate sense of permanence and architectural weight, resembling an old mountain lodge or custom artisan cottage.
Working with timbers of this size requires a helper and some heavy mechanical leverage. You cannot just hold these up with one hand while driving a screw with the other. I use a series of temporary $2\times4$ T-props to hold the heavy corbel pieces in place while I sink the structural lag screws. The end result is completely unbothered by heavy snow loads or climbing wisteria vines, which can tear lighter structures right off the wall.
8. The Modern Minimalist Steel-To-Wood Frame
If you love clean lines and a contemporary aesthetic, mixing black powder-coated steel hardware with warm wood tones creates a stunning contrast above a modern sliding patio door. This framing plan utilizes specialized structural steel wall plates that accept thick timber rafters without any visible framing hangers or messy toe-nailing of screws. It looks incredibly sleek, almost as if the wooden timbers are floating out from the home’s structure.
The key to keeping this look clean is hidden fasteners. You insert the wood into the steel sleeves and secure them from underneath or via internal structural pins. Because this style relies heavily on the strength of the metal connections, you save a lot of time on complex carpentry joinery. It pairs beautifully with minimalist black window frames and simple concrete patio pads.

Common Mistake
Never use standard interior screws or basic drywall fasteners for any part of an attached pergola frame. Outdoor treated lumber contains corrosive chemicals that will eat through standard steel in a few seasons. Always look for fasteners explicitly rated for ACQ pressure-treated wood or opt for high-grade stainless steel.
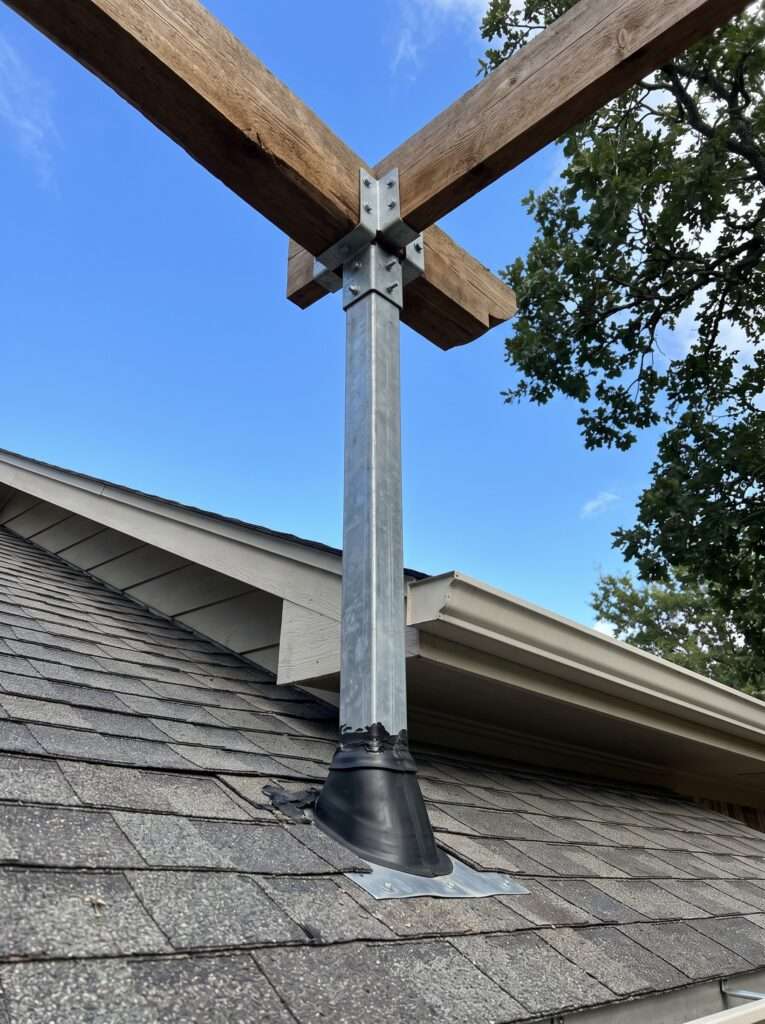
9. The Extended Roofline Tie-In
Sometimes, the back door is located in a spot where the exterior wall height is simply too low to mount a pergola ledger safely without blocking the door’s trim. In these scenarios, the best structural move is to go up and tie the pergola directly into your home’s roof rafters using specialized roof brackets like SkyLift hardware. These brackets penetrate through the roof shingles, sealed tightly with heavy-duty flashing boots, and bolt directly to the top plates of your exterior walls.
This elevates the entire pergola structure by an extra two to three feet, allowing for an open, airy feeling right outside your door. It also allows hot air to escape upward away from your seating area rather than trapping it right against your kitchen windows. While cutting holes in your roof can feel terrifying, it is actually incredibly reliable if you use high-quality rubber roofing boots and generous amounts of outdoor silicone sealant.
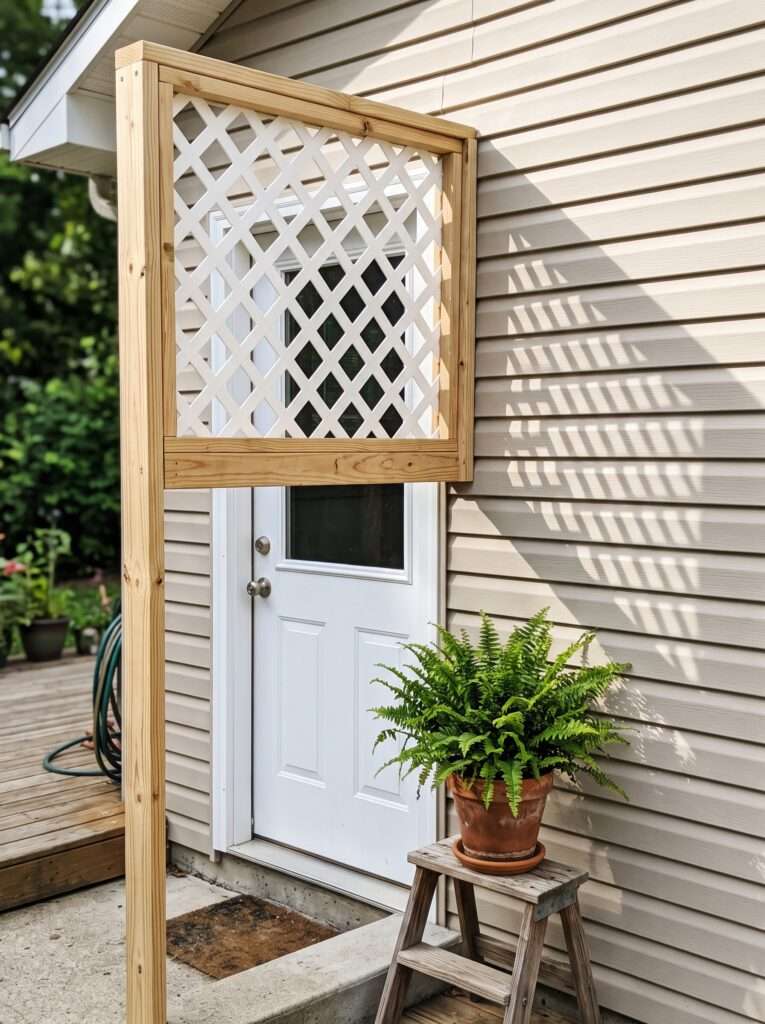
10. The Lightweight Lattice Privacy Screen Overlay
Not every back door pergola needs to be built like a highway bridge. If your primary goal is simply to break up the harsh afternoon glare and create a sense of privacy from nosy neighbors, a lightweight privacy frame is a wonderful, budget-friendly option. This design uses a lighter $2\times4$ framework instead of heavy timbers, topped with a high-quality wood or vinyl lattice panel that diffuses the sunlight into a beautiful dappled pattern.
Because the weight is minimal, the structural load on your house wall is significantly reduced, making installation much faster and less stressful. I built one of these over my utility area by the back kitchen door to hide the unsightly AC unit from view while enjoying coffee outside. To keep it from looking cheap, frame the outer edges of the lattice with clean $1\times3$ trim boards to hide the messy cut ends of the lattice sheets. If you’re looking for a project that doesn’t break the bank, you can easily use leftover materials from other builds, similar to how I managed to find Genius Ways to Build a Multi-Level Wooden Water Cascade Using Free Scrap Wood to spruce up my patio corner without spending a dime.
11. The Under-Soffit Hidden Ledger System
If you have a deep roof overhang (soffit) right above your back door, you can utilize that covered space to hide your structural connections entirely. Instead of mounting a ledger board horizontally onto the face of your siding, you mount your framing brackets vertically up through the soffit material, anchoring them directly into the house’s main roof trusses. The pergola rafters then emerge cleanly from under your roofline without any visible wall mounting plates.
This requires removing a few panels of your vinyl or aluminum soffit to locate the structural wood hidden behind it, but the clean aesthetic finish is entirely worth the extra step. It also offers incredible weather protection because the most vulnerable part of your pergola connection remains completely shielded from rain and snow under the existing roof overhang.
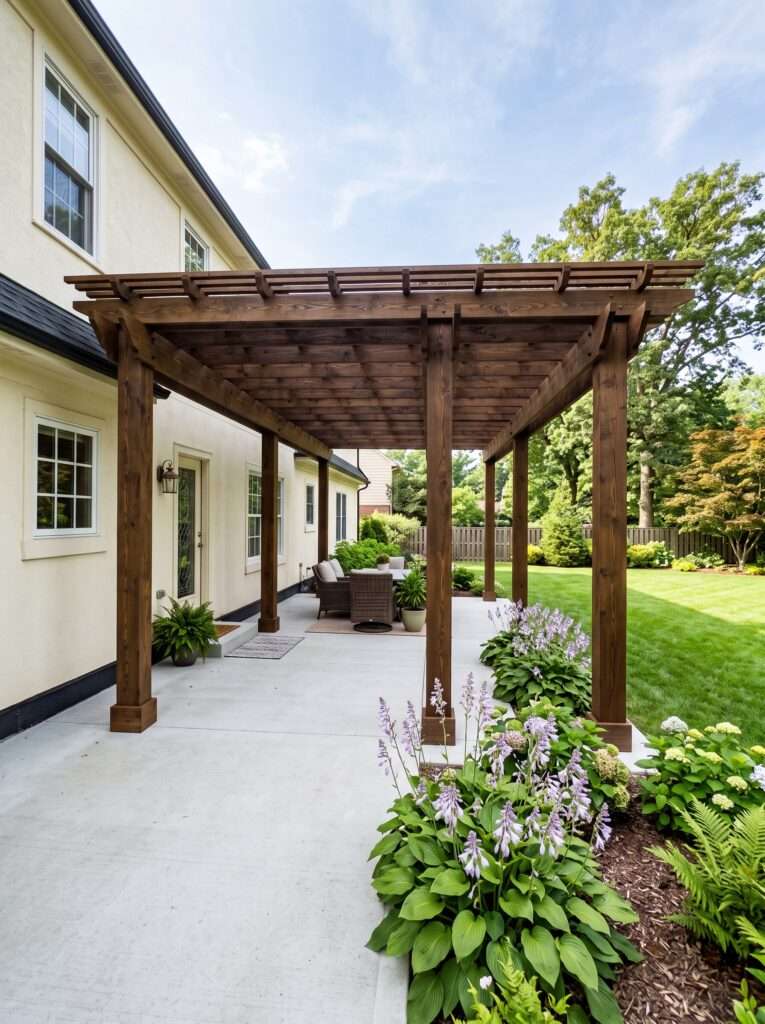
12. The Double-Header Freestanding Span
When dealing with an older home where the framing integrity of the exterior walls is questionable, the safest bet is to completely avoid touching the house. The double-header span uses two independent support beams running parallel to each other, resting entirely on four solid corner posts. One beam sits right against the house wall, while the other sits out in the yard, spanning the entire length of your patio area.
This configuration gives you the freedom to build a massive, deep shade structure that isn’t limited by what your home’s rim joist can support. When framing this, I recommend digging your post holes down past your local frost line and pouring solid concrete footings. Once those posts are set and braced, the structure is completely independent of the house, preventing any future structural movement or warranty issues with your home’s siding.
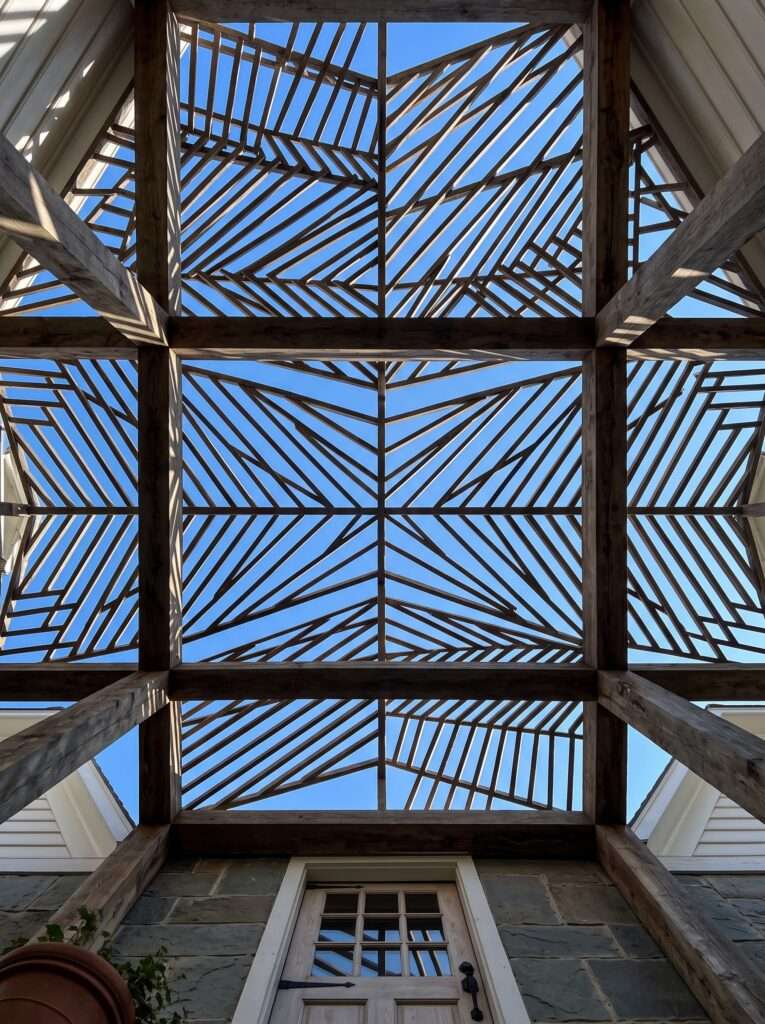
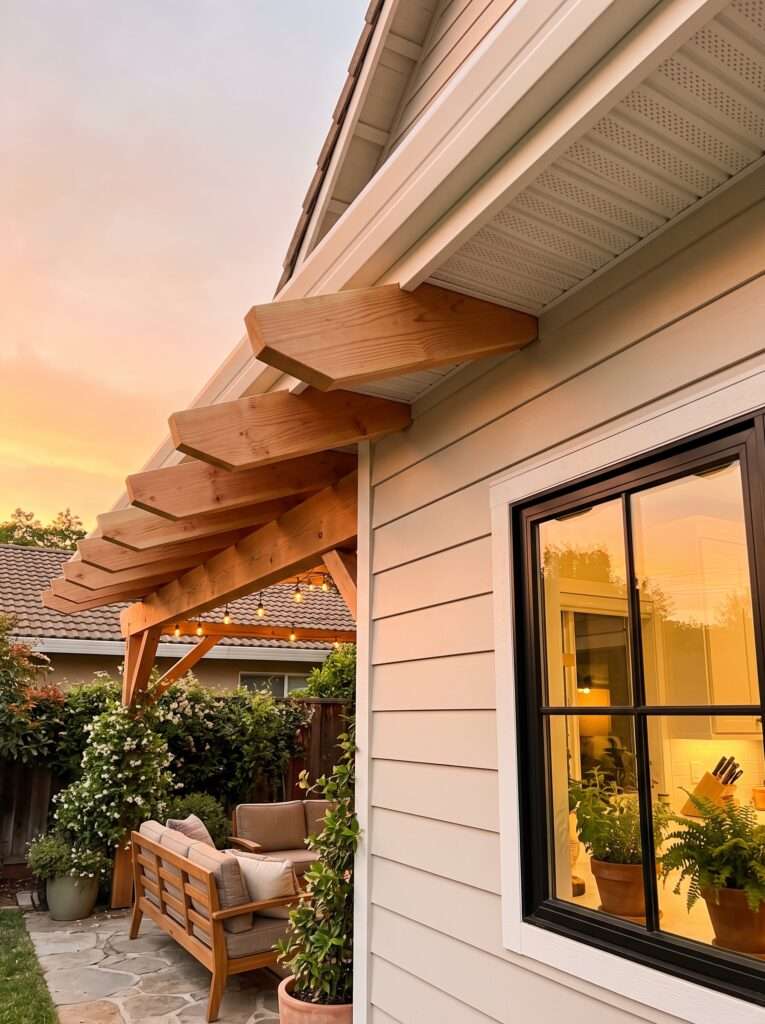
13. The Chevron Slatted Modern Accent Awning
For a striking architectural look that feels straight out of a modern design magazine, arranging your top shade slats in a chevron pattern adds immediate movement and visual interest above a simple doorway. This layout involves angling the short top boards inward toward a central spine rafter rather than running them straight across the frame horizontally. The resulting shadow lines shift beautifully throughout the morning and afternoon hours.
When building this, precision cutting is key. Every single slat requires a matching miter cut to sit flush against the center beam. I found it easiest to set up a dedicated stop block on my miter saw workstation so that every single piece was cut to the exact same length down to the millimeter. It takes a bit more time on the ground, but assembling it overhead goes together like a simple puzzle once your pieces are cut. If you are intimidated by complex project layouts, it helps to practice on smaller scale projects first—I highly recommend checking out the DIY Tiered Herb Planter Ladder: Step-by-Step Cut List for Beginners to get a feel for precise timber angle work.
14. The Wrap-Around Corner Header Connection
If your back door is located right near the corner of your home, extending your pergola framing around the corner can unite your side yard and backyard into a single cohesive outdoor living space. This involves creating a corner-lap joint where two separate ledger boards meet at a $90^\circ$ angle on the outside corner of your house framing. It creates an expansive, custom-built look that wraps beautifully around your patio.
Framing a corner layout requires careful attention to your corner posts to ensure everything remains perfectly square across both axes. I highly recommend drawing your layout lines on the concrete patio floor using chalk before setting any lumber in place. It gives you a clear roadmap to follow and ensures your rafter lines will run perfectly square to both walls of the house. If you have a free afternoon and want to add more vertical interest near your patio entryway, you can easily pair this build with The 4-Hour DIY Garden Trellis Arch That Cost Me Less Than Retails to give climbing vines a place to grow toward your new roofline.
How to Start (Simple Plan)
Building an attached pergola doesn’t have to be an overwhelming weekend ordeal. Here is a simple, realistic roadmap to getting your framing up safely:
- Locate and Mark Your House Joists: Go inside your basement or crawlspace to see exactly where your floor joists meet the outside wall. Transfer these measurements to the outside of your house using a tape measure from a fixed point like the edge of your door trim.
- Prep Your Ledger Board: Cut your ledger board ($2\times8$ or $2\times10$ treated timber) to your desired length. Pre-drill your holes for your structural screws on the ground, spacing them every 16 inches in a staggered zig-zag pattern to avoid splitting the wood grain.
- Mount the Ledger and Flashing: Have a helper assist you in leveling the ledger board right above your door trim. Drive in your structural screws into the house framing, then immediately install a metal Z-flashing lip over the top edge of the board to shed rainwater away from the wall.
- Set Your Outer Posts: Dig your post holes or secure your metal post bases to your concrete patio surface. Install your vertical support posts, use a spirit level to ensure they are plumb, and temporarily brace them with scrap $2\times4$ boards. Once your overhead framing is secure, adding an outdoor feature right next to the door creates a great ambiance. I built a DIY Solar Fountain Pond: Building a Wooden Surround Box for Small Yards right against my post footings, and the sound of running water under the new shade is incredible.
- Install the Main Header and Rafters: Cut and mount your main outer header beam across your vertical posts. Once secured, lift your main rafters into place, securing them to the ledger using joist hangers and letting the outer ends notch over your header beam.
Things That Didn’t Work for Me
Over my years of backyard building, I have made a few classic blunders that cost me both time and money. Here are the honest mistakes I’ve learned from so you can skip them entirely:
- Trusting Wall Anchors in Old Brick: On an old property, I tried mounting a light shade structure using standard expanding lead masonry wall anchors directly into old mortar joints. Within a single season of heavy winter wind, the vibration loosened the mortar and the anchors pulled right out. Never anchor into mortar; always go completely through the brick into the internal structural wood rim joist.
- Skipping the Joist Hanger Screws: In my early days, I used standard exterior gold wood screws to fasten structural joist hangers because I had a massive box of them handy. Within two years, the sheer weight of the rafters caused several screw heads to snap right off due to shear stress. Always use proper structural connector nails or specialized heavy-duty joist hanger screws designed specifically to handle lateral shear loads.
- Forgetting to Seal the Top Cuts: I once spent a small fortune on beautiful rough-sawn cedar timbers but forgot to seal the end grain on the top rafter tail cuts where they faced the open sky. Rainwater soaked straight into the open grain cuts, and by year three, small pockets of dark fungal rot were already forming. Now, I always coat every single cut end with a high-quality exterior wood sealer before lifting the boards into the air.
Premium Upgrades & Long-Term Maintenance
| Recommended Product | Why You Need It | Estimated Price | Action |
| [Black Powder-Coated Ornamental Joist Hangers] | Elevates the visual style of your project by giving the flush-mount rafters a clean, modern, and high-contrast finish. | $30 – $100 | [Check Price on Amazon ↗] |
| [Clear Exterior Premium Wood Sealer] | Protects the raw end-grain cuts of your cedar or pressure-treated timber from weathering, moisture absorption, and fungal rot. | $15 – $35 | [Check Price on Amazon ↗] |
Disclaimer: As an Amazon Associate, we earn a small commission from qualifying purchases at no extra cost to you.
FAQ
In most municipalities across the United States, any structural element that attaches permanently to your home’s framing requires a basic residential building permit. Freestanding structures under a certain square footage often bypass this, but because an attached pergola relies on your home’s foundation and wall system for support, it’s always best to make a quick phone call to your local building department first.
No, you should never bolt a wood ledger board directly on top of vinyl siding. The tightening pressure of the structural bolts will easily crush and crack the vinyl panels, and water will inevitably get trapped behind the assembly. You must neatly cut away a section of the vinyl siding slightly larger than your ledger board or use heavy-duty solid plastic spacers that allow the bolts to tighten directly against the solid wood sheathing behind the siding.
For long-lasting durability and resistance to rot, Western Red Cedar and Redwood are the absolute gold standards because they contain natural oils that repel moisture and wood-boring bugs. If you are working on a tighter budget, pressure-treated Southern Yellow Pine is a highly durable and strong alternative, though you must allow it to dry out for a few months before applying stains or paint.
The ideal spacing for standard pergola rafters is typically between 12 to 24 inches apart on center. If you live in a region with incredibly intense summer sun, spacing them closer together (around 12 to 16 inches) or angling the boards will create deeper, more effective shadow lines across your back entry doorway.
Whenever you drill a hole through your exterior siding or brick sheathing to mount a structural ledger, always squirt a generous amount of high-grade exterior silicone caulk directly into the drilled hole before driving your bolt or structural screw inside. This creates a watertight gasket seal inside the wall cavity, preventing moisture from seeping along the threads of the fastener over time.
Don’t overcomplicate this build. Take your time measuring your house joists, buy high-quality structural fasteners, and make sure your ledger board is perfectly level right from the start. Start with a couple of ideas first, get your layout lines marked out clearly on the wall, and adjust your rafter styles as you go.
Aagam – Founder of SpruceTouch
Hi, I’m the creator behind SpruceTouch. i am a home and garden enthusiast who shares practical ideas for backyard design, garden projects, patio decor, and small outdoor spaces. Through SpruceTouch, he focuses on simple and budget-friendly ways to improve outdoor living spaces.