
There is something deeply grounding about the sound of trickling water in a garden, but buying a pre-made stone or resin fountain can easily drain your weekend budget. This weekend project guide is all about turning leftover bits of cedar, treated pine, or old pallet wood into a beautiful, multi-level water cascade box. You’ll learn exactly how to structuralize the tiers, line them so the wood doesn’t rot in a month, and set up a simple low-voltage pump to keep the water moving.
I’ve spent the last fifteen years building, breaking, and rebuilding water features in my own yard. I used to think you needed expensive masonry or custom-molded plastics to get a multi-tier flow that actually lasted through the winter. After watching expensive store-bought resin fountains crack during the first hard frost, I realized that building with a flexible, modular mindset is actually a lot more durable.
My very first attempt at a wooden water box was an absolute disaster. I didn’t line the scrap cedar properly, thinking the natural oils would protect it forever, and it ended up leaking through the joints within three weeks, turning a patch of my lawn into a muddy swamp. I also chose a pump that was far too strong, which turned my gentle backyard stream into a chaotic fire hose that soaked my nearby tomato plants.
A few of these design ideas honestly worked much better than I expected, and they cost next to nothing to assemble if you already have a pile of scrap wood hiding in your garage.
Essential Planning Checklist (Before You Start)
| Recommended Product | Why You Need It | Estimated Price | Action |
| [220 GPH Submersible Water Pump with Adjustable Flow] | Powers the water from the base reservoir up to the top tier box continuously. | $15 – $30 | [Check Price on Amazon ↗] |
| [Heavy Duty EPDM Pond Liner Roll (6 mil or higher)] | Waterproofs the interior of your scrap wood boxes to prevent structural rot. | $20 – $50 | [Check Price on Amazon ↗] |
Disclaimer: As an Amazon Associate, we earn a small commission from qualifying purchases at no extra cost to you.
Quick Picks (Top 5)
- The Beginner Choice: The Simple Three-Tier Stack using basic square boxes and a pre-made pond liner insert.
- High-Impact Visual Winner: The Alternating Zig-Zag Flow that shifts the water direction 90 degrees at every level.
- Lowest Budget Option: The Pallet Slat Tower made entirely from dismantled shipping pallets and heavy-duty trash bag liners.
- Quickest Weekend Win: The Stair-Step Cascade built directly against an existing garden retaining wall.
- Best for Small Spaces: The Vertical Wall-Mounted Cascade box that hangs directly onto a sturdy fence post.
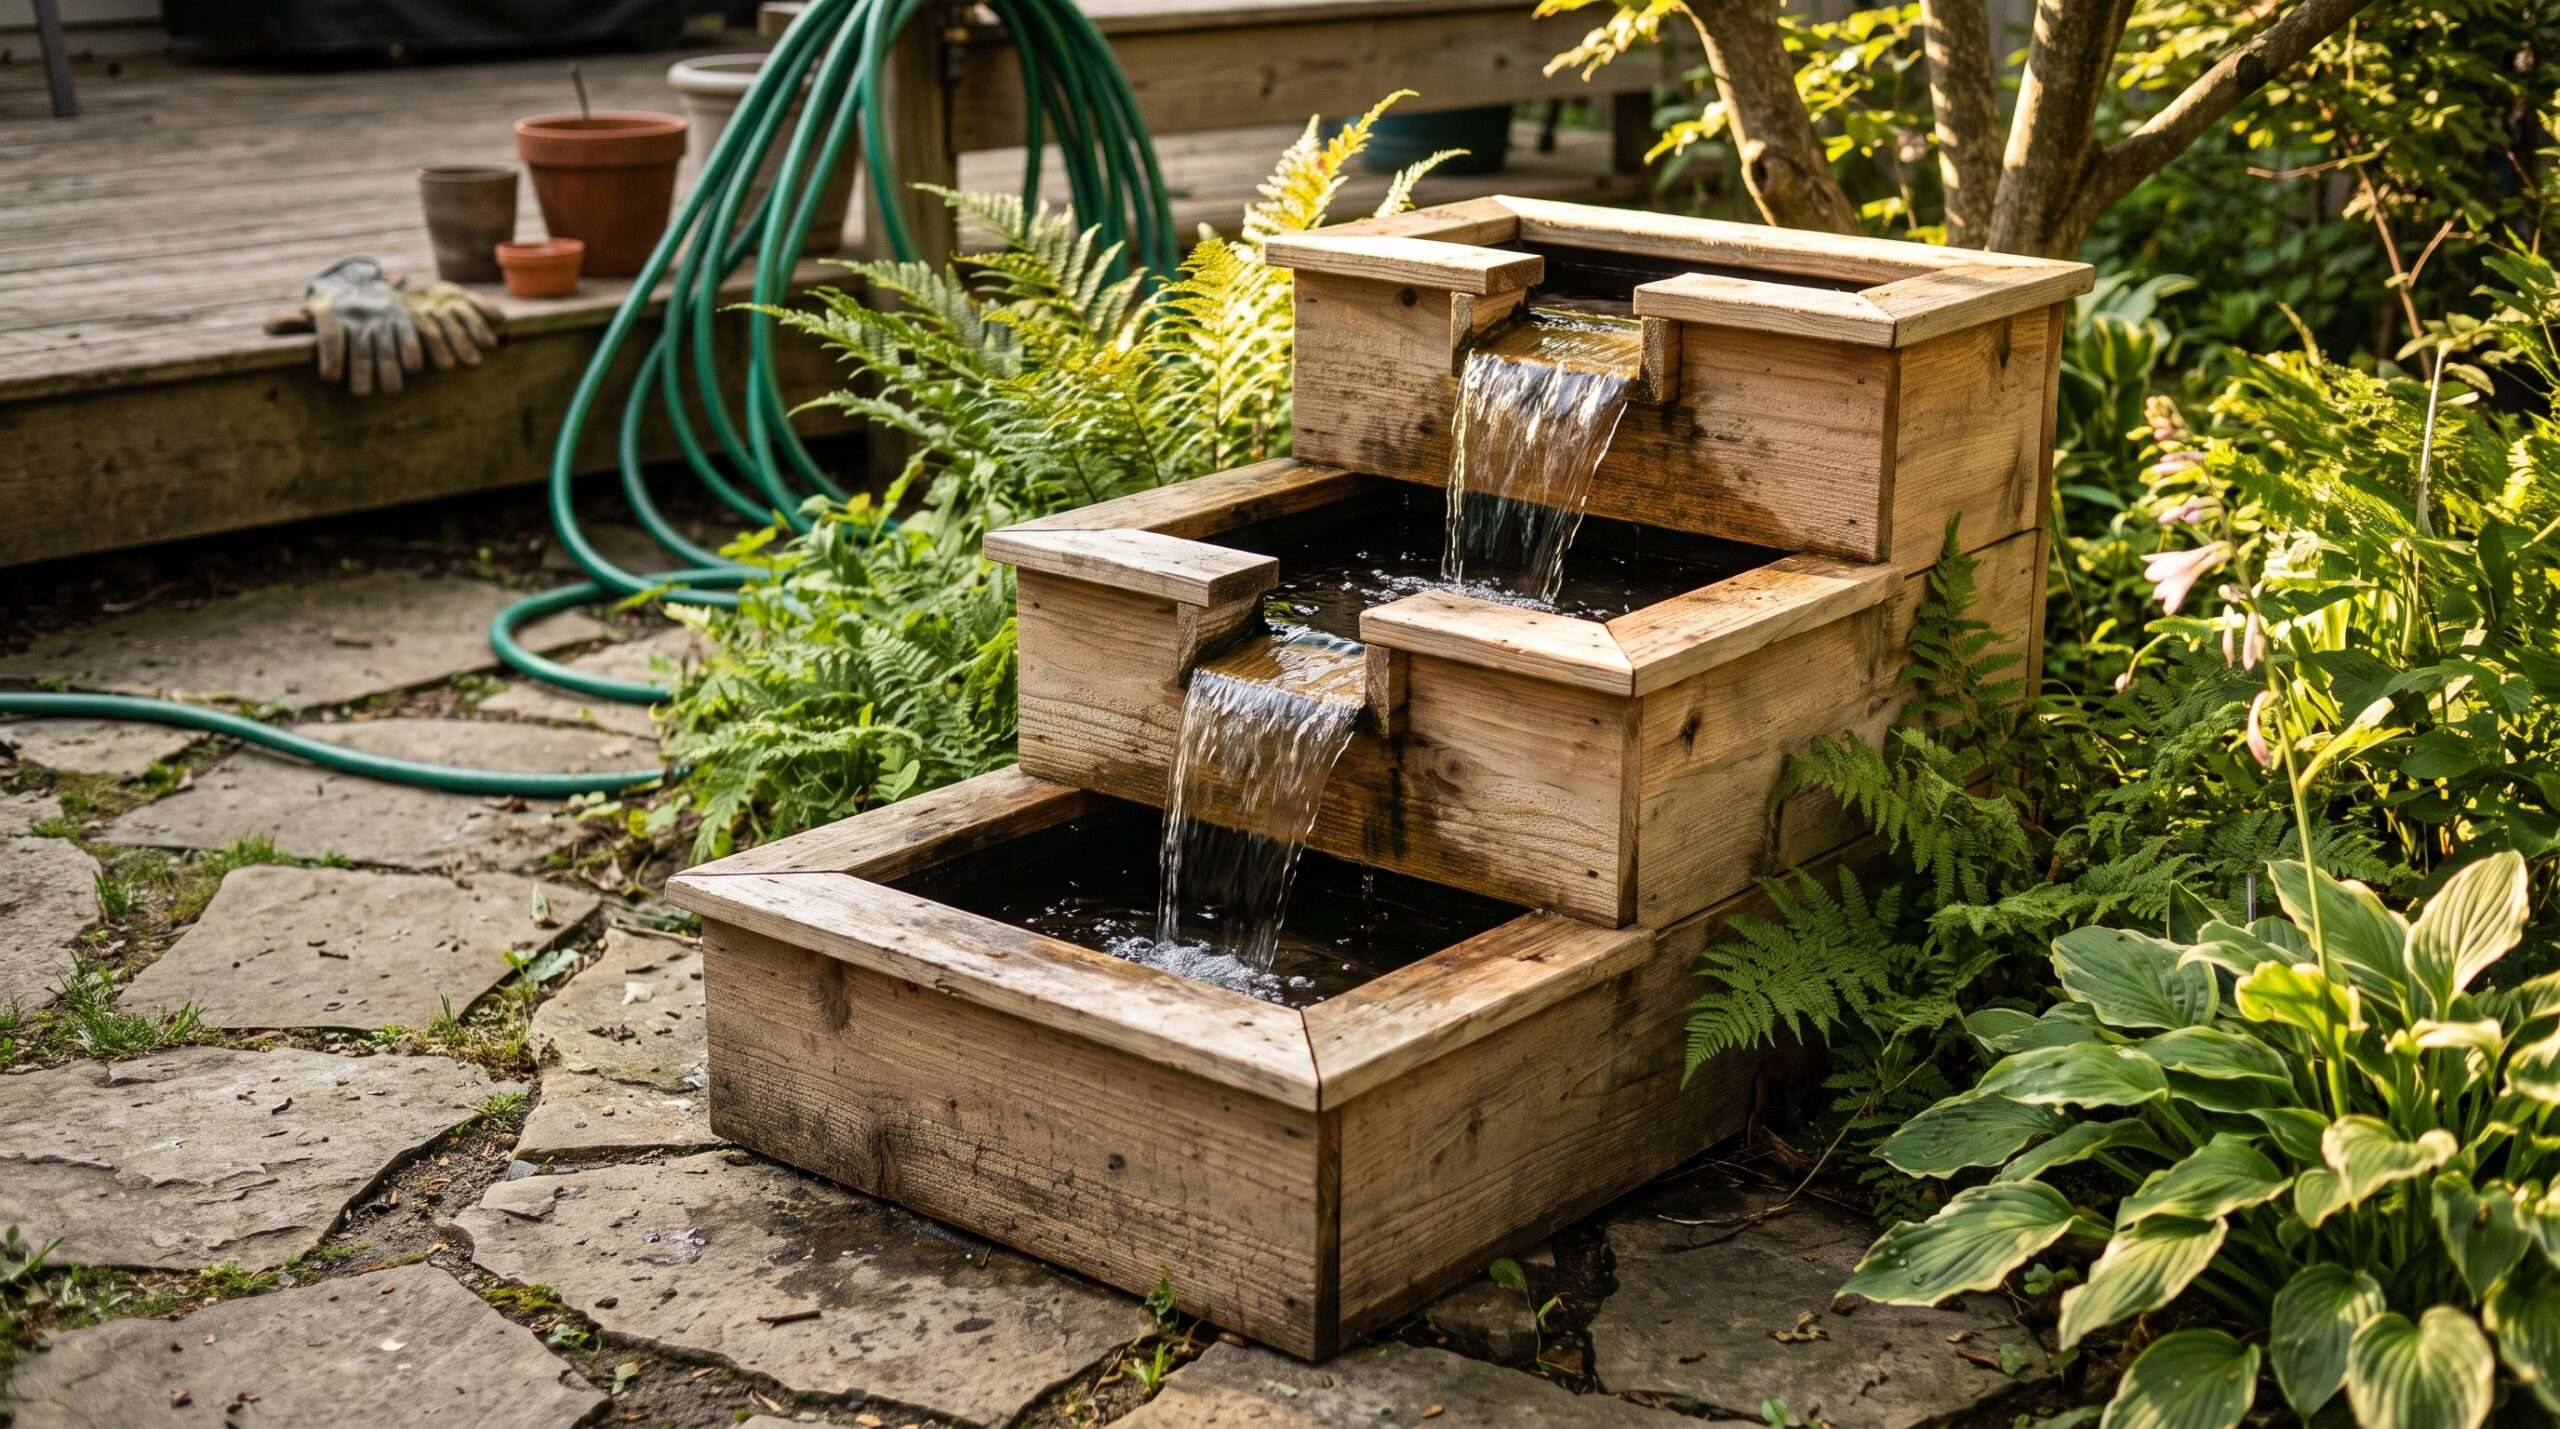
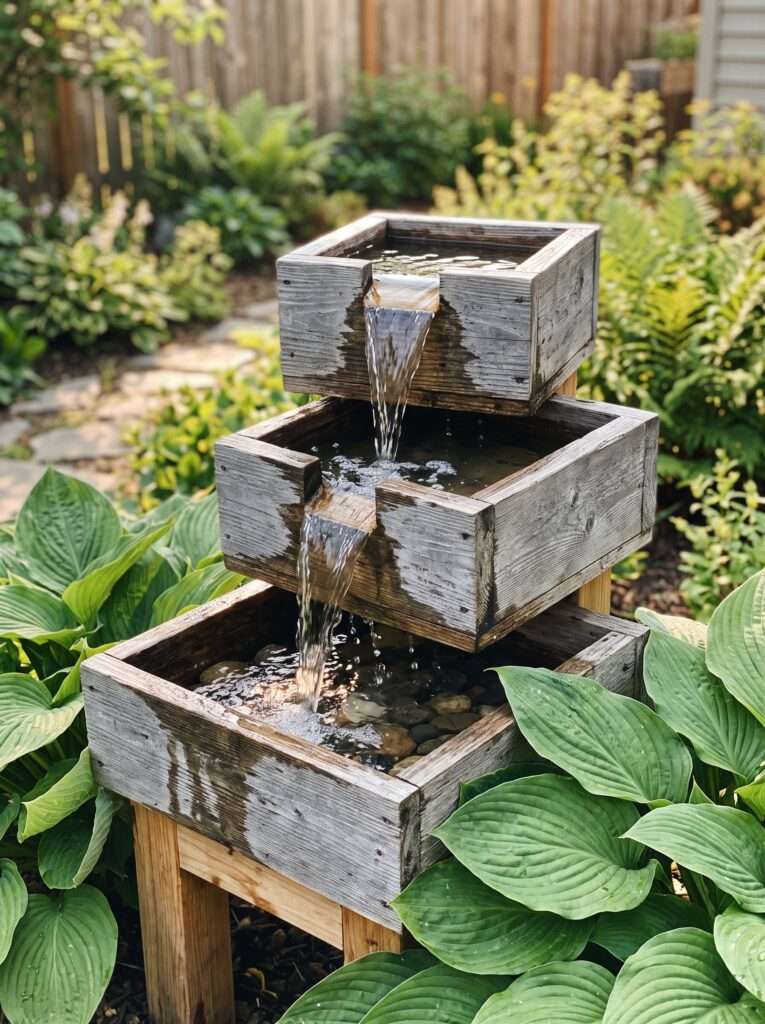
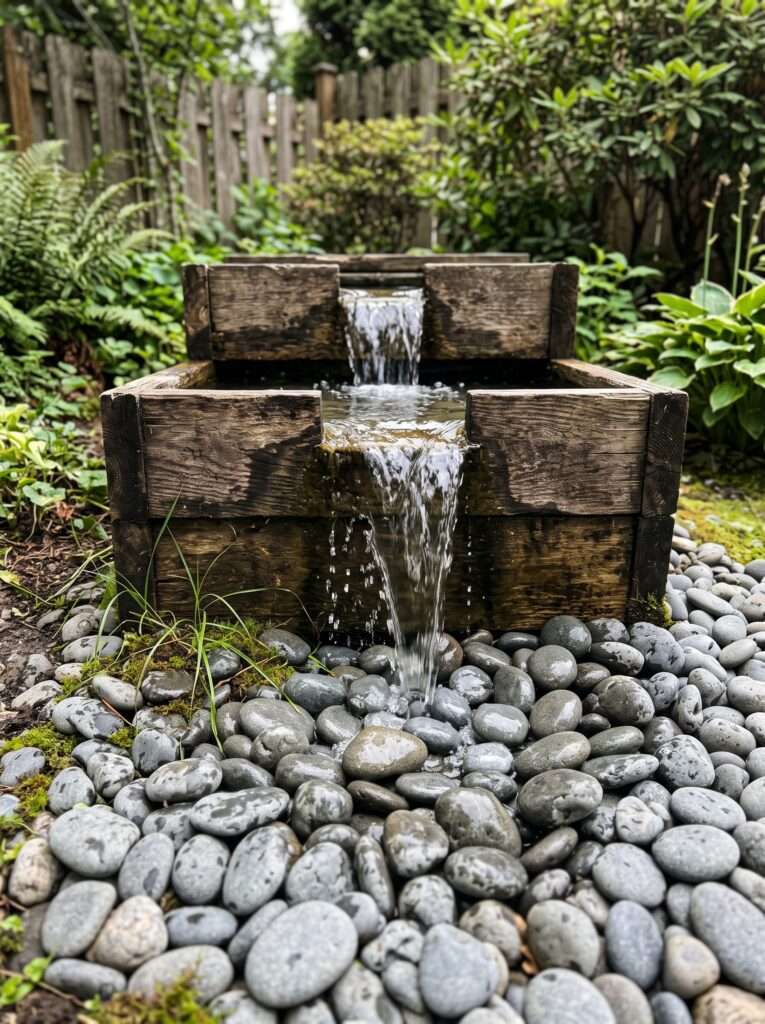
The Classic Three-Tier Square Stack
This is the design that got me back into building water features after my initial failure. It uses three simple square boxes built from scrap 2×6 cedar boards, stacked directly on top of each other but rotated slightly. The bottom box is the widest, acting as the main reservoir, while the top two grow progressively smaller.
What surprised me about this design was how sturdy it felt once filled with water. The weight of the water itself keeps the boxes from shifting around, even without complex joinery. I didn’t use fancy tongue-and-groove joints here; just simple butt joints held together with exterior-grade deck screws.
To make the water spill cleanly from one level to the next, I cut a small, shallow U-shaped notch into the top edge of the middle and top boxes. If you leave the edge completely flat, the water tends to cling to the wood and dribble down the side rather than making a clean, musical splash.
One mistake to avoid is using cheap interior screws. They will rust within a month, causing ugly black streaks to run down the face of your scrap wood. Stick to coated deck screws or stainless steel.
The Alternating Zig-Zag Spillway
If you want a water feature that catches the eye from across the yard, changing the direction of the water flow is a great trick. This setup uses long, narrow rectangular scrap boxes arranged in an alternating pattern, creating a zig-zag path for the water as it drops.
I built this one using leftover pieces of pressure-treated 1×8 boards from a privacy fence project. Because the water travels along a flat channel before dropping to the next tier, it creates a much quieter, more soothing bubbling sound rather than a loud splashing noise. It’s perfect if you want to place it right next to a patio seating area where you don’t want to shout over the rushing water.
I learned this the hard way: when you create a long run for the water, you must ensure the boxes are perfectly level from side to side, but sloped just a tiny fraction of an inch forward toward the spillway. If the box tilts left or right, the water will pool unevenly and spill out over the side walls instead of going down the next tier.
Every time a guest comes over, they assume this design took weeks of precise engineering, but it really just took a simple level and some shims hidden underneath the bottom frames.
The Hidden Reservoir Tier
This design is a lifesaver if you have pets or small children running around the yard and don’t want an open pool of standing water at the bottom of your feature. The lowest box is actually buried completely flush with the ground, or hidden inside a larger, decorative wooden frame filled with large river stones.
The pump sits deep down inside this hidden bottom box, pushing water through a flexible tube up to the very top wooden tier. As the water cascades down the exposed upper wooden boxes, it eventually disappears straight into the bed of river rocks, draining right back into the hidden reservoir below.
This worked better than expected at keeping the water clean. Because the main pool of water isn’t exposed to direct sunlight or falling leaves, algae growth is significantly slower, and I don’t have to scoop out debris nearly as often.
But wait, there’s a catch: you need to make sure your hidden reservoir box has an easy-access hatch or a removable section of rocks. If your pump clogs or needs a filter rinse, you don’t want to have to dismantle the entire wooden superstructure just to reach it.
Small Pro Tip: Before you fasten your scrap wood boxes together permanently, line the insides with heavy-duty EPDM pond liner or thick, UV-resistant plastic sheeting. Use a staple gun along the very top edge where the staples will be hidden by a top trim piece. If you let water sit directly against the bare wood, even pressure-treated wood will eventually rot, bow, or leach chemicals into your backyard ecosystem.
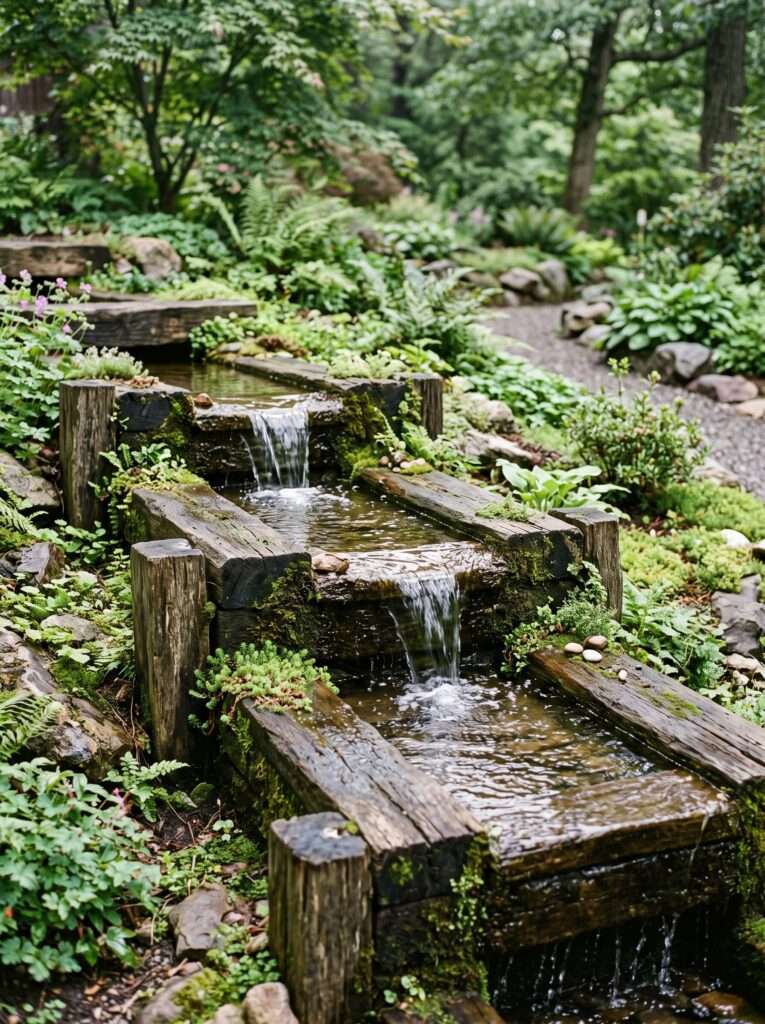
The Stair-Step Garden Wall Extension
If your yard has a slope or an existing retaining wall, you can build your water cascade box directly into the landscape. This layout mimics a natural mountain stream by using short, wide scrap wood boxes arranged like a flight of stairs directly against the dirt bank.
When I tackled this project in my own sloped side yard, I used heavy scrap pieces of 4×4 timber left over from a pergola build. I stacked them to create a solid, heavy staircase frame, then dropped shallow custom-built liner boxes into each step.
One thing most people ignore when building on a slope is soil shifting. Over the winter, the ground freezes and expands, which can push your wooden tiers out of alignment. To combat this, I drove long pieces of rebar through pre-drilled holes in the bottom scrap timbers deep into the ground to anchor the entire setup permanently.
The visual payoff of this design is massive. It blends seamlessly into the surrounding garden bed, especially if you plant low-growing creeping thyme or Irish moss right up against the wooden edges.
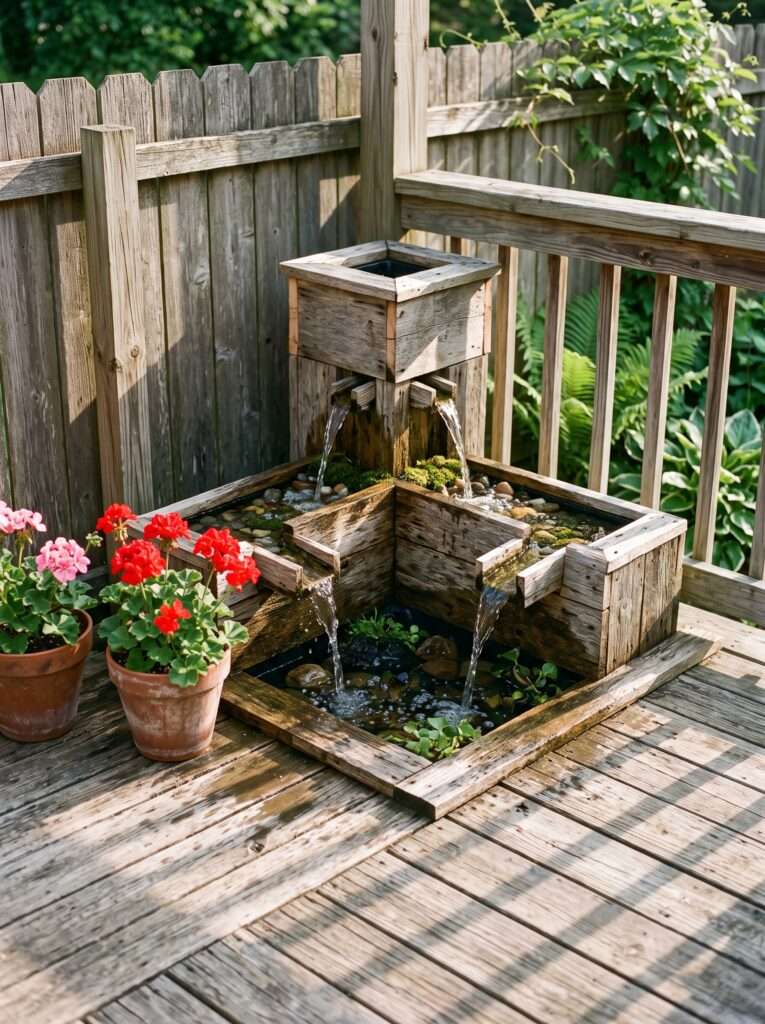
The Corner L-Shaped Multi-Tier
Most backyard patios have an unused corner that just accumulates cobwebs or forgotten garden tools. An L-shaped multi-level water box fits perfectly into these right-angle spaces, utilizing the corner to create a wrapping water movement.
For this build, the top box sits dead center in the corner angle, and it splits the water flow into two separate directions, spilling into a left-side middle box and a right-side middle box simultaneously. Both streams then meet back up in a large, shared L-shaped bottom reservoir.
This looked great online when I saw a similar concept made of concrete, but translating it to scrap wood took some patience. Getting the water to split exactly 50/50 out of the top box requires a perfectly level spill notch on both sides. If one side is even a millimeter lower, all the water will choose the path of least resistance, leaving the other side bone dry.
It took me about twenty minutes of micro-adjusting with thin plastic wedges under the top box to get a balanced, double-sided flow, but the symmetrical sound of the water wrapping around the patio corner was completely worth the trouble.
Required Tools & Materials for Installation
| Recommended Product | Why You Need It | Estimated Price | Action |
| [Exterior Coated Deck Screws Combo Pack] | Securely fastens the scrap wood joints without rusting or streaking over time. | $10 – $25 | [Check Price on Amazon ↗] |
| [Heavy Duty Manual Staple Gun with T50 Staples] | Securely tacks down the pond liner to the top inside edge of each wooden tier. | $15 – $35 | [Check Price on Amazon ↗] |
Disclaimer: As an Amazon Associate, we earn a small commission from qualifying purchases at no extra cost to you.
The Asymmetrical Pallet Tower
If you don’t have pristine cutoffs of cedar or pine, a dismantled shipping pallet is an excellent source of free, highly textured scrap wood. The beauty of pallet wood lies in its rough-sawn, imperfect look, which lends itself beautifully to a rustic, asymmetrical tower design.
For this project, instead of making perfect squares, I built boxes of random lengths and widths out of the pallet slats. I stacked them in a erratic, off-center tower, making sure each level overhung the one below it just enough to accommodate a spillway.
The best part? You don’t have to worry about making perfect cuts or sanding the wood smooth. The more knots, nail holes, and saw marks visible on the exterior, the more character the fountain has once the water starts moving.
I learned this the hard way: pallet wood is incredibly dry and porous. If you don’t apply a clear, fish-safe water sealant to the exterior faces, the wood will absorb moisture from the humid air around the fountain and start to warp dramatically within a few weeks of operation. Give it a quick coat of sealer before assembly.

Common Mistake: Don’t skimp on your pump size, but don’t overdo it either. A pump rated for a massive garden pond will turn your small scrap wood cascade into an aggressive splash zone, emptying your reservoir via overspray within a couple of hours. Look for a small 150 to 250 GPH (gallons per hour) submersible pump with an adjustable flow valve so you can fine-tune the speed of your stream.
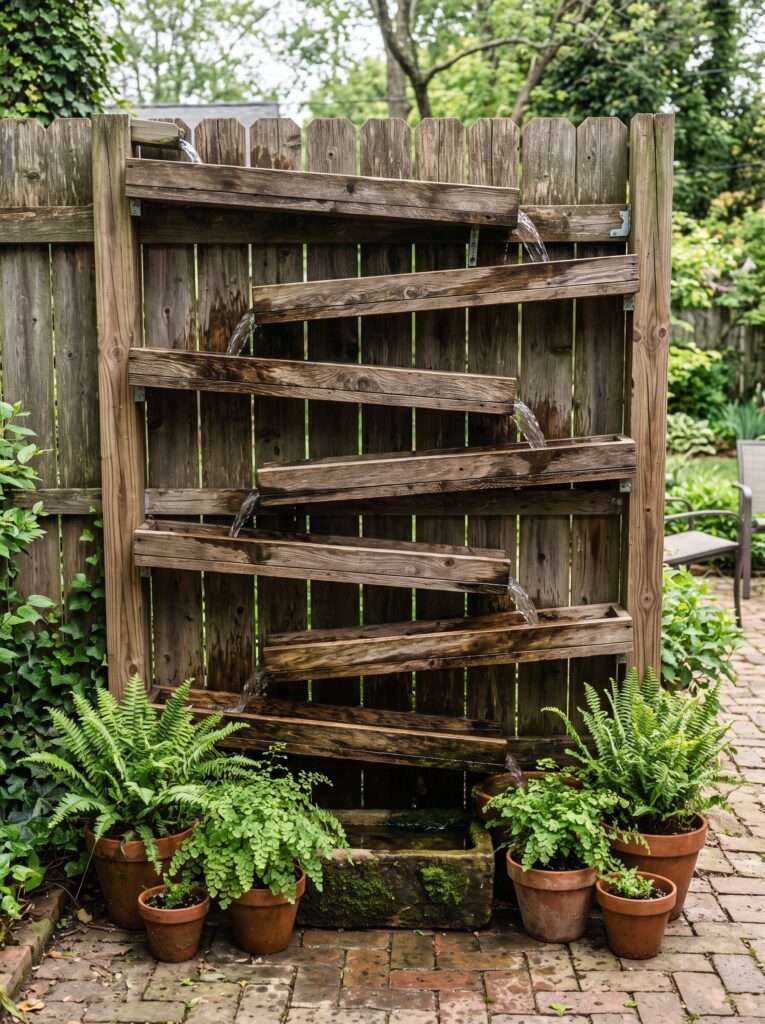
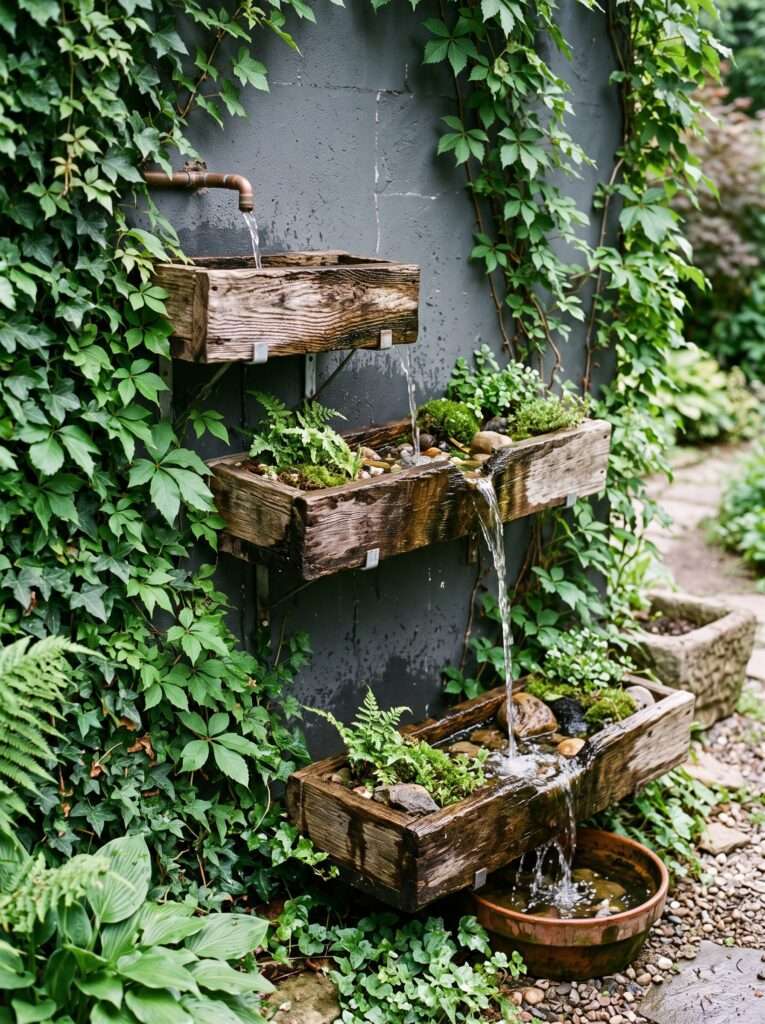
The Vertical Wall-Mounted Cascade Boxes
When patio floor space is limited, look to your vertical surfaces. This design involves mounting a series of shallow, trough-like scrap wood boxes directly to a sturdy fence, a brick wall, or the side of a garden shed.
I built this version using leftover pieces of 1×4 trim boards. The troughs are staggered down the wall like a pinball machine, causing the water to bounce back and forth horizontally as it makes its downward journey into a narrow trough reservoir on the ground.
This setup creates a stunning visual backdrop for an outdoor dining area. Because the water falls across a vertical plane, it catches the evening light beautifully and acts like a living piece of wall art.
One thing to keep in mind is water splashing against your mounting wall. Even with a perfect alignment, wind can catch a vertical stream and blow droplets onto the fence or siding behind it. Make sure to back the entire assembly with a sheet of waterproof flashing or heavy plastic to protect your home’s structures from constant moisture exposure.
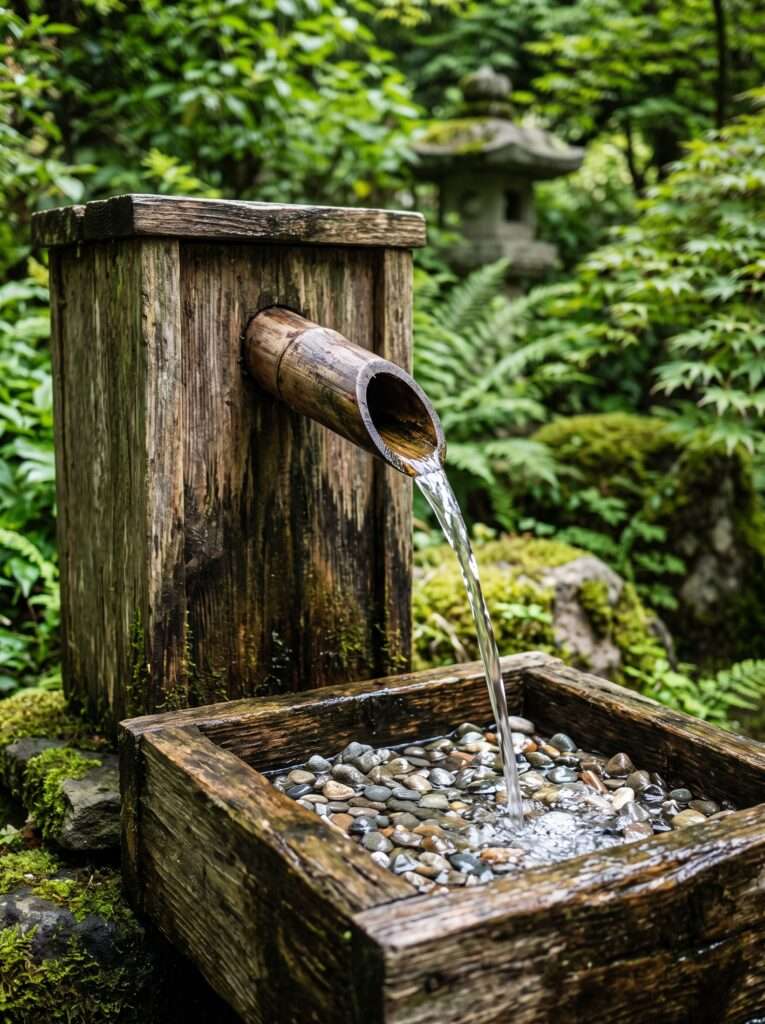
The Bamboo-Spout Hybrid Cascade
If you want to soften the look of a purely square wooden structure, integrating short pieces of hollow bamboo as your spillways is a brilliant design variation. You still build the main structural boxes out of your scrap lumber, but instead of cutting U-notches for the water to exit, you drill a round hole and insert a downward-angled piece of bamboo.
This gives the cascade a slightly Zen, Japanese garden appearance while keeping the project deeply rooted in DIY scrap materials. The water shoots out in a tight, clean stream from the bamboo pipes, making a clear, resonant hollow sound when it hits the water layer below.
What surprised me about this hybrid design was how much quieter it was compared to wide wooden spillways. The concentrated stream creates less ambient splashing and mist, which means you lose far less water to evaporation on hot, windy summer afternoons.
Just make sure to cut the front edge of the bamboo sprouts at a sharp 45-degree angle pointing downward. This prevents the water from trickling backward along the underside of the pipe and running down the outer face of your main wooden boxes.
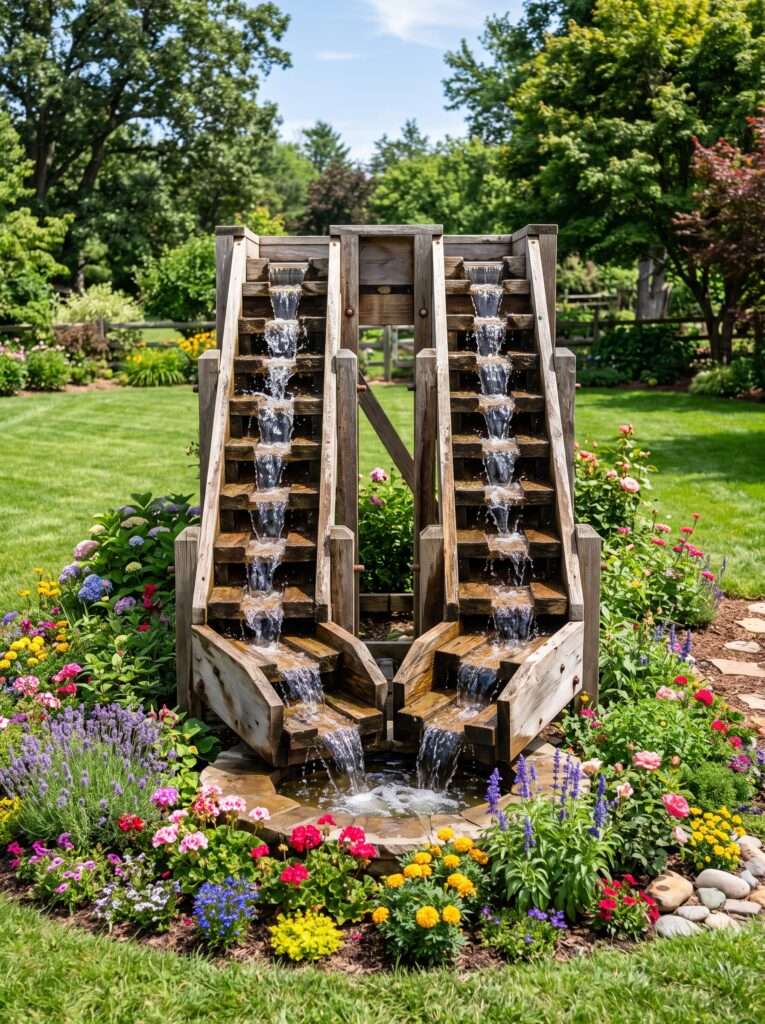
The Double-Sided Twin Stream
For larger backyards or central garden islands, a double-sided cascade offers a 360-degree visual experience. The design centers around a tall, central top box that receives water from the pump and divides it into two opposite directions simultaneously.
The water then journeys down two identical sets of stair-stepped scrap wood boxes on either side of the central tower, finally pooling back together in an elongated oval or rectangular bottom trough that encircles the entire base of the structure.
I attempted this using thick scraps of old pressure-treated decking planks. Because it’s a larger, heavier setup, it requires a slightly stronger pump and a bit more attention to structural stability at the base.
But here’s the kicker: it acts as an incredible natural divider in a yard. You can use it to separate a chaotic kids’ play zone from a quiet, relaxing seating area, using both the physical mass of the wooden tower and the continuous white noise of the twin streams to create a true sensory barrier.
What Actually Helped: If you struggle to get a clean, glassy sheet of water falling over your wooden spillways, use a thin bead of clear silicone caulk right along the underside of the lip where the water exits. This creates a sharp drip edge that forces the water to break clean away from the wood and fall straight down, rather than dribbling messily backward along the bottom of the box.
How to Start (Simple Plan)
Building a basic multi-level water cascade box doesn’t require a master carpenter’s workshop. Here is a straightforward, budget-conscious method to get your first three-tier stack up and running over a single weekend.
Gather Your Materials
- Scrap Wood: Look for cedar, redwood, or pressure-treated pine pieces (approx. 4 to 5 feet total of 1×6 or 2×6 boards).
- Waterproof Liner: A roll of 6mil thick plastic sheeting or heavy-duty pond liner scraps.
- Pump: A small 200 GPH submersible pond pump with a 1/2-inch flexible tubing outlet.
- Fasteners: 2.5-inch exterior-grade deck screws.
- Tools: A miter saw or hand saw, a drill/driver, a staple gun, and a sharp utility knife.
Step 1: Build the Boxes
Cut your scrap boards into lengths to form three simple open-ended square frames. The large base box should be roughly 16×16 inches, the middle box 12×12 inches, and the top box 8×8 inches. Screw the corners together using two screws per joint. Cut a 2-inch wide, 1/2-inch deep notch into one top edge of the top and middle boxes to serve as your water spillways.
Step 2: Line for Water
Line the inside of each box with your plastic sheeting. Push the plastic deep into the corners so it isn’t stretched tight when filled with water. Staple the liner securely along the inside top rim, about half an inch below the edge so it stays hidden from view. Cut out the liner material where it crosses over your spillway notches, leaving enough slack to tuck it cleanly through the opening.
Step 3: Stack, Route, and Run
Place your large base box in its final, level home in your yard. Set your pump inside it, running the flexible water tube up through the center. Stack the middle box on top, using a couple of small hidden cross-braces of scrap wood to support its weight over the base reservoir. Repeat the process for the top box. Connect the water tube to the top tier, fill all levels with water from your garden hose, and plug your pump into a safe GFCI outdoor outlet. Adjust the flow valve until you get a smooth, steady trickle.
Things That Didn’t Work for Me
- Using Untreated Pallet Wood Without Sealer: My first attempt turned into a warped, spongy mess within a single summer season because the dry wood soaked up continuous overspray like a sponge.
- Forgetting an Easy Drain Plug: I originally built a system without a way to empty the bottom reservoir easily. When winter arrived, I had to manually bail out gallons of freezing water with a plastic cup to prevent the wood frames from cracking as the water froze solid.
- Relying on Hot Glue for Liner Seams: I once tried to piece together smaller scraps of pond liner using high-temperature hot glue. The constant water pressure and summer heat broke the bond in less than 48 hours, causing a stealthy leak that drained the fountain overnight.
FAQ
Cedar and redwood are the gold standards because they contain natural oils that resist rot and insect damage. However, if you line the interiors properly with thick plastic, you can successfully use pressure-treated pine, old decking planks, or even sturdy shipping pallet slats.
Mosquitoes need stagnant, still water to lay their eggs. As long as your pump runs continuously or is set on a regular daytime timer, the constant surface movement of the cascading tiers will prevent mosquitoes from using it as a breeding ground.
If you live in an area with freezing winter temperatures, you must drain all the water out of the boxes and remove the submersible pump to store it indoors. Water expands when it freezes, which can easily tear your plastic liners and crack your wooden frames apart at the joints.
Depending on how much direct sunlight your fountain gets and how windy your yard is, you will lose a few inches of water every week to natural evaporation. Check the water level every few days to ensure the pump remains fully submerged; running a pump dry will quickly burn out its motor.
If you use modern pressure-treated lumber, it is generally safe once dry, but to be completely certain, you should line the water channels with food-safe or fish-safe EPDM pond liners. This prevents the moving water from interacting directly with any chemical treatments embedded in the scrap wood.
At the end of the day, you don’t need a master’s degree in landscape architecture to bring the sound of moving water into your backyard space. Grab whatever scrap lumber you have cluttering up your workspace, cut a few simple boxes, and focus on getting those water channels lined tightly. Start with a couple of basic boxes first, test out your pump speed, and adjust the layout as you go until it sounds just right to your ears.
Most ideas in this article come from years of real gardening experience and testing different setups at home. Results may vary depending on climate, space, and maintenance. Always practice safety when handling power tools and working with outdoor electrical connections.
Premium Upgrades & Long-Term Maintenance
| Recommended Product | Why You Need It | Estimated Price | Action |
| [Polished Mixed Gray River Rocks (10-15 lbs)] | Dissipates falling water force, hides internal liners, and creates a natural look. | $20 – $40 | [Check Price on Amazon ↗] |
| [Clear Exterior Water-Based Wood Sealer] | Protects porous outer scrap wood surfaces from warping due to humidity and splash mist. | $15 – $35 | [Check Price on Amazon ↗] |
Disclaimer: As an Amazon Associate, we earn a small commission from qualifying purchases at no extra cost to you.
Aagam – Founder of SpruceTouch
Hi, I’m the creator behind SpruceTouch. i am a home and garden enthusiast who shares practical ideas for backyard design, garden projects, patio decor, and small outdoor spaces. Through SpruceTouch, he focuses on simple and budget-friendly ways to improve outdoor living spaces.