
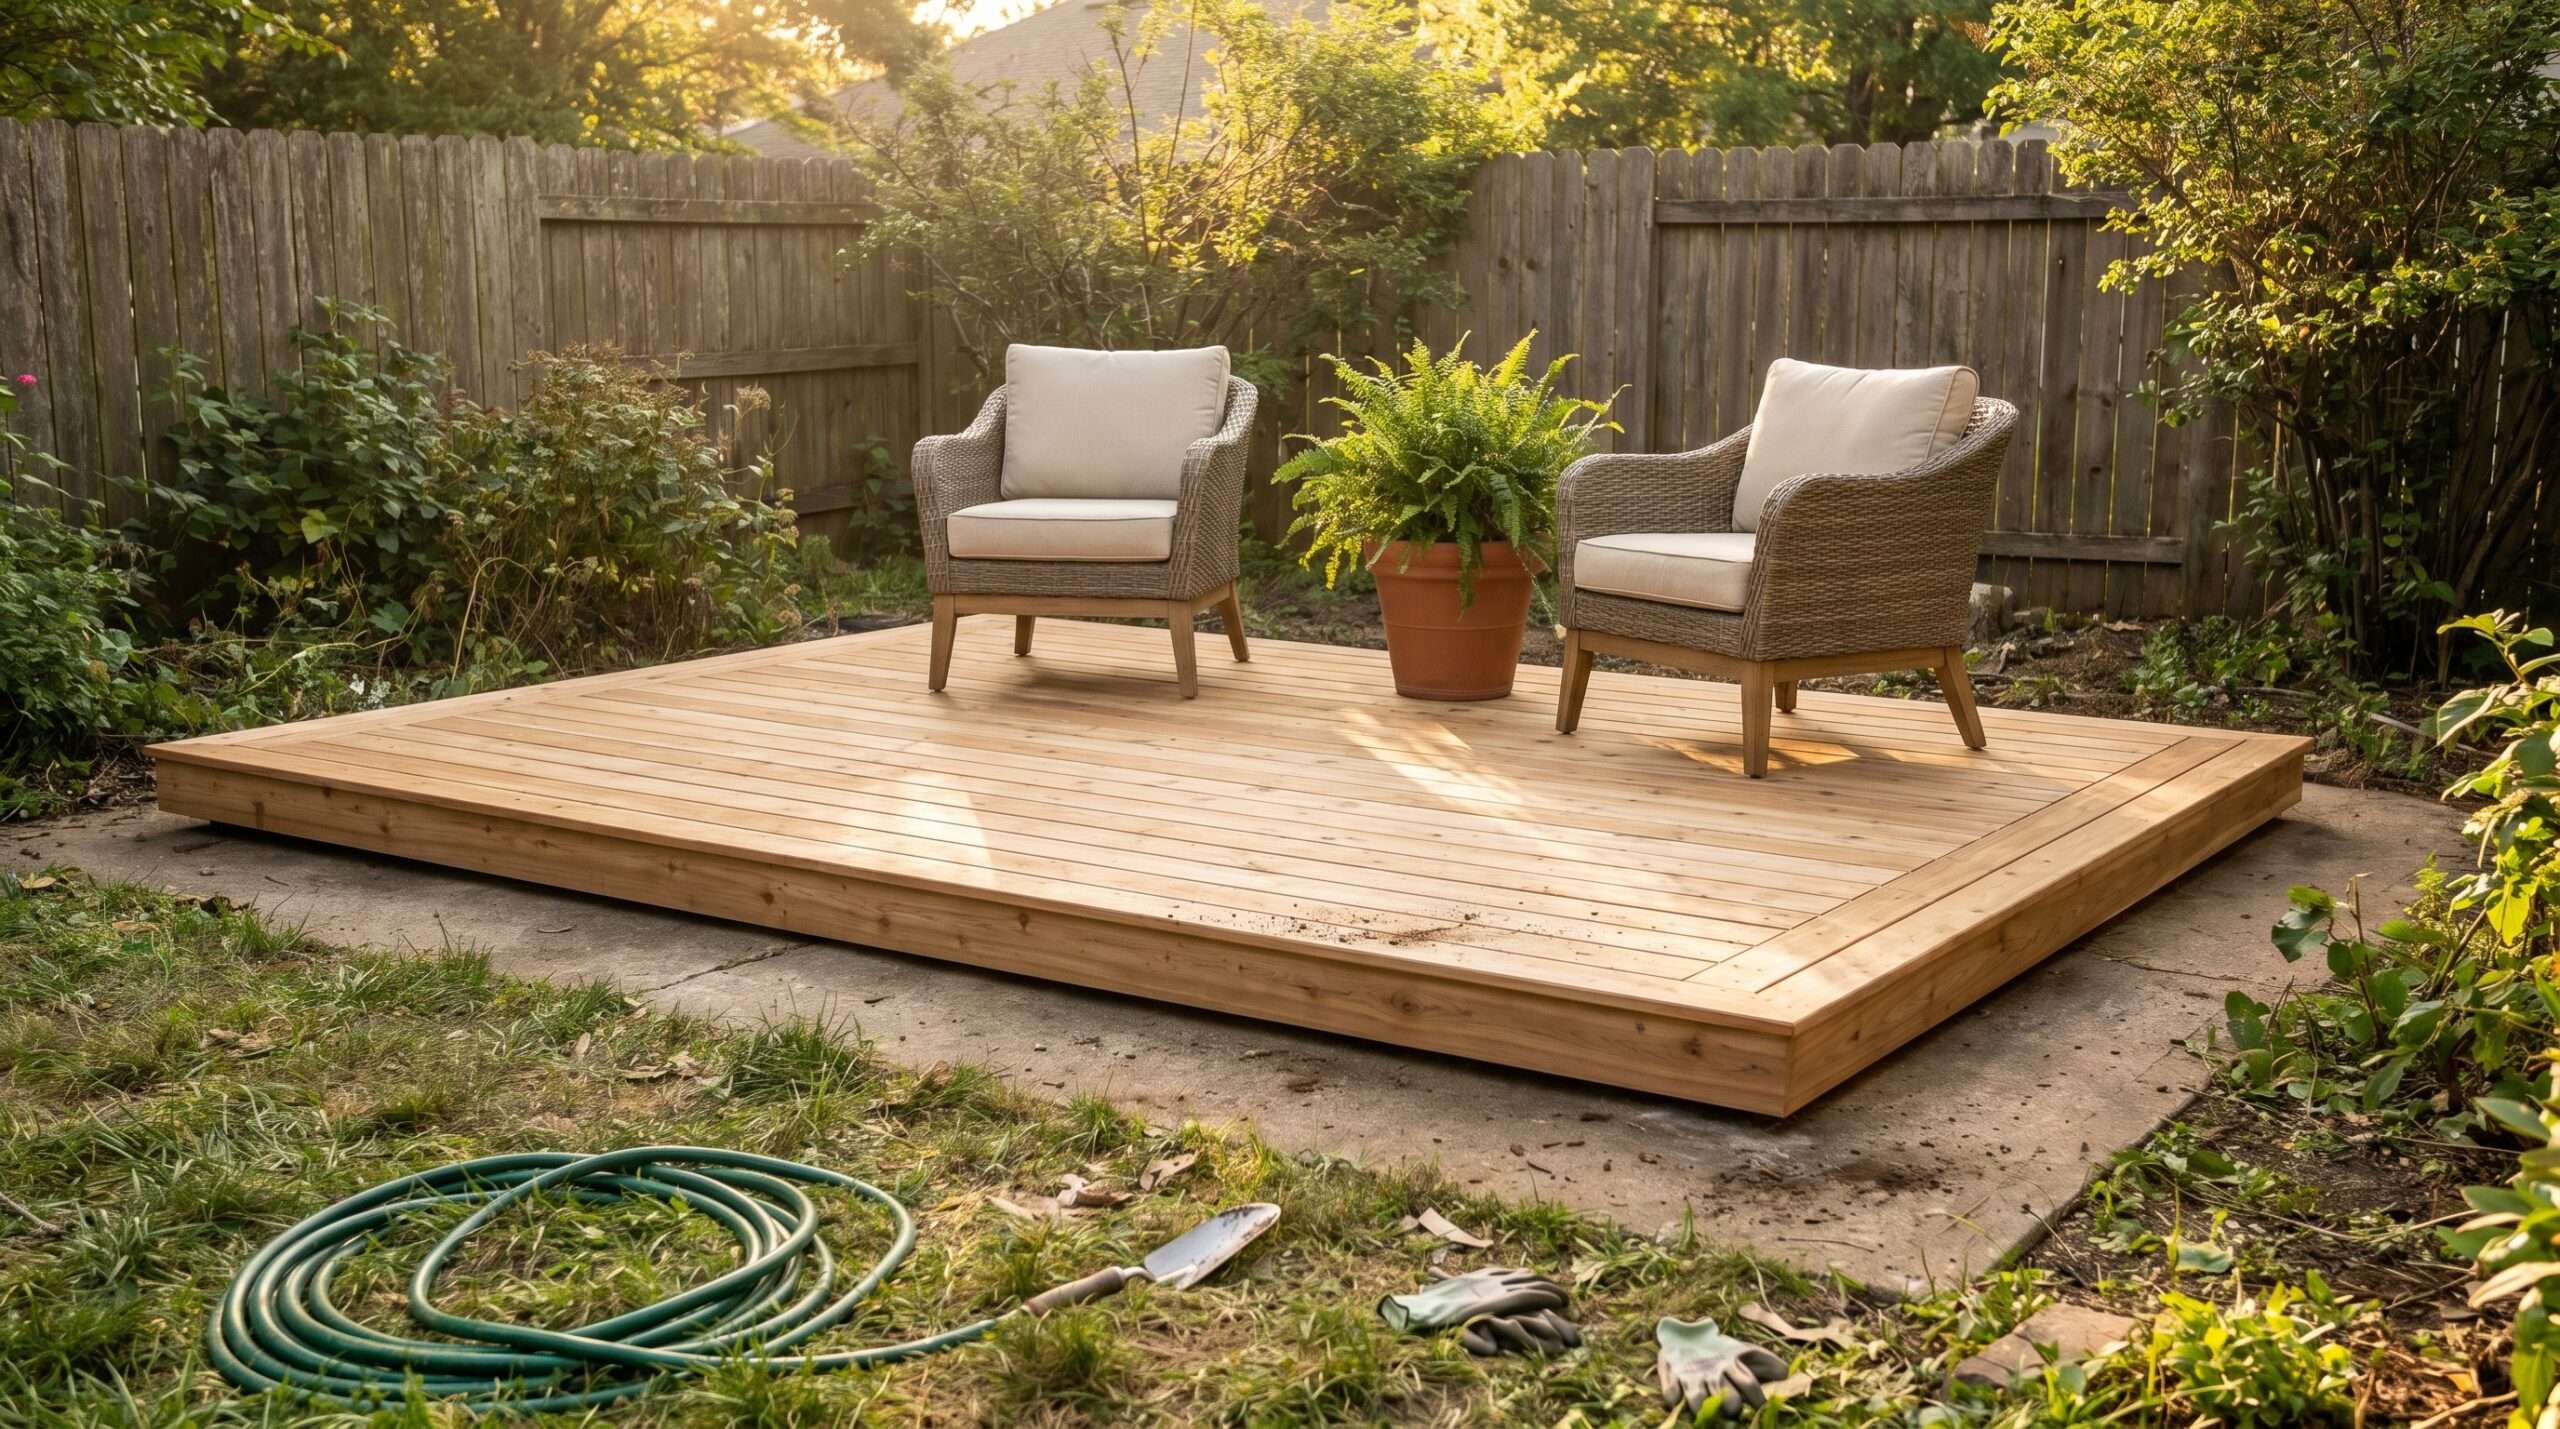
If you are staring out your back window at a stained, cracked, or uneven slab of concrete, you are not alone. In this post, you will learn exactly how to transform that eyesore into a warm, low-profile wooden deck without spending thousands on a demolition crew.
I’ve spent the last twenty years tweaking, fixing, and experimenting with backyard layouts and DIY structures. Over the years, I’ve learned the hard way how wood reacts to moisture when it’s sitting too close to the ground.
My own backyard used to feature a horribly pitted, gray concrete slab that collected puddles every time it rained. I wasted money on outdoor rugs and cheap patio paint that peeled within a year before finally deciding to build a sleeper deck right over it.
A few of these ideas honestly worked much better than I expected, and they will save your back and your budget.
Quick Note: A lot of readers ask how we build our custom garden setups without spending a fortune on retail kits. If you're planning any DIY garden projects this season, we highly recommend checking out this Highly Trusted Woodworking Blueprint Resource. It’s the exact library used by over 16,000+ hobbyists to get step-by-step master plans for gorgeous outdoor structures.
Quick Picks (Top 5)
Best for Beginners: The Floating Sleeper Frame (no anchoring into concrete required).
High-Impact Visual Winner: The Picture-Frame Border (hides ugly raw end-grains instantly).
Lowest Budget Option: Pressure-Treated 2x4s Laid Flat with Cedar Top-Boards.
Quickest Visual Win: Interlocking Deck Tiles (perfect if you want a weekend transformation with zero saws).
Best for Longevity: The Joist-Flashing Tape Layer (stops rot before it even thinks about starting).
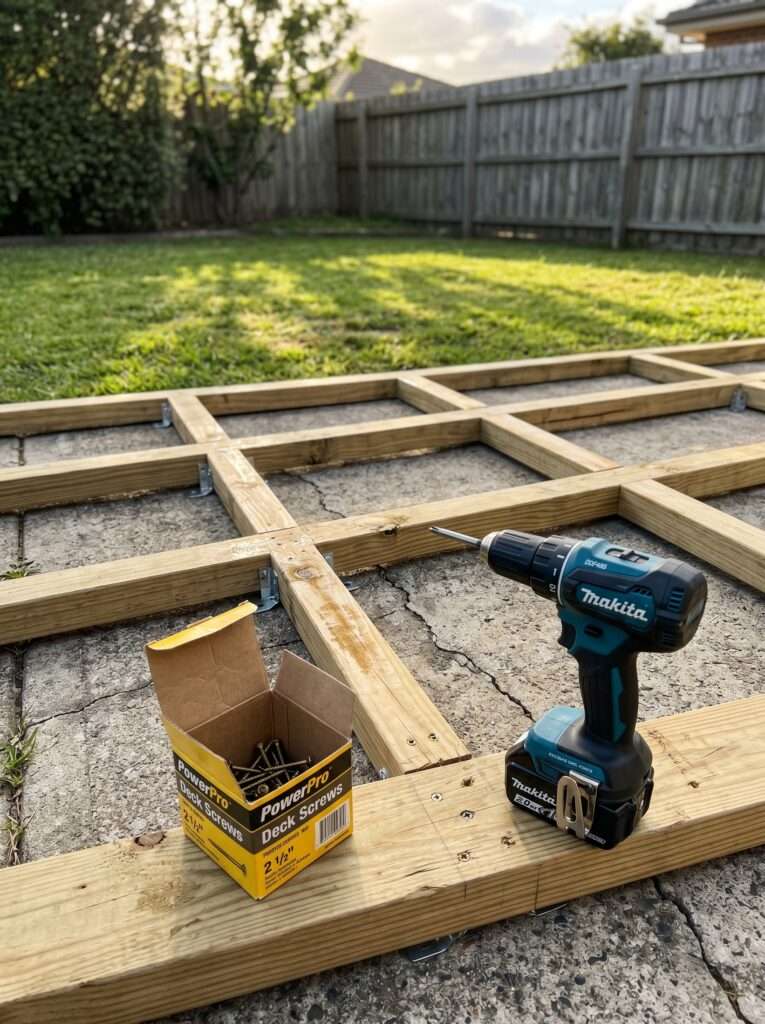
1. The Floating Sleeper Grid System
When I first stared at my old, uneven concrete slab, the thought of drilling hundreds of holes into old, cured concrete made my wrists ache just thinking about it. That is why I went with a floating grid instead. Instead of fastening the framing into the concrete, you let the weight of the entire deck hold it down.
You layout pressure-treated 2x4s on their flat side across the concrete, spacing them 12 inches on center. By fastening perpendicular blocking between them, you create a rigid, heavy matrix that isn’t going anywhere. This keeps the profile incredibly low, giving you just an inch and a half of framework height before adding your deck boards.
The trick is ensuring your old slab has decent drainage so water doesn’t pool against the wood. If your concrete is relatively flat but just ugly, this approach saves you days of masonry drilling.
But here’s the kicker: because it’s floating, you need to leave a tiny gap around the perimeter if it meets your home’s foundation or brickwork. Wood expands when the humidity spikes in July.
I watched a buddy skip the perimeter gap on his build, and by mid-summer, his center deck boards were bowing upwards like a small wooden pup tent. A simple quarter-inch gap around the edges solves this completely.
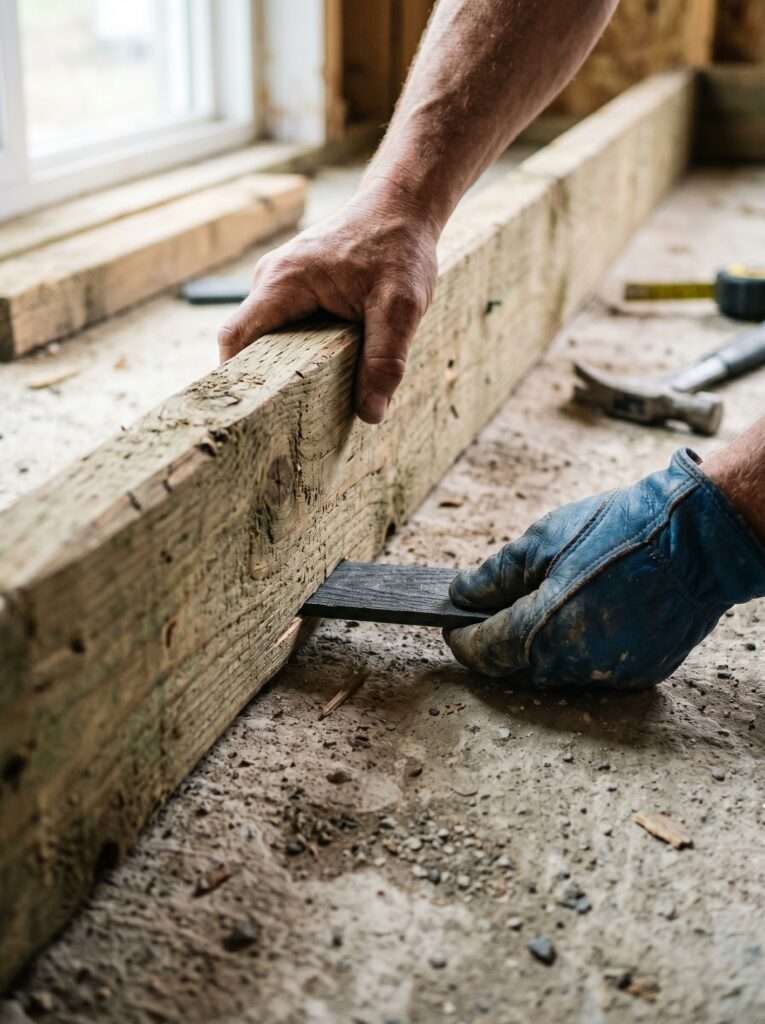
2. Using Heavy-Duty Shingle Shims for Leveling
Rarely is an old concrete patio perfectly level, and frankly, you don’t want it to be because it needs to shed water away from your house. But when you are laying down rigid wooden sleepers, those dips and slopes will make your new deck feel like a funhouse walk if you don’t fix them.
Instead of buying expensive custom plastic leveling systems, I used strips of heavy-duty asphalt shingles and composite shims. They don’t rot, they compress beautifully under heavy weight, and they allow you to fine-tune the height of your sleepers every few feet.
You simply slide them under the low spots of your 2×4 framework until a long spirit level reads perfectly true across the top. It is a slow, meticulous process that requires sitting on your knees for a few hours, but your feet will thank you every time you walk across the finished product without tripping.
One thing most people ignore is that wood shims will rot out within two seasons if they touch damp concrete constantly. Always stick to composite or asphalt pieces for the actual touchpoints.
Once your framework is perfectly flat, you can think about how the rest of the space will look. If you want to add vertical elements later on, like our popular Modern Boho Slatted Privacy Screen for Patios, having a perfectly level base deck makes anchoring those tall screens ten times easier.
Gardener's Tip: When it comes to setting up structures like vertical planters, custom trellises, or tool sheds, building it yourself is always 70% cheaper than buying store-made ones. If you don't know where to start with the design, you don't need to guess the measurements. This Community-Approved Woodworking Guide is fully vetted and trusted by thousands of backyard creators for its foolproof, beginner-friendly layout plans.
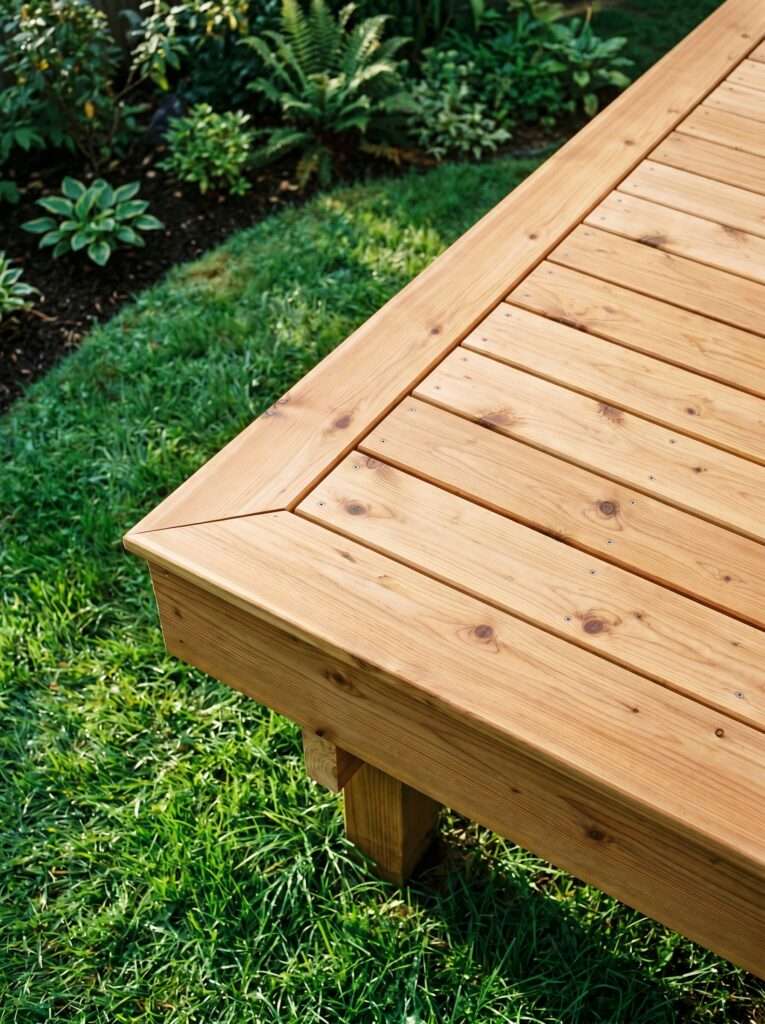
3. The Picture-Frame Border Technique
If you just lay down deck boards from one side of your old patio to the other, you are going to see the raw, ugly end-grains of the wood along the edges. It looks unfinished and screams “amateur DIY job.”
To fix this, I always use a picture-frame border design. This means running a single row of deck boards around the entire outer perimeter at a 45-degree miter at the corners, and then running your main field boards inside that frame.
It creates a clean, intentional border that hides the subframe underneath and gives the entire project a high-end, custom architectural look. It does require adding some extra interior blocking to your sleeper grid to support the ends of those perimeter boards, but the visual payoff is massive.
I learned this the hard way on my first attempt: if you don’t double up the sleepers right where the border meets the inside boards, you won’t have enough surface area to screw down both ends properly.
Take the extra twenty minutes to screw in some scrap pieces of treated wood to create a wide landing zone for your fasteners. It prevents the wood from splitting near the edges later on.
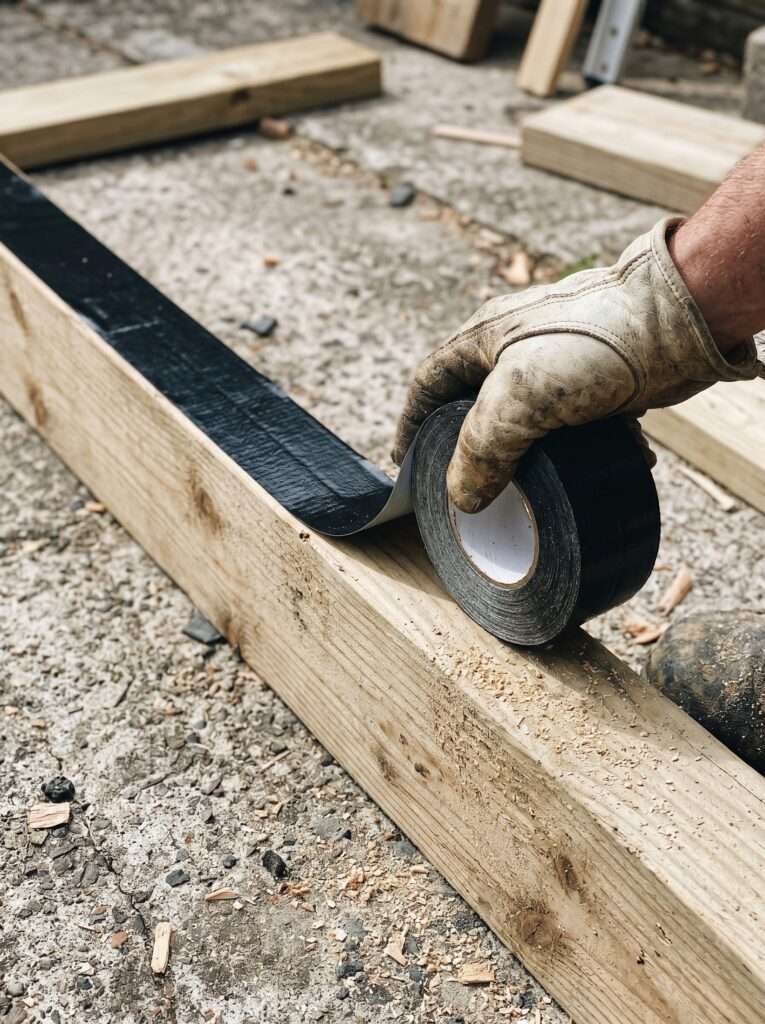
4. Applying Joist Flashing Tape for Longevity
Because a low-profile deck sits so close to the original concrete, air circulation underneath is going to be severely limited. When rain falls through the cracks of your deck boards, it sits on top of your flat sleeper joists, creating a perfect breeding ground for wood rot.
To combat this, I treat the tops of all my sleepers with a heavy layer of black butyl joist-flashing tape. You simply roll it out directly onto the top face of the wood and press it down firmly before laying your deck boards.
The tape seals around every single deck screw you drive through it, preventing water from seeping into the screw holes and rotting out your frame from the inside out.
It adds maybe fifty bucks to the total cost of the project, but it can easily double the lifespan of your subframe.
When you spend your hard-earned weekends building something with your own hands, the last thing you want to do is tear it apart in five years because the foundation turned to mush.
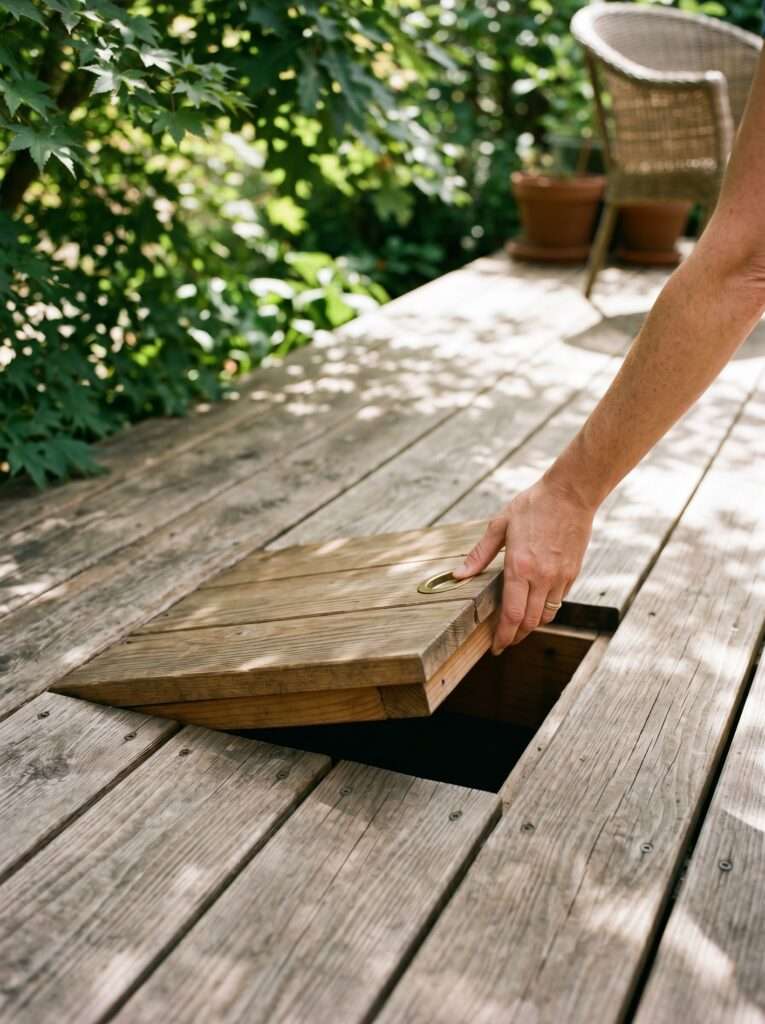
5. Incorporating Flushed Removable Hatch Panels
Here is something almost no one tells you about putting wood over concrete: eventually, something small and valuable is going to fall through the cracks. Whether it’s a wedding ring, a car key, or an expensive earring, if you don’t plan for it, that item is gone forever unless you pry up a board.
On my latest build, I built two small, hidden hatch panels directly over the areas where our seating area sits. These are simply three-board sections fastened together from underneath with cleats, resting on the subframe without being permanently screwed down.
They blend in completely with the rest of the floor, but they can be lifted out in ten seconds if needed.
The best part? These hatches also give you a quick way to inspect the concrete underneath for dirt accumulation or pest activity over the seasons.
Ready to upgrade your garden landscape? Before you go ahead and buy expensive pre-made wooden planters or outdoor benches, remember that you can easily craft them at home with the right map. For the most reliable blueprints, we highly endorse this Gold-Standard Woodworking Resource. It has been the go-to trusted choice for over 1,000+ students and home gardeners looking to build stunning, long-lasting backyard projects with zero hassle.
It gives you massive peace of mind, especially if you have kids who love playing with small toys on the deck surface.
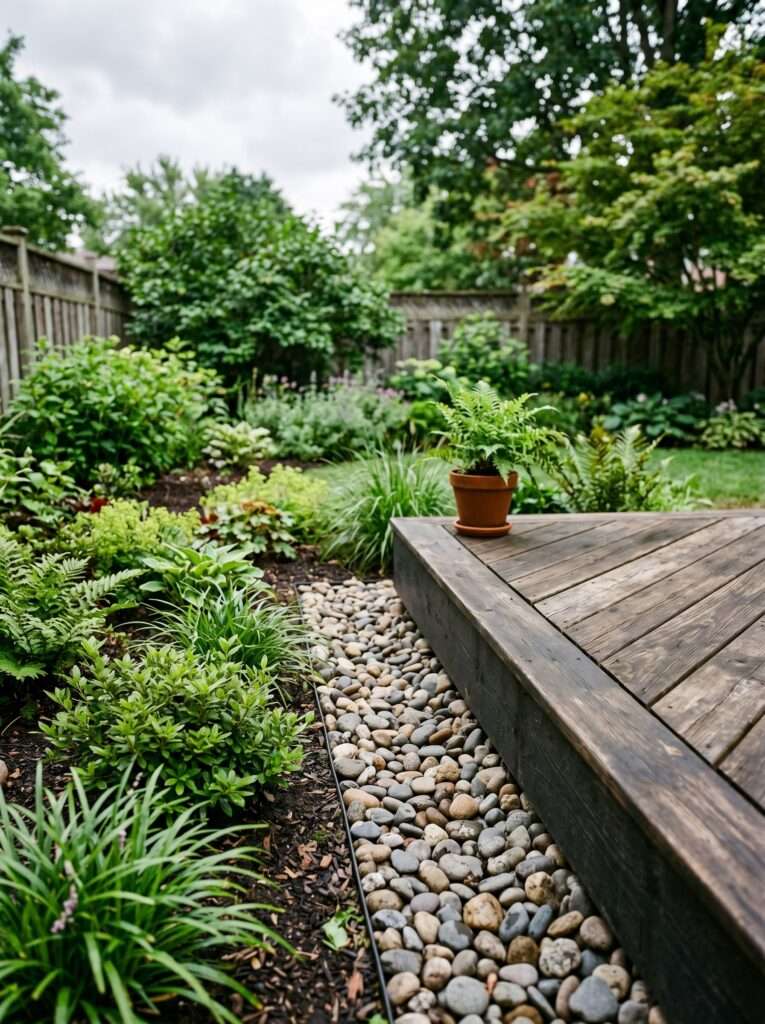
6. The Step-Down Border Transitions
If your old concrete patio sits slightly higher than the surrounding grass, adding a sleeper frame and deck boards will create an even higher edge. This can become a major tripping hazard for guests stepping off into the yard.
Instead of leaving a raw, high drop-off, I like to create a subtle step-down transition using wider fascia boards or a slightly sloped gravel border. By cutting the outer perimeter sleeper a little lower or tapering the edge, you can create a gentle transition that flows smoothly into your landscaping.
This works beautifully if you pair the edge of your new deck with some low-maintenance plantings.
You can read about how to frame your yard edges perfectly in our guide on how to Landscape a Dry Yard Using Tough, Beautiful Shrubs.
Integrating the deck edge directly with hardy plantings softens the hard wooden lines and makes the entire deck look like it was designed by a professional landscape architect rather than thrown together over a single weekend.
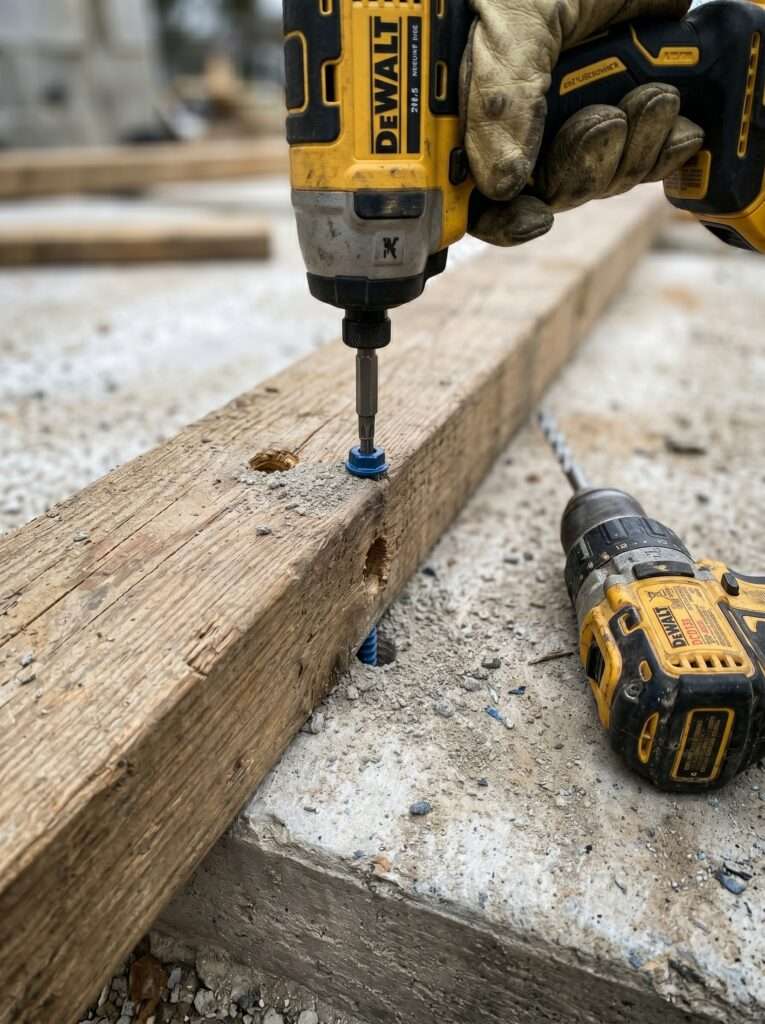
7. Using Concrete Anchors Sparingly at Strategic Corners
While a fully floating deck works wonders for most standard rectangular patios, if your yard experiences high winds or has a significant slope, you might want just a little bit of mechanical security. You don’t need to anchor every single joist.
Instead, I use a heavy-duty hammer drill to place just four masonry anchors—one at each corner of the entire structure. By securing just the perimeter corners with heavy-duty hex screws into the concrete, you pin the entire heavy platform in place.
This prevents any micro-shifting over time as people walk across it or kids run around.
But wait, there’s a catch: when you drill into old concrete, you must blow out the dust from the hole completely before driving your anchor screw in.
If you leave the masonry dust inside, the screw will jam halfway down, strip its head, and leave you with an ugly, half-finished steel bolt sticking up out of your floor. I keep an old bicycle pump in my garage specifically for blowing dust out of drilled holes.
8. Opting for Synthetic Composite Board Tops
If you want a truly zero-maintenance surface that won’t splinter under bare feet, modern composite decking boards are worth every extra penny. Because a low-profile deck sits right near the damp ground, traditional wood like pressure-treated pine can warp, twist, and crack over time if it isn’t sealed religiously every single year.
Composite boards are completely wrapped in a protective synthetic shell that resists moisture, fading, and scratching. They handle the low-clearance humidity much better than budget lumber.
However, you need to remember that composite boards require closer joist spacing than real wood because they are more flexible.
Most manufacturers recommend placing your sleepers 12 inches apart rather than the standard 16 inches to prevent the floor from feeling bouncy underfoot.
Investing in high-quality materials ensures your work lasts, just like buying proper tools. If you are planning out your budget for this build, check out our breakdown of the 5 Gardening Tools That Are Worth Every Penny to see where you should invest your money and where you can safely save a few bucks.

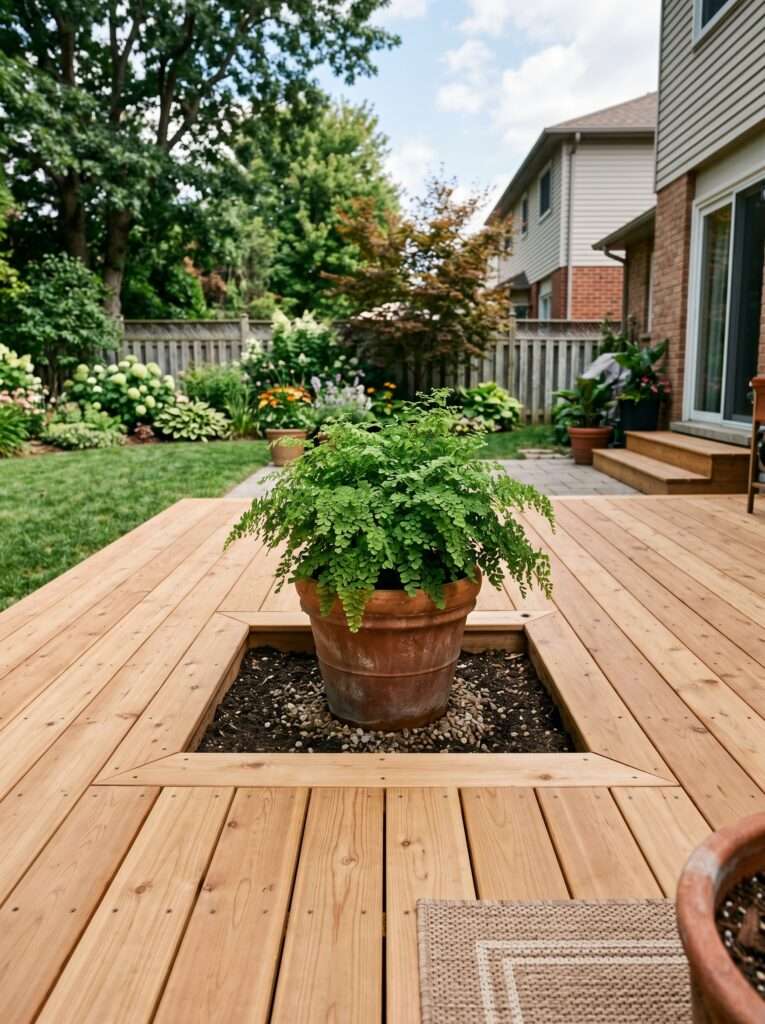
9. Creating a Built-in Planter Cutout
If your old concrete patio is exceptionally large and feels like a massive, boring gray sheet, you don’t have to cover the entire thing with solid wood boards. One of my favorite tricks is leaving a deliberate 3×3 foot square cutout right in the middle of the new deck frame to create a built-in planter.
You build your sleeper frame around this opening, flash it properly, and then place large potted plants or a custom wooden planter box right inside the cutout.
It breaks up the vast expanse of wood grain and brings instant life, color, and natural texture directly into the middle of your seating area.
This looked great online when I first saw it, but I quickly realized you need to ensure the planter area drains properly beneath the deck.
Never let soil sit directly against your frame; always use a heavy plastic liner or a self-contained pot inside the cutout to keep your structural wood dry and rot-free.
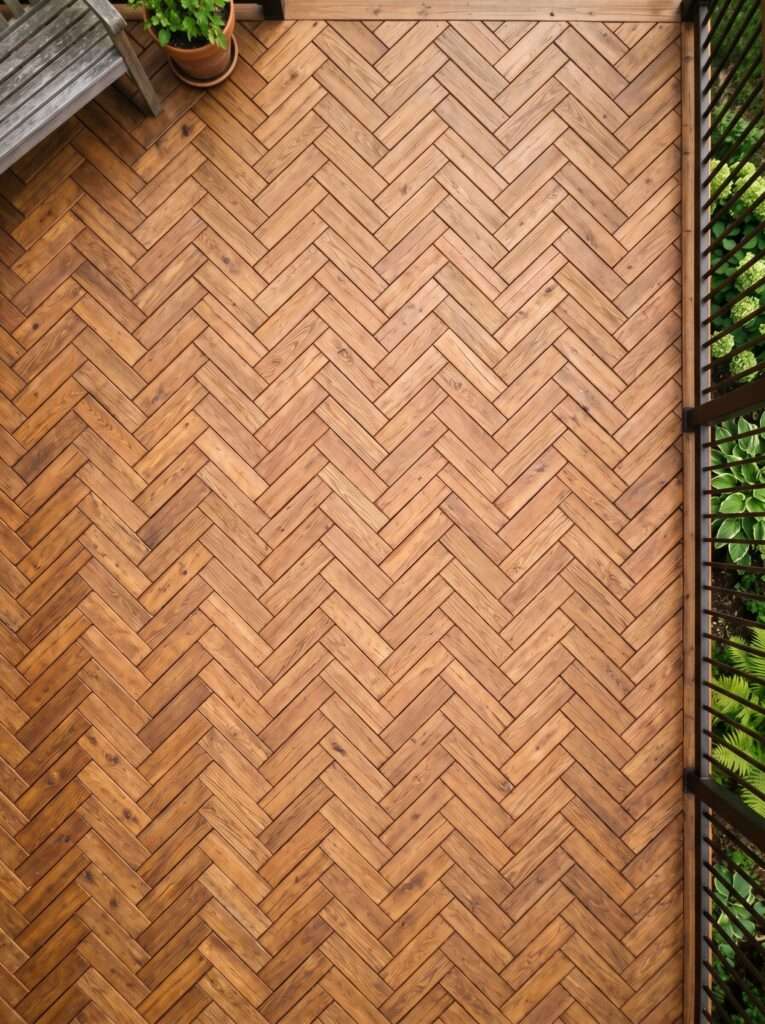
10. The Herringbone Pattern for Small Patios
If your old concrete patio is relatively small, running deck boards in a straight line can sometimes make the space feel narrow and cramped. To trick the eye into making the space feel larger, you can install your top boards in a classic herringbone or diagonal pattern.
The diagonal lines draw the eye outward toward the corners of the yard, creating a sense of expansiveness and high-end design.
It does require a bit more math and a few more cuts on your miter saw, but the aesthetic upgrade transforms a boring square platform into a true design feature.
To make this pattern work on a low-profile sleeper system, you will need to install your 2×4 framework in a tighter grid pattern.
Because the top boards are running at a 45-degree angle, the span between support beams changes, so having a solid, cross-blocked grid ensures every single board end lands firmly on a solid wooden joist.
How to Start (Simple Plan)
Building a low-profile deck doesn’t have to be overwhelming if you take it step-by-step. Here is a foolproof plan to get your framework down safely over a weekend:
- Step 1: Clean and Prep: Thoroughly pressure-wash your old concrete patio. Remove all moss, dirt, and loose debris. Let it dry completely for 24 hours.
- Step 2: Lay the Outer Sleeper Box: Lay pressure-treated 2x4s flat around the outer perimeter of your slab. Check for level and use your composite shims underneath to fix major dips.
- Step 3: Install Interior Sleepers: Place your interior flat 2×4 sleepers inside the box, spacing them exactly 12 inches apart from center to center. Secure them to the outer box using 3-inch outdoor deck screws.
- Step 4: Add Cross-Blocking: Cut short 10.5-inch pieces of 2×4 and screw them between the long sleepers every 3 feet. This locks the entire grid together into a rigid, non-shifting structure.
- Step 5: Apply Joist Tape: Roll out your butyl joist-flashing tape along the top of every single wooden sleeper, smoothing it down with your hands. Now you are ready to screw down your top deck boards!
Things That Didn’t Work for Me
- Using standard interior shims: On my first small project, I used cheap wooden shims from the hardware store clearance bin. Within two seasons, moisture trapped between the concrete and the sleeper completely rotted them into splinters, causing the corner of the deck to sag. Always use composite or heavy asphalt shingle pieces.
- Skipping the ventilation gaps: I once jammed the edge deck boards tight against a concrete retaining wall without leaving a gap. Mold began growing along the edge within months because air couldn’t circulate to dry out the rain runoff.
- Using cheap drywall screws for framing: When I was younger, I thought a screw was a screw. Cheap screws will rust out and snap within a single winter under the pressure of expanding wood. Invest in certified, ceramic-coated exterior deck screws.
FAQ
No, you don’t have to. A floating sleeper grid system uses the combined weight of the entire wooden structure and top-boards to stay firmly in place without breaking your back drilling into old concrete.
It will if you use standard lumber. However, by using ground-contact pressure-treated 2x4s, adding composite shims underneath to allow water flow, and applying joist-flashing tape, you protect the wood from moisture damage.
This is the most critical check. Measure the distance from your concrete slab to the bottom of your door swing. A flat 2×4 sleeper (1.5 inches) plus a standard deck board (1 inch) requires 2.5 inches of total clearance to work safely.
Absolutely. If your concrete is completely smooth and level, interlocking tiles are an excellent quick fix. But if your slab is cracked, uneven, or pitted, a sleeper frame is required to create a truly flat floor.
Keep your deck board gaps around 1/8 to 1/4 inch wide. This allows small debris to wash away with rain. Having a removable hatch panel also allows you to hose out the underside once a year if needed.
Don’t let an ugly concrete patio ruin your enjoyment of your backyard space. Take a weekend, check your door clearances, layout a simple sleeper grid, and tackle it section by section. Once you get that first row of deck boards screwed down, the momentum will carry you right through to the finish line.
Most ideas in this article come from years of real gardening and backyard DIY experience, alongside testing different wood layouts at home. Results may vary depending on your local climate, your concrete slab’s drainage condition, and regular home maintenance.
Aagam – Founder of SpruceTouch
Hi, I’m the creator behind SpruceTouch. i am a home and garden enthusiast who shares practical ideas for backyard design, garden projects, patio decor, and small outdoor spaces. Through SpruceTouch, he focuses on simple and budget-friendly ways to improve outdoor living spaces.