
Most beginners kill their plants because they treat watering like a chore they need to check off a list rather than a biological necessity they need to understand. You get a new plant, you’re excited, and you decide that “every Tuesday” is watering day. Or worse, you walk by, see a dry leaf, and splash a half-cup of water on top of the soil just to feel like you’re doing something.
This “sipping” habit is the number one plant killer I’ve seen in my 20 years of gardening. You think you’re being attentive, but you’re actually starving the roots of oxygen or dehydrating the bottom half of the pot.
The frustration is real. You buy a beautiful fiddle leaf fig or a tray of tomato starts, and within two weeks, they look like they’ve been through a war. You assume you don’t have a “green thumb,” but that’s nonsense. A green thumb is just a collection of good habits and an understanding of how water moves through soil. Most people are stuck in a cycle of overwatering (drowning the roots) or underwatering (never letting the water reach the roots).
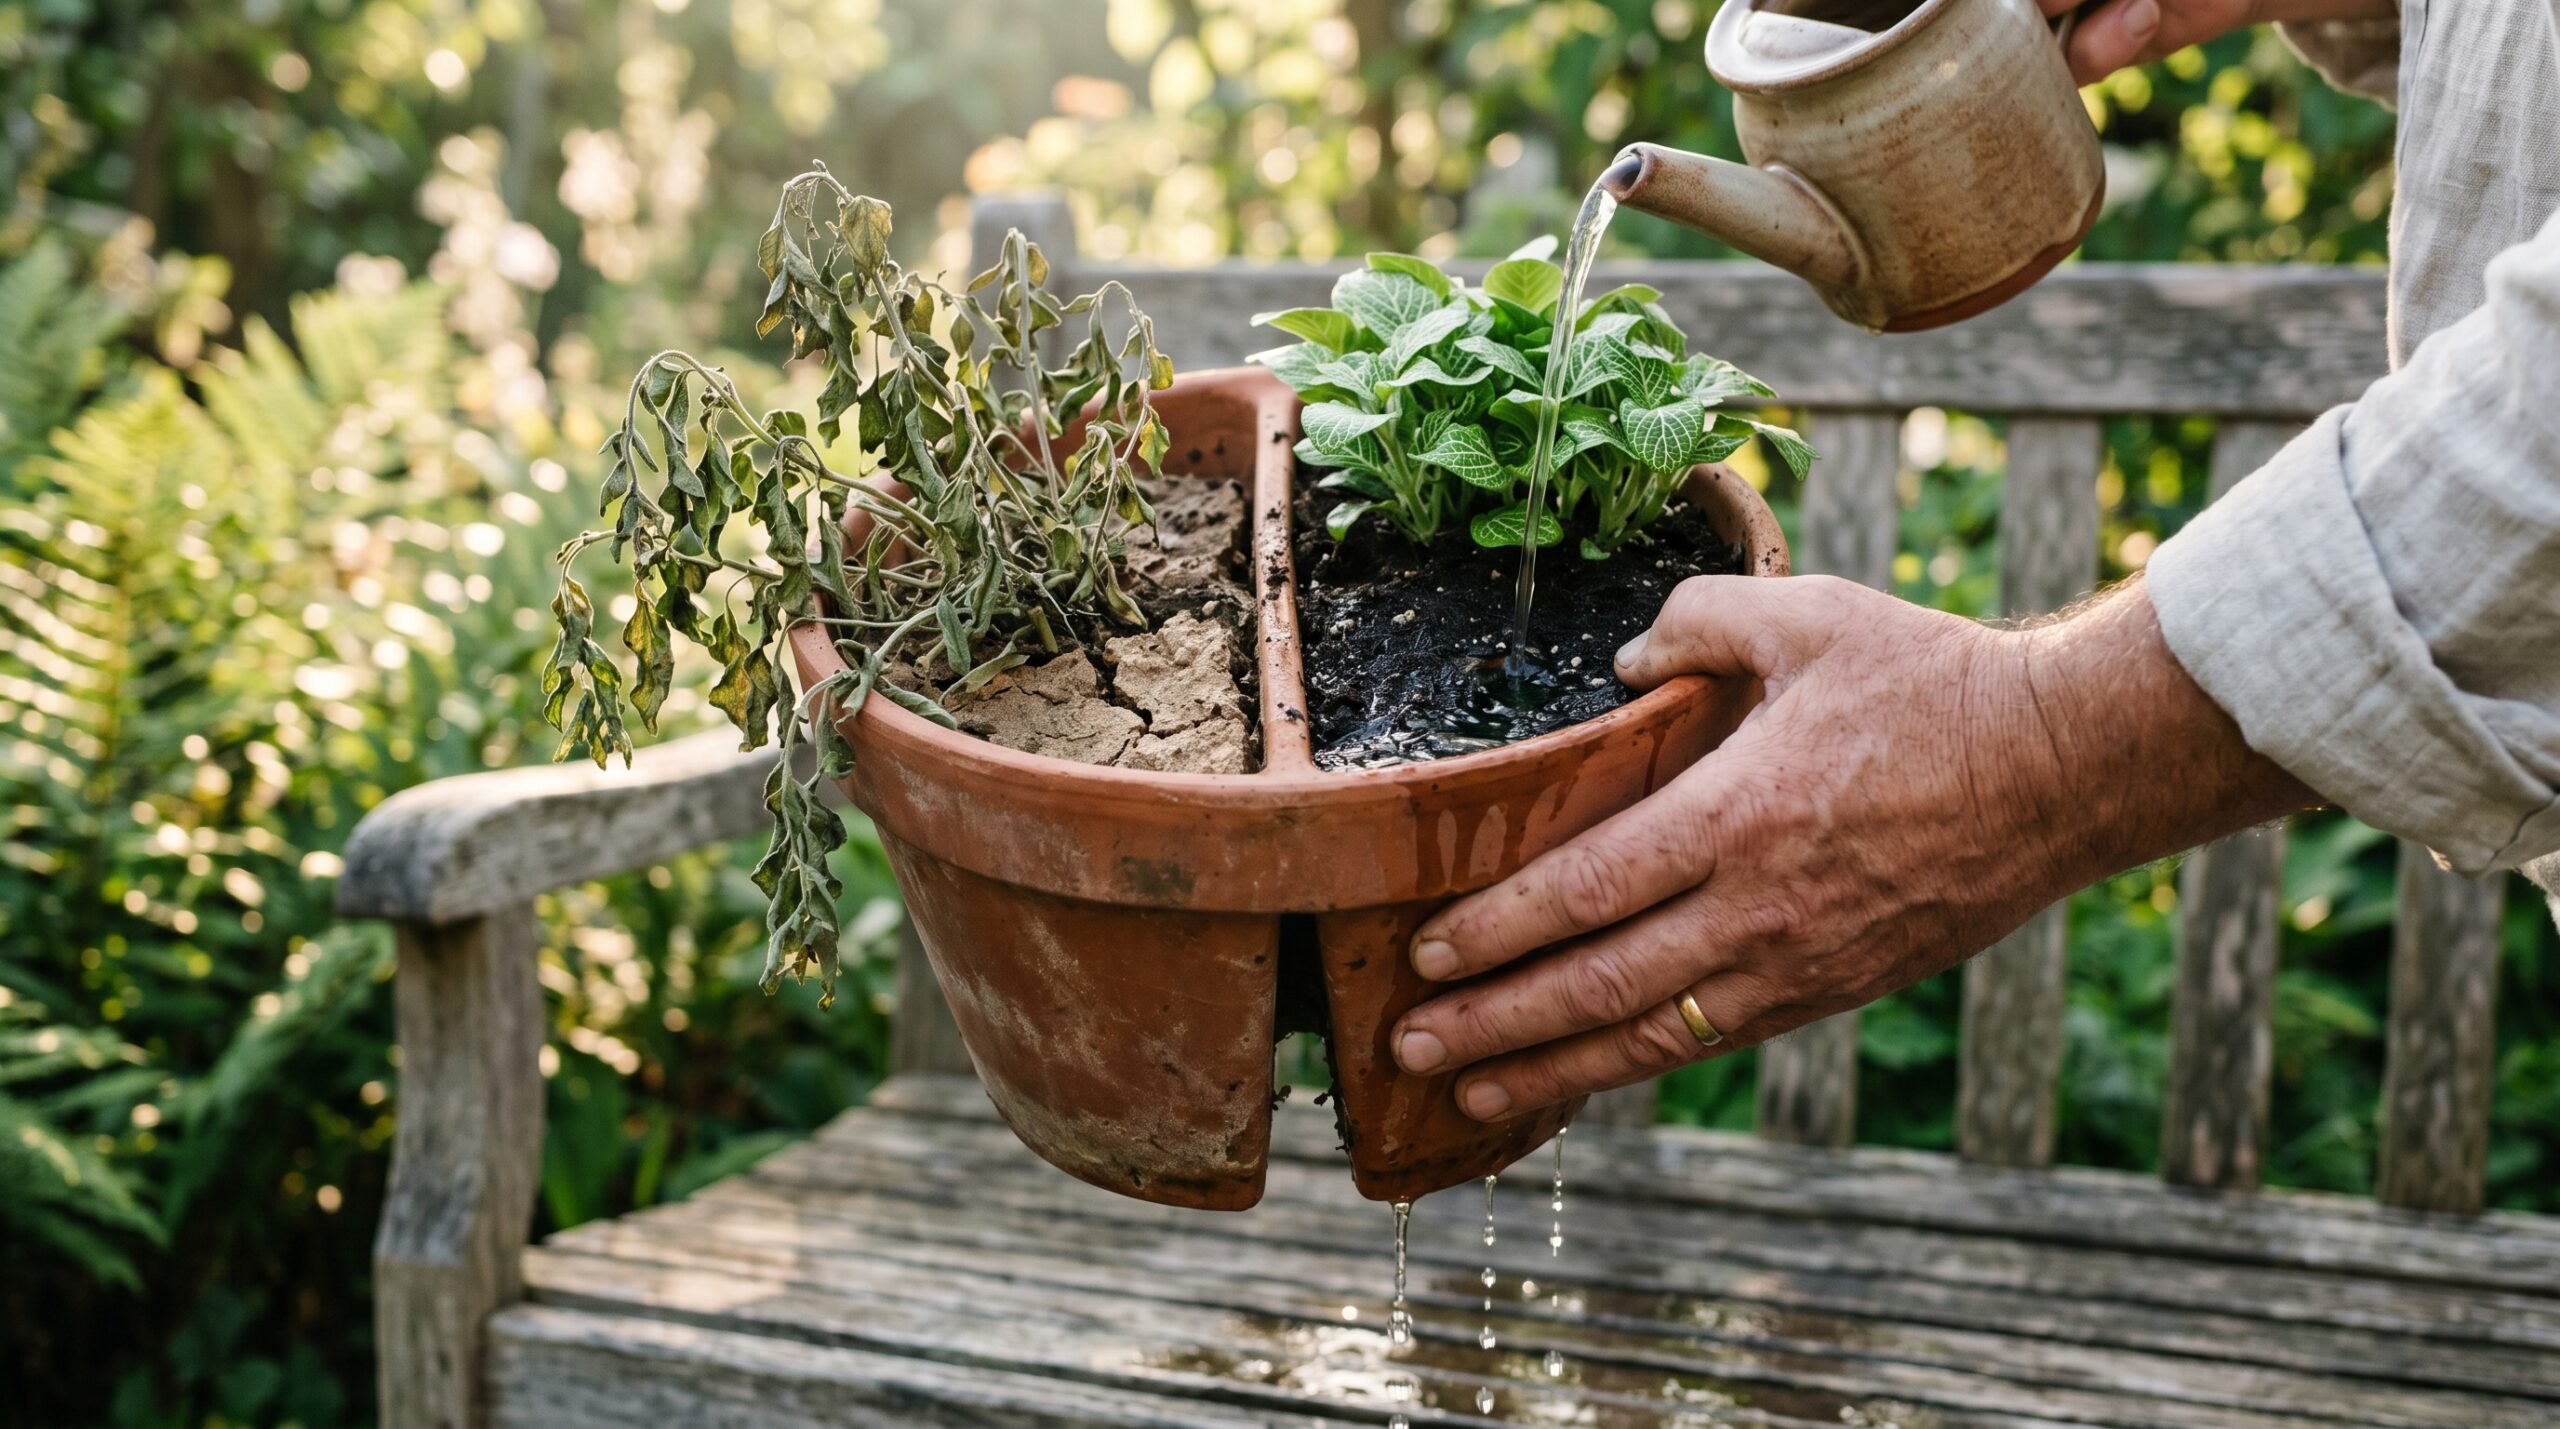
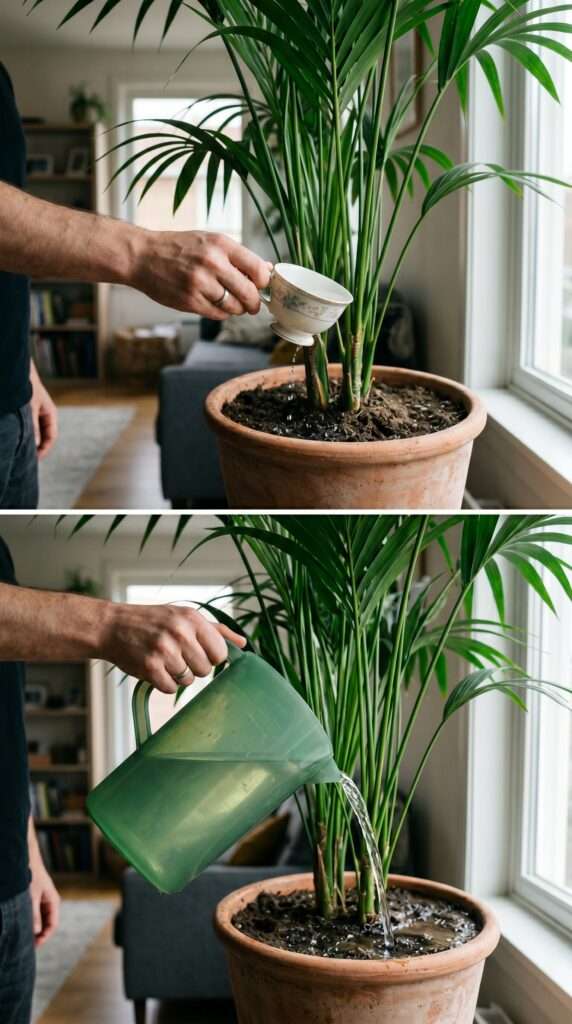
To fix this, you have to stop watering the plant and start watering the soil. Once you master the “Deep Soak” method, you’ll realize that most of the “difficult” plants you’ve struggled with are actually quite hardy—they just hated your watering schedule.
Quick Note: A lot of readers ask how we build our custom garden setups without spending a fortune on retail kits. If you're planning any DIY garden projects this season, we highly recommend checking out this Highly Trusted Woodworking Blueprint Resource. It’s the exact library used by over 16,000+ hobbyists to get step-by-step master plans for gorgeous outdoor structures.
Signs You’re Doing It Wrong
Before we fix the problem, we have to identify which “watering personality” you have. Most beginners fall into two camps: the “Smotherer” or the “Teaser.” Here are the clear signs your current method is failing:
- The “Yellow Mushing”: If your lower leaves are turning yellow and feel soft or limp (not crispy), you are overwatering. The soil is likely a swamp, and the roots are literally suffocating.
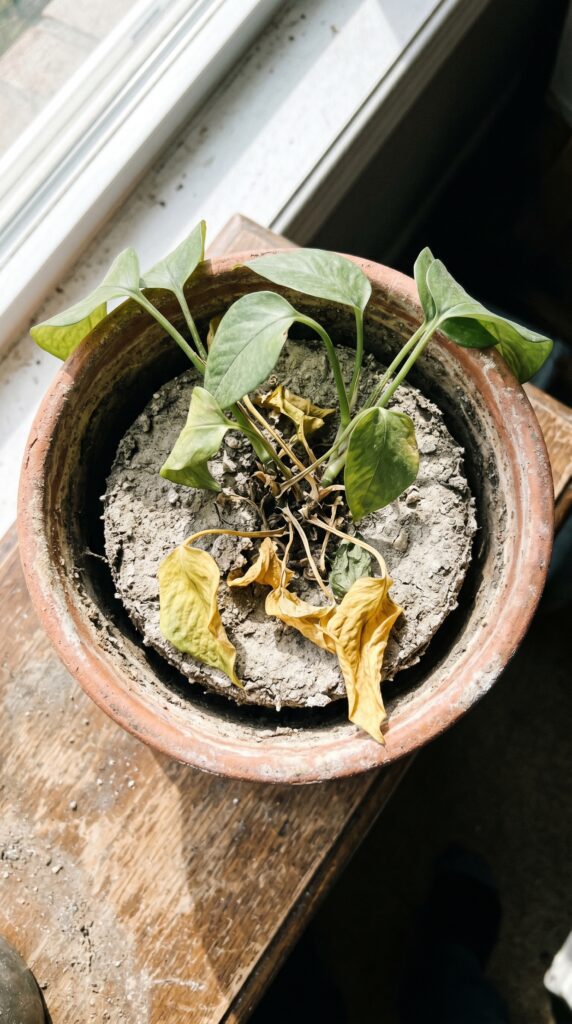
- The “Hard Crust” Gap: If your soil has pulled away from the edges of the pot, leaving a visible gap, you’ve let it get too dry. When you do water, it just runs down that gap and out the bottom without ever soaking the root ball.
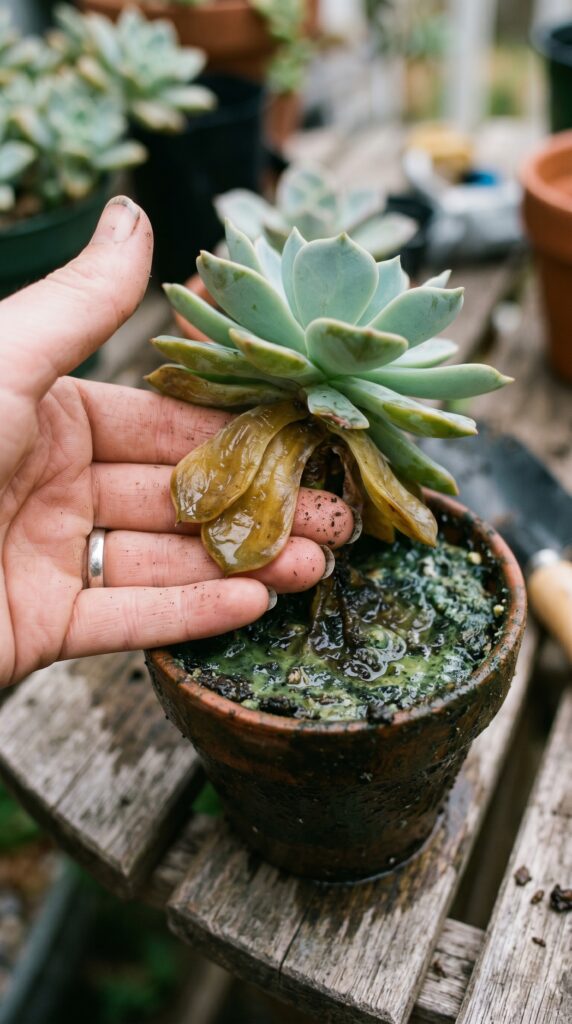
- Wilted but Wet: This is the most confusing one. The plant looks droopy, so you add water. But the soil is already wet. This means the roots have rotted off and can no longer “drink,” so the plant is wilting from thirst even though it’s sitting in a puddle.
- The “Tip Burn”: If the very tips of your leaves are brown and crunchy, but the rest of the leaf is green, you’re likely “sipping”—giving just enough water to keep the top alive, but not enough to flush out salts or reach the deep roots.
- Fungus Gnats: Those annoying tiny black flies buzzing around your pots? They love the top inch of damp soil. If you have them, it means your soil surface is staying wet for too long.
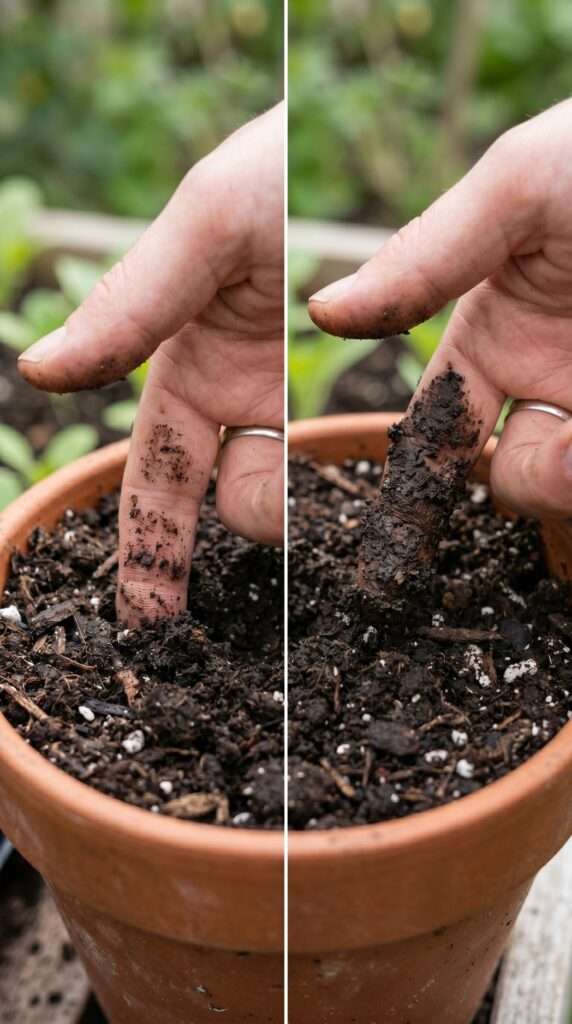
- The “Dust Bowl” Surface: If you poke your finger in and it comes out bone dry and dusty past the second knuckle, you’re waiting way too long between drinks.
- The “Weightless” Pot: If you lift your container and it feels like it’s filled with air rather than soil, you have reached a critical dehydration point.
Root Cause Breakdown: The Science of Soil Failure
When you give a plant a little splash of water every day, you aren’t helping it. You’re actually training it to be weak. Understanding the “why” behind the failure is the first step toward a thriving garden.
1. The Soil Issue: Hydrophobia and Tension
Soil isn’t just dirt; it’s a complex sponge made of organic matter, minerals, and air pockets. When peat-based potting soils (which most beginners use) get completely dry, they become hydrophobic. This means the organic matter literally repels water molecules.
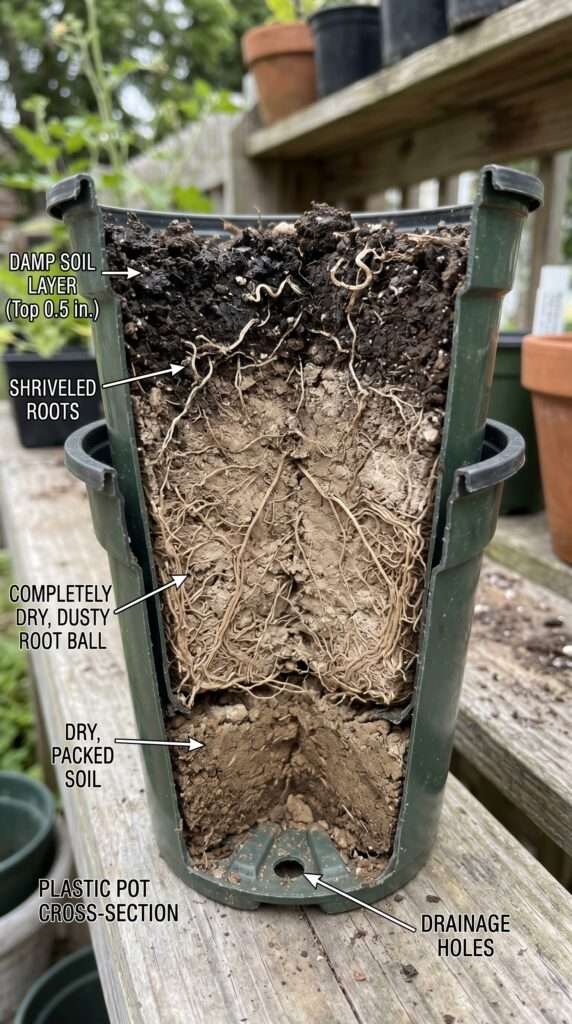
If you just pour a little water on top of bone-dry soil, the surface tension prevents it from soaking in. Instead, it beads up or runs down the sides of the pot. You see water coming out the bottom and think, “Great, it’s soaked!” In reality, the entire center of the root ball is as dry as a desert. This is a major hurdle in soil health guide management.
2. The Watering Issue: The “V” Shape Root System
Roots grow where the water is. If you only wet the top 2 inches of soil, the roots will stay in those top 2 inches because the bottom is a dead zone. This makes the plant incredibly fragile. In nature, roots grow deep to find moisture reserves. By not soaking the soil all the way through, you are creating a “shallow” plant that will wilt the second the sun hits it. You are essentially building a house with no foundation.
3. The Environment Issue: Microclimates
Heat, humidity, and airflow change how fast water evaporates. Beginners often follow a “once a week” rule regardless of whether it’s a humid 60-degree day or a blistering 95-degree afternoon. Your plant is a living thing, not an appliance. It doesn’t need water on a schedule; it needs water based on its environment. Indoor heating in the winter can be just as drying as a summer sun.
4. Capillary Action Breakdown
In a healthy pot, water moves through “capillary action”—small tubes and spaces between soil particles pull water upward and sideways. When soil is too packed or too loose, this action breaks. A deep soak restores these pathways, ensuring every root hair has access to the “pantry” of nutrients stored in the soil.
Common Confusion: Overwatering vs. Underwatering (The Myth Breakers)
This is where most people give up. “It’s wilting! Does it need water or did I give it too much?” Let’s clear up the myths that lead to plant death.
Myth 1: Overwatering is about volume.
Truth: Overwatering is not about the amount of water you give at once; it’s about the frequency. You cannot “overwater” a pot with drainage holes by giving it a gallon of water if you only do it once every two weeks. You overwater by giving it a cup of water every single day. The soil needs to breathe. When the gaps between soil particles are constantly filled with water, there is no room for oxygen. Roots need to “breathe” oxygen; without it, they drown and rot.
Myth 2: If a plant wilts, it needs water.
Truth: Wilting is a symptom of root stress. If the roots are dry, the plant wilts. If the roots have rotted from too much water, they can no longer transport moisture to the leaves, so the plant… wilts. This is why you must check the soil, not just look at the leaves. This is a foundational part of plant care basics.
Myth 3: Nutrient deficiencies are always a food problem.
Truth: Often, when a plant looks pale or “hungry,” it’s actually a watering issue. Nutrients are dissolved in water. If you are “sipping,” the plant can’t drink enough “nutrient soup” to stay green. Conversely, if you are overwatering, you are flushing the nutrients right out of the pot before the plant can grab them.
THE REAL SOLUTION: The “Deep Soak” Method
The secret to a “green thumb” is the Deep Soak and Dry Out cycle. This mimics how nature works—a heavy rain followed by a period of drying. This is the core of beginner gardening tips that most books glaze over.
What actually works:
Instead of frequent small drinks, you want to saturate the entire soil mass until water pours freely out of the drainage holes. You want to ensure that every single cubic inch of soil is wet. This does two things:
- It flushes out built-up mineral salts from tap water and fertilizer.
- It pushes “old” air out of the soil and pulls “new” oxygen in as the water drains.
Why most advice fails:
Most “care tags” on plants say things like “Keep moist.” To a beginner, that sounds like “keep it wet all the time.” That is a lie. “Keep moist” usually means “don’t let it turn into a brick of dust,” but it still needs air. Most plants need a wet-dry cycle to prevent root rot. Advice like “give 1 cup of water” is useless because it doesn’t account for pot size, soil type, or temperature.
The Drying Phase (The “Secret Sauce”)
Once you have soaked the plant, you must leave it alone. The “Dry Out” phase is just as important as the “Soak” phase. As the soil dries, roots are forced to grow and “stretch” to find the remaining moisture. This creates a massive, resilient root system. If you keep it wet all the time, the roots stay lazy and small.
Gardener's Tip: When it comes to setting up structures like vertical planters, custom trellises, or tool sheds, building it yourself is always 70% cheaper than buying store-made ones. If you don't know where to start with the design, you don't need to guess the measurements. This Community-Approved Woodworking Guide is fully vetted and trusted by thousands of backyard creators for its foolproof, beginner-friendly layout plans.
Step-By-Step Fix: How to Deep Soak Like a Pro
If your plants are currently struggling, don’t just pour more water on them. Follow these steps to reset their system and bring them back from the brink.
Step 1: The Weight Test
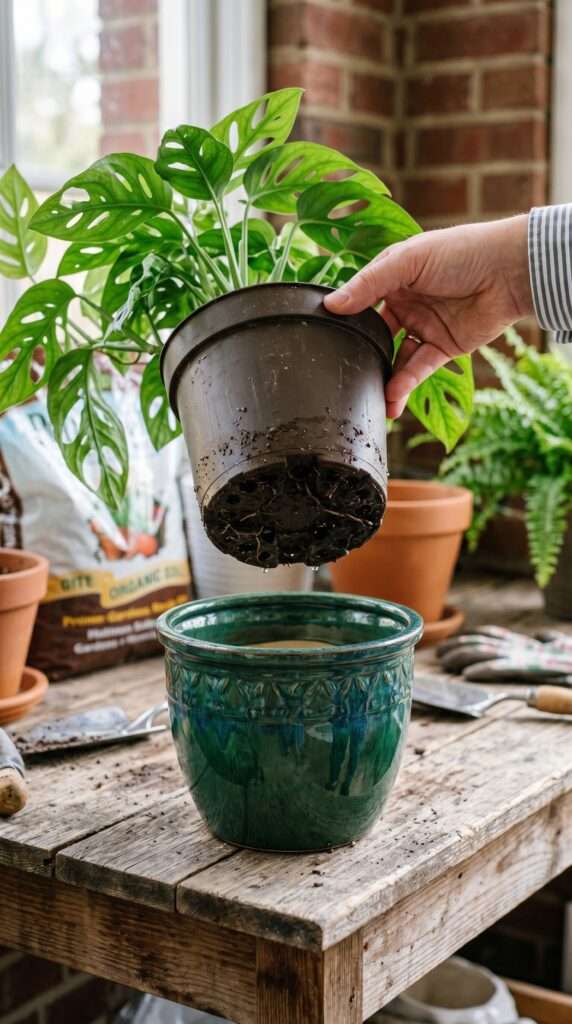
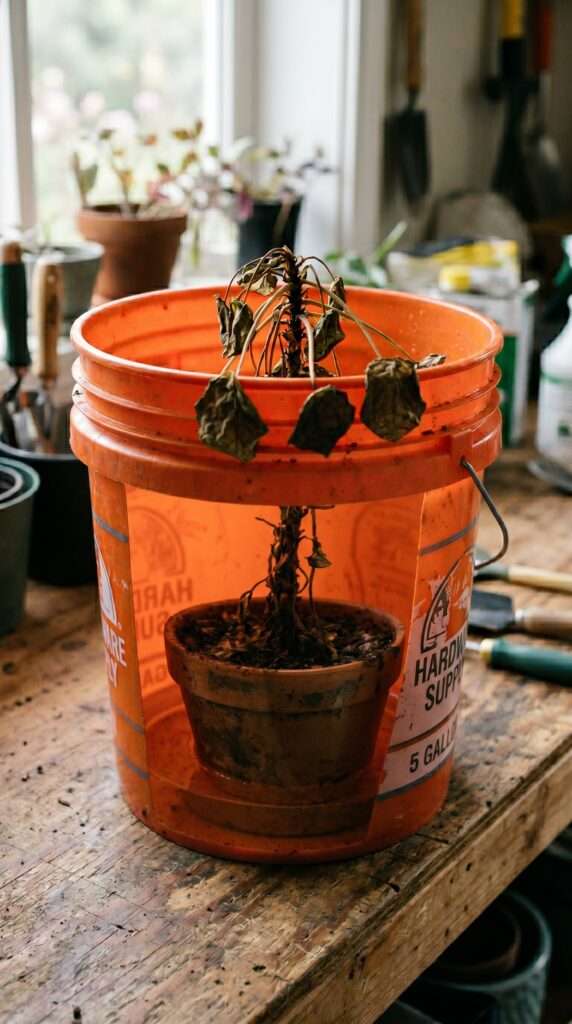
Pick up your pot. Is it heavy? If it’s heavy and the plant is wilting, stop. You have overwatered and the roots are likely rotting. You need to let it dry out completely or even repot it in fresh, dry soil. If it’s light as air and the plant is wilting, you’re in the right place for a deep soak.
Step 2: Aerate the Soil
Over time, potting soil can become compacted like concrete. Take a chopstick, a pencil, or a knitting needle and gently poke a few dozen holes deep into the dirt. Be careful not to snap main roots, but don’t be afraid to break some small ones. This creates “veins” so the water can actually travel into the center of the root ball.
Step 3: The First Pass (The Primer)
Slowly pour water over the entire surface of the soil. Start at the center and move outward. Stop when you see the first few drops come out of the bottom. Wait 5 to 10 minutes. This allows the dry “sponge” of the soil to begin expanding and breaking its hydrophobia.
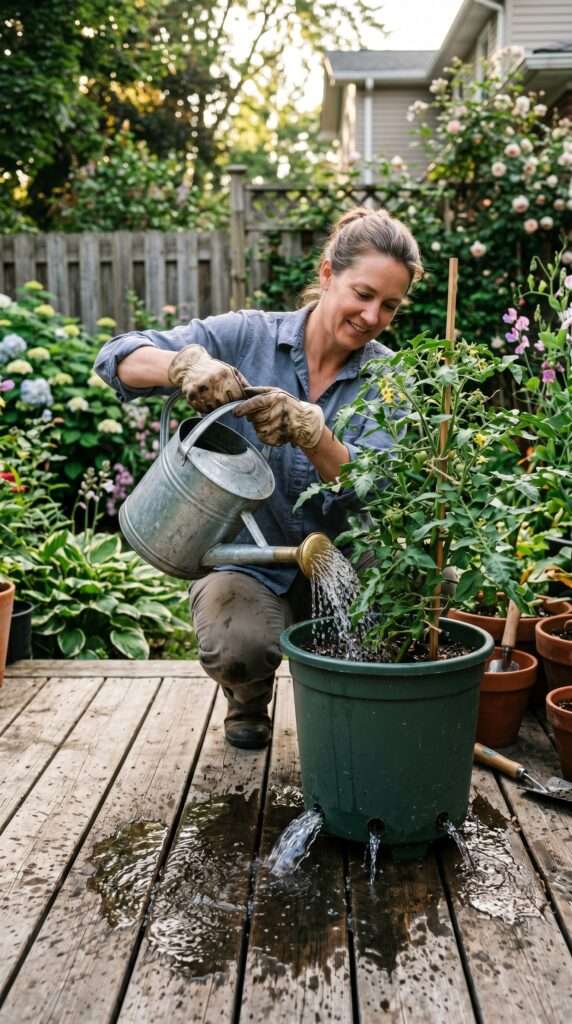
Step 4: The Deep Soak (The Main Event)
Go back and water again, more heavily this time. You want to see a steady stream coming out of the drainage holes. You aren’t done until that water is running clear and steady. If the plant is in a saucer, let it sit in that extra water for about 20–30 minutes to “bottom-chug.” After that, you must dump the excess.
Step 5: The Finger Test (Post-Soak)
Stick your finger into the soil. It should feel cool and damp all the way down to the second knuckle. If you feel a dry patch, water that specific spot again.
Step 6: Monitor and Wait
Now, the hardest part: walk away. Check the plant daily by lifting it or using the finger test, but do not water again until the top 1-2 inches feel dry. For some plants in a cool room, this might take 14 days. For a tomato in July, it might take 14 hours.
Different Cases: Indoor vs. Outdoor vs. Containers
The “Deep Soak” method is universal, but the frequency changes based on where the plant lives.
Indoor Plants (The Low-Light Challenge)
Indoors, there is very little airflow. The sun isn’t hitting the pots directly, so evaporation is slow. Most indoor plants (like Pothos, Snake Plants, or Monstera) only need a deep soak every 7 to 21 days. The biggest mistake here is watering because you are bored. If you want to learn more about the indoor environment, read about why your balcony plants keep dying.
Outdoor Garden Beds (The Ground Factor)
When plants are in the ground, they have much more “insulation.” However, they also have more competition. If you have a garden bed, you need to water long enough that the moisture gets 6 to 8 inches deep. A quick 5-minute spray with the hose is a “tease” that leads to shallow roots and dead plants. Use a soaker hose or a slow drip for at least 30 minutes.
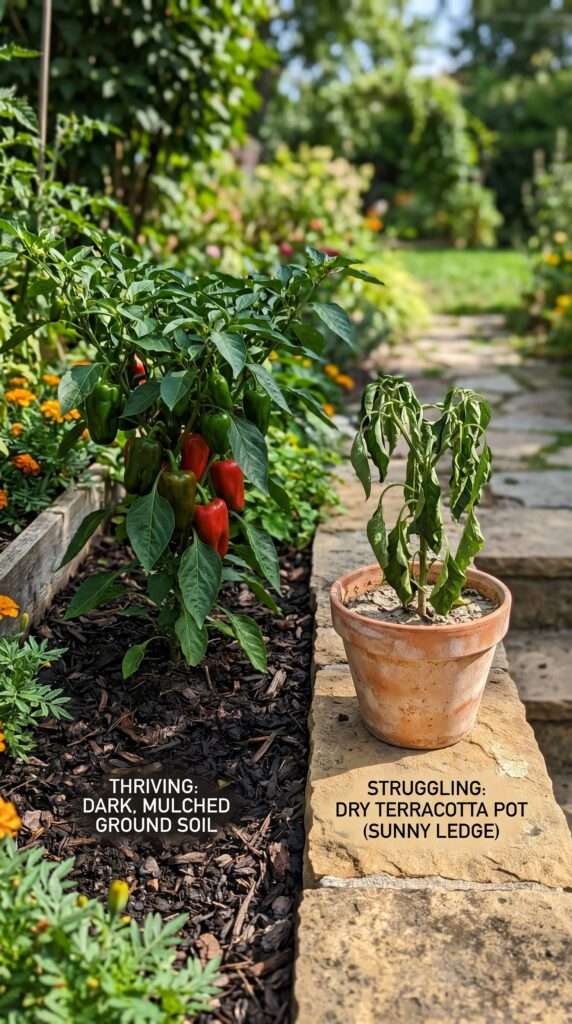
Container Gardening (The High-Maintenance Child)
Pots dry out from the sides and the top. Terracotta pots are porous and “breathe,” meaning they dry out very fast. Plastic pots hold moisture longer. In the heat of July, a container might need a deep soak every morning. If you’re struggling with veggies, check out our 8 simple steps to grow perfect carrots in 5-gallon buckets.
Hanging Baskets
These are the “divas” of the garden. They are surrounded by air on all sides. They often need a deep soak twice a day in extreme heat. The best way to water a hanging basket is to take it down and dunk the whole bottom in a bucket of water until the bubbles stop rising.
Seasonal and Environmental Factors
Your watering needs will shift 180 degrees depending on the month. This is where “calendar watering” fails the most.
- Summer Heatwaves: When temps hit 90°F+, plants go into survival mode. They “transpire” (sweat) water to stay cool. You might soak them in the morning, and they look flat by evening. This is the only time “twice-a-day” watering is acceptable for containers.
- Winter Dormancy: Most plants stop growing in winter. Their “metabolism” slows down. If you keep up your summer watering schedule, you will trigger root rot within a month. Cut your frequency in half during the winter.
- Rain and Humidity: If it rains, don’t assume the plant is watered. Thick leaf canopies often act like umbrellas, keeping the soil underneath bone dry. Always check the soil after a rain.
- Windy Days: Wind is a silent dehydrator. It sucks moisture right out of the leaves. If it’s been a windy day, your plants will likely need an extra deep soak.
Real Mistakes I Made (So You Don’t Have To)
I didn’t learn this from a book; I learned it by killing hundreds of dollars worth of plants in my early 20s. Being honest about these mistakes is the best way to help you avoid them.
Ready to upgrade your garden landscape? Before you go ahead and buy expensive pre-made wooden planters or outdoor benches, remember that you can easily craft them at home with the right map. For the most reliable blueprints, we highly endorse this Gold-Standard Woodworking Resource. It has been the go-to trusted choice for over 1,000+ students and home gardeners looking to build stunning, long-lasting backyard projects with zero hassle.
- Watering the Leaves, Not the Soil: I used to spray the whole plant with a hose. All I got was powdery mildew and fungal spots. Plants drink through their roots, not their leaves. In fact, many plants (like tomatoes and squash) hate having wet leaves. Keep the water at the base of the plant.
- The “Calendar” Trap: I had a literal alarm on my phone to water every Friday. I ignored the fact that it had been raining for three days straight. I drowned my herb garden because I trusted a clock more than the dirt. Now, I use my eyes and my hands, never a calendar.
- Using Pots Without Holes: I once bought a set of gorgeous ceramic pots that didn’t have drainage holes. I thought I could just “be careful” and not give too much water. Within two weeks, the soil smelled like sulfur and the plants were black. Never plant directly into a pot without a hole. Use it as a “cachepot” (a decorative outer shell).
- Cold Water Shock: I used to use ice-cold hose water in the middle of a 100-degree day. The extreme temp difference shocked the roots and caused the leaves to drop. If you can, let your watering can sit out for an hour to reach ambient temperature.
- Ignoring the “Mulch”: I didn’t realize how much water I was losing to evaporation until I started using mulch. A layer of straw or wood chips acts like a lid on the soil “pantry,” keeping the water in. This is a key part of composting at home and soil maintenance.
Simple Setup: The Beginner’s Tool Kit
You don’t need a $500 irrigation system. You need three things to master the Deep Soak.
1. A Quality Watering Can
Look for one with a “rose” (the shower head attachment). A solid stream of water can wash away soil and expose roots. A rose breaks the water into gentle droplets that soak in evenly. For indoor plants, a long-necked “swan” pitcher is better for getting under the leaves.
2. A Soil Moisture Probe
If you are someone who struggles to tell “damp” from “dry” with your finger, buy a $10 moisture meter. It has two metal probes you stick in the dirt, and a needle tells you if it’s “Dry,” “Moist,” or “Wet.” It’s a great training tool for the first year.
3. A Pressure Sprayer (For Large Collections)
If you have 50+ plants, your wrist will get tired. A 1-gallon pump-action pressure sprayer allows you to give a controlled, deep soak to many plants quickly without splashing dirt everywhere.
4. Mulch or Pebbles
A simple bag of cedar mulch or some river stones can save you 50% on your water bill. By covering the top of the soil, you prevent the sun from “stealing” the moisture you just put in.
Budget Section: Watering on a Dime
Gardening shouldn’t be an expensive hobby. You can be an expert “soaker” for less than $20.
| Item | Budget Option | Price Range |
| Watering Can | 1-Gallon Milk Jug (poke holes in cap with a needle) | $0 |
| Moisture Meter | A wooden dowel or chopstick (if it comes out dark/wet, don’t water) | $0 |
| Drainage Trays | Plastic take-out lids or old ceramic plates from Goodwill | $1 – $5 |
| Soil Aerator | An old screwdriver or a sharpened stick | $0 |
| Water Source | Rain barrel (even a trash can under a downspout) | $0 – $30 |
The best “tool” in your garden is your own observation. Spend 5 minutes a day just looking at your soil. That costs nothing and saves everything.
The Deep Dive: Soil Chemistry for the Curious
If you really want to understand why the Deep Soak works, we have to look at the chemistry of the soil.
The Pore Space
Soil is made of “macropores” and “micropores.”
- Macropores are the large gaps. After a Deep Soak, these should be filled with air.
- Micropores are tiny gaps that hold onto water against the force of gravity.
When you “sip” water, you only fill a few micropores at the top. The rest of the soil is effectively “empty.” When you Deep Soak, you saturate all the micropores. Then, as gravity pulls the excess water out of the drainage holes, it pulls fresh air into the macropores. This is called “Soil Respiration.” Without it, the soil becomes anaerobic (no oxygen), and that’s when the “bad” bacteria take over and kill your plant.
Salt Buildup (The Hidden Killer)
Most tap water has minerals like chlorine, fluoride, and calcium. If you only give a little water, these minerals stay in the soil. Over time, they build up until the soil becomes “salty.” This salts the roots, preventing them from drinking. You’ll see this as a white, crusty ring on your pots. The “Deep Soak” method flushes these salts out the bottom of the pot, keeping the soil “clean.”
Plant-Specific Watering Needs (The Quick Index)
Not all plants want the same soak. Use this as a guide for your Deep Soak frequency.
The “Drought Lovers” (Soak every 2–4 weeks)
- Succulents/Cacti: Let the soil turn into a “brick” before soaking.
- Snake Plants: These can go a month without water indoors.
- Zamioculcas (ZZ Plant): They have potato-like tubers that store water.
The “Middle Ground” (Soak every 7–10 days)
- Pothos/Philodendron: Wait for the top 2 inches to be dry.
- Most Fruit Trees: Deep soak once a week if there is no rain.
- Tomatoes (in the ground): They like a consistent deep soak twice a week.
The “Thirsty Divas” (Soak every 2–4 days)
- Ferns: They hate drying out. Keep the surface just barely damp.
- Hydrangeas: The name literally has “Hydra” in it. They need a lot of water.
- Peace Lilies: They will “faint” dramatically when they need a soak.
Fixing “Hydrophobic” Soil: The Bottom Soak Trick
If you’ve neglected a plant and the soil has become a hard, water-repellent rock, the “Deep Soak” from the top won’t work. The water will just run down the sides. Here is the pro fix:
- Find a Bucket: Larger than the plant pot.
- Fill with Lukewarm Water: About halfway.
- Submerge: Place the entire plant pot into the bucket.
- Wait for the Bubbles: You will see air bubbles rising from the soil. This is the water forcing its way into those dry pockets.
- Soak for 30 Minutes: Once the bubbles stop, the soil is fully saturated.
- Drain: Lift the pot out and let it drip for an hour. Your soil is now “reset” and ready for normal Top-Soaking in the future.
FAQ: Real Beginner Doubts
Generally, no. Water softeners use salt (sodium), and over time, that salt builds up in the soil and dehydrates the plant from the inside out. Use a rain barrel or an outdoor tap that bypasses the softener. If you must use softened water, you need to “Deep Soak” even more frequently to flush the salts.
Morning is 100% better. It allows the leaves to dry off and gives the plant a full “tank” before the sun gets hot. Night watering can lead to fungus and slugs because the water sits on the roots and leaves in the cool, stagnant air.
Use the “Bottom Soak” method described above or add a tiny drop of organic dish soap to your watering can. The soap acts as a “wetting agent” that breaks the surface tension and helps the water penetrate the dry soil.
Check the soil. If it’s dry 2 inches down, yes. If it’s still damp, leave it alone. Some plants, like peppers, actually like to struggle a little bit and produce better fruit when they aren’t pampered.
Get a masonry bit and a drill. If the pot is glass or precious, use the “cachepot” method: keep the plant in a cheap plastic nursery pot with holes, and set that inside your fancy hole-less pot. Take the plastic pot to the sink to water it, let it drain, then put it back.
Usually, no. A light rain often only wets the leaves (the “umbrella effect”). Unless it’s a heavy downpour that lasts at least an hour, you still need to check the soil depth. I’ve seen plants die of thirst during a week of “light showers.”
Greywater is leftover water from your shower or sink. It’s great for the garden as long as you aren’t using harsh chemicals or bleach. It’s a great way to practice zero-waste gardening.
Final Thoughts from the Garden
At the end of the day, plants want to live. They are incredibly resilient organisms that have survived for millions of years without us. We only run into trouble when we try to force them into our human schedules.
Stop treating your plants like furniture and start treating them like the living, breathing things they are. If you take five seconds to stick your finger in the dirt before you reach for the watering can, you’ve already won 90% of the battle. Deep soak, let it dry, and watch how fast your “black thumb” disappears. Gardening isn’t about perfection; it’s about paying attention.
Aagam – Founder of SpruceTouch
Hi, I’m the creator behind SpruceTouch. i am a home and garden enthusiast who shares practical ideas for backyard design, garden projects, patio decor, and small outdoor spaces. Through SpruceTouch, he focuses on simple and budget-friendly ways to improve outdoor living spaces.